Showing posts with label Fabric. Show all posts

Monday, July 30, 2012

Another eBosser Video!!!


Happy Monday Crafters!!  I am so excited for today’s post because I have an all-new eBosser video for you!


Before we get to the video, let me share with you first the card that I made using fabric cut with the eBosser which is what the video is all about.

20120726-DSC_0014-1

The flower in my card is cut using the AccuQuilt Go Die called Round Flower.  The first thing that I did was cut all my fabric pieces (up to 8 layers at a time) in one pass with the eBosser.  That’s right!  8 Layers!  How awesome is that?


Next, I used that same die to cut out some cereal weight chipboard from the same die and I used some liquid adhesive to adhere the fabric to the chipboard to create this layered, dimensional fabric flower.


I couldn’t stop there, after all the eBosser was all warmed up and ready to go for me, so I decided to have some fun with embossing!  Using the Craftwell Regency embossing folder, I brayered on some Papertrey Ink Hawaiian Shores ink onto one side of the embossing folder.  I then carefully inserted a piece of Hawaiian Shores cardstock into the folder and ran it through my eBosser.  This technique really adds something to embossing and I just love how it makes this folder look even more vintage.  All that was left to do was to round the corners, add it to a white cardbase and stamp my sentiment on the leaf of the flower.  The sentiment is from Papertrey Ink’s Signature Series: Butterfly stamp set.

20120726-DSC_0016-1

I just love how this card came together and it just goes to show you….the possibilities are endless with the eBosser.


So, now here is the video that I put together for you showing you how to cut 8 layers of fabric in a single pass.  I demonstrate this with two of the most common types of steel rule dies available…AccuQuilt Go dies and Sizzix Bigz dies.  Enjoy the show!


Monday, April 16, 2012

eCraft Challenge Week


Earth Day is upon us, so with that in mind Craftwell decided to challenge the Design Team to use some recycling in our projects this week!  I just love doing this and I really should do it more often!

20120409-DSC_0012-1

I decided to create a tag that would be appropriate for so many different occasions and one that is gender neutral too.  To start off with, I stamped a background from the Tim Holtz “Remnants” stamp set on a Kraft colored tag from Inkssentials with some Distress Embossing Ink and embossed it with some clear Embossing Powder.

20120409-DSC_0007-1

I then used a brown Faber-Castell Gelato to color in the non embossed area.  Gelatos come in a chapstick like container and they are a creamy pigment colorant.  I applied them directly onto the tag, rubbed them in a bit with my finger and applied a little water.  This gave the background the perfect aged look that I was going for. 

20120409-DSC_0009-1

I then took a piece of chipboard from a Lucky Charms cereal box and cut the star from the eCraft Fundamentals 1 SD card.  I stamped the same background stamp onto the star and embossed it with clear powder.  I did not apply any additional color on the star, so that you can see the contrast.  I glued the star in place on the tag so that the backgrounds line up.

20120409-DSC_0015-1

I then took an old pair of jeans (that never fit me right…ugh I hate that) and hand cut a strip of the denim.  I ran that strip through my Xyron 1 1/2” X sticker maker and adhered it onto the tag and trimmed off the ends.  I then used a Dymo label maker that embosses the greeting and created the “You are a” part of the sentiment and added that on top of the denim.  I then added the two brads on the ends and pounded on them with the Tim Holtz Texture Hammer.


Now, for the “STAR”, I pulled out something that I pilfered a long time ago.  These letters are from an old computer keyboard.  When we replaced the keyboard, I went through and popped off all the keys and saved them in a baggie that was stuffed in a drawer in my craft room.  As I was going through my supplies, I came across these and knew that they were just perfect for what I wanted on this tag.

20120409-DSC_0016-1

To add the final touch, I cut a few more strips of denim and added some homemade crinkle ribbon and inserted it in the hole.  I love how this all looks and how it came together!  Make sure you stop by the eCraft by Craftwell blog everyday this week to see some more recycling techniques from Kim, KimberlyRae, Debi, and Jennifer!  I know that I can’t wait to see what they come up with!

Monday, March 12, 2012

Baby Frame for the eCraft Design Team Challenge


Welcome to Challenge Week on the eCraft by Craftwell blog!  This week we have been challenged to use the products from PrintOnIt.com to create a baby gift.  Now, all sorts of ideas popped in my head for this including onesies, socks, blankets, ornaments, etc.  I decided to do something a little bit more personalized.  I made this to show how the Inkjet Opaque Transfer Sheets don’t have to go on clothes.

20120306-DSC_0017-1

I printed out some digital paper from my stash onto the Inkjet Opaque Transfer Sheets and then cut out the letters using my eCraft.  This paper is very slippery so to get some clean cuts on these letters, I had to pull out all the stops.  I used a little spray temporary adhesive and adhered that to my veggie mat from Dollar Tree.  I also decided to tape down the edges with some painters tape just to make sure that I didn’t waste any of this material…this may have been overkill, but it worked!


Next I used my heat press to adhere the letters onto a piece of solid colored fabric from Joann’s.  If I had to do this project again, I would have to come up with a better method to keep the letters straight.  I put a piece of cardstock there and lined up the letters to the edge of the cardstock, but they are so light that at some point a couple of them shifted.


After my letters were adhered to my fabric, I adhered the whole panel to a piece of chipboard that was cut to fit my frame.  Now, it was time to do something with my frame…


This frame was originally black and the mom that I made this for really likes the distressed look so I actually did two different distressing techniques on it.  First, I painted the frame in some pale blue paint from Martha Stewart (Blue Sky) and then I used a sanding block to sand off some of the paint in some places.  Then I applied a heavy coat of Weather Crackle Effect by Martha Stewart and let that dry.  Once that medium was dry I painted on top of it in another Martha Stewart paint (Greek Tile).  I have to tell you…this was really cool because the crackle starts to happen once your top coat of paint starts to dry and the Martha Stewart paints dry pretty quickly.  I got the frame, the paints, and the Crackle from Michaels. After my painting techniques were done, I sprayed the frame with a clear coat to preserve the look (and to prevent any paint from chipping off). I love how this blue compliments the yellow in this little boy’s room.


20120306-DSC_0017-1-2


Thanks for stopping by and make sure you visit the eCraft by Craftwell blog each day this week to see what the other girls have done with this challenge!

Monday, October 31, 2011

eCraft Monday Design Team Project


HAPPY HALLOWEEN!!!


Before we start with today’s project, I want to wish you all a happy and safe Halloween!  I hope that all the kids have a wonderful time today!


Now that Halloween is here, believe it or not, it is time to start thinking about another major crafting holiday that is coming!  It is less than 2 months away…that’s right I am talking about Christmas!  This month, the eCraft Design Team is focusing on Christmas.  We have another wonderful sponsor too!  Pink by Design Stamps!  This week all of us are going to be using Pink by Design Stamps to make a Christmas project using an image from eCraftCentral.com and fabric.  I have decided that for this month, I am going to focus my Design Team projects on one of my favorite parts of the Christmas season…gift giving!  Every year, I put together some food gifts to give to some of the people in my life to show how much I appreciate them.

DSC_0106_edited-1

I started this project with a recycled cookie tin.  I love the shape of this tin and the red color is just gorgeous.  There is however a scratch in the lid, so I knew that I wanted to cover that up.

DSC_0069-3_edited-1


A snowflake from eCraftCentral.com found HERE cut in silver vinyl is just what is needed to cover that scratch!  The snowflake went over the top edge of the tin a little, but that is not a problem, I just trimmed off the excess.


DSC_0071-3_edited-1

Now to add more on top of the snowflake!  I added a doily that is from Wilton and can be found in the cake decorating aisle of any major craft store.  I then added a strip of ribbon on top of that.  Then I cut another image from eCraftCentral.com


DSC_0073-2_edited-1

This shape is actually an outline of THIS flower.  I obviously did not draw any of the inset pieces.  This shape was cut out of an old t-shirt of my husband’s.  I love how even with the Heat n Bond on the back the edges still curl up a little to add a little more dimension.  I also spritzed this with some Perfect Pearls mist and since the fabric I used is a t-shirt, it really soaked up the mist well.


DSC_0104_edited-1

The zipper flower and the pearlized pins are the finishing touches.  Next step is the tag!  Every good gift needs a tag and this is where my Pink by Design Stamp Set came into play.  I love this little owl from the Beary Merry Christmas stamp set.


DSC_0105_edited-1

First off the tag is another cut from eCraftCentral.com found HERE and I cut the tag out twice.  Once in white cardstock and the next time in a red polka dot patterned paper.  I cut the patterned paper tag and adhered the bottom portion onto my tag and stamped the owl in the top half.  I just had to color in this cutie with some Copics!  To keep with my color theme, I made the owl a light gray, and colored in the red hat and some red accents on the wings and the belly.  The sentiment is also from the Pink by Design Beary Merry Christmas stamp set.  To attach the tag, I tied a bit of red baker’s twine to the zipper flower and added a white pearly button.

Now, what to put inside this box!  I chose to fill it up with some Sugar Cookies.  These are the easiest sugar cookies to make and a recipe that I grew up on.

DSC_0110_edited-1


Here is the recipe in case you would like to make them yourself!

AUNTIE BARB’S SUGAR COOKIES (No-Roll Sugar Cookies)

1 cup sugar

1 cup butter

1 egg

1 tsp. vanilla

2 cups flour

1 tsp. cream of tartar

1/4 tsp. salt

1/2 tsp. baking soda


Cream sugar and butter together.  Add egg and vanilla.  Blend in the remaining ingredients that have been sifted together. Roll dough into small balls and place on ungreased cookie sheet.  Flatten with the bottom of a glass that has been dipped in sugar (it helps if the glass is a little wet to pick up the sugar).  Bake in a preheated oven at 350 degrees for 10 minutes or until slightly browned around the edges.


Hope you enjoyed my project this week!  I will be back on Friday with a video tutorial for all of you!

Monday, October 24, 2011

eCraft Monday Design Team Project


It’s Monday again, and that means another eCraft Design Team Project! This week the Design Team was tasked with making some Halloween Home Décor using the wonderful Square 1! When I saw the Cut-Its Set from Lettering Delights called Monster Lights, I knew exactly what I wanted to do!

DSC_0070-2_edited-1

Spooky huh?  I used the Print & Cut Hinge Method to cut this entire design out of one piece of Square 1 by printing blocks of colors and textures with Make the Cut.

DSC_0067-1

I cut these out using a pressure of 2 1/2 to get a great kiss cut on the pieces.  I did not cut out the end pieces on the bolts because I wanted to experiment with using Perfect Pearls on Square 1.

DSC_0071-1_edited-1

To start with I mixed a little Pewter colored Perfect Pearls with some water on my non-stick craft mat.

DSC_0072-1_edited-1

I then masked off the end bolt with a post it note and painted my Perfect Pearls on.

DSC_0073-1

Here they are all painted on!  Love that shimmer!


DSC_0070-2_edited-1

I used my Copic Multiliner to color in the pupils and make him a little bit silly!  The Perfect Pearls worked well, but I think it would work better if the Square 1 was not printed already.  I did have a little flaking on this after my son was playing with it, so this may also not be great on something like this which will come in contact with little fingers.


One of the things that I just love about Square 1 is that it is removable, so that means when Halloween is over, I can peel this off the light fixture and place it back on the backing paper and save it for next year!


Since this is my last Design Team project using Square 1, I just have to say that I LOVE this stuff!  I will definitely be using it again in the future, and it is now a new staple in my craft room.  My oldest son is also enjoying that his mommy can make any kind of stickers that he wants.  I actually have to limit him on this, because the requests have just gone crazy!  If you have not ordered some Square 1, be sure to do it!


Debi, Lisa and Raven will be sharing some more Square 1 projects with you this week, so make sure that you are following us on the eCraft by Craftwell blog, and then next week we will have a new fabulous sponsor that you will not want to miss!  Have a great week everybody!

Monday, October 10, 2011

eCraft Monday Design Team Project

Happy Columbus Day!  It is time for another eCraft Design Team post.  If you are not following the eCraft by Craftwell blog, by all means start!  My fellow Design Team Members are amazing and I am sure that you will all be inspired by them.  Also, I will be back tomorrow with a new Make the Cut video!

This week, we are again using the awesome Square 1 printable, removable, fabric to create projects incorporating leaves and/or pine cones. When I think of leaves and pine cones, my mind tends to go to Thanksgiving when the beautiful fall colors are still out there and the Christmas season is right around the corner. I decided to do a super easy project for you with Thanksgiving in mind that packs a punch.

clip_image001

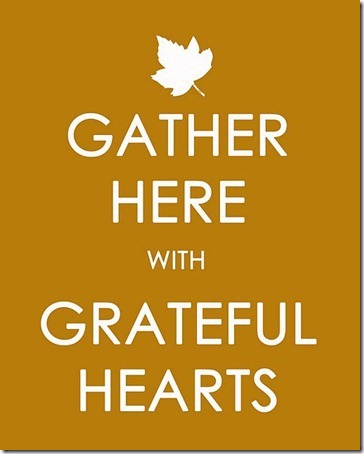
My inspiration for this project came from this picture on Pinterest
clip_image002

Source: myblessedlife.net via Denise on Pinterest

I love the saying and the fact that it is like the “Keep Calm and Carry On” style but with a Thanksgiving twist was just the ticket for my project. To start, I used a digital paper from Scrap Girls that is a text background, and I just knew I had to use it because the text on this paper is all about blessings. Perfect right? I then printed that out and then went back and added my saying on top of it using Century Gothic font. After I did this, I realized that I could have done this all in one step if I used my Photoshop Elements, but it certainly isn’t necessary.

I then turned to my trusty Square 1 and using the leaves found on the eCraft Fundamentals 1 SD card, I cut out a few of each. I did a “kiss cut” on the Square 1 like you would do for vinyl.

clip_image003

Since Square 1 is a printable material, I took a gamble here that I could color the leaves myself. I had GREAT success using alcohol inks. I added a bunch of autumn colors onto a felt pad using my ink blending tool and then dabbed them on the Square 1. I then went back and added some Gold Mixative and a little Alcohol Blending Solution to come up with the gorgeous colored leaves. The picture shows them when the inks were still wet. It only took a few minutes for them to dry.

clip_image004

I wanted to make sure that the leaf that was on my digital paper did not get lost on the page, so I took my leaf and placed it down on my non-stick craft mat and gently inked the edges with Vintage Photo Distress Ink.

clip_image005

One of the wonderful things about Square 1 is that the adhesive is removable so I was able to very easily remove it from my craft mat and place it on my digital paper.

clip_image006

Here is a close up for you!

clip_image007

I then grabbed a black picture frame that I had purchased last year during a crazy ridiculous sale and decided that a touch of embellishment on the frame would just add a little something special to this clean and simple project. I used some of the other leaves that I cut out of Square 1 and colored with alcohol inks and placed them right on the frame.

clip_image008

Again, since they are removable I was able to position them just right so that they peeked out from under the little pumpkin and pine cones that I added on top with some Glossy Accents.

clip_image009

Every week, I am loving Square 1 more and more. It is so versatile! Hope you enjoyed my project today! I promise next week, I will have another Halloween project for you!

clip_image001[1]

Supplies & Other Directions:

Black Picture Frame

Matte Photo Paper printed with Digital Paper and saying (Digital Paper from Scrap Girls and font used was Century Gothic)

Square 1

eCraft (used a pressure of 2 1/2, blade cap on, tabs off to get the kiss cut on the Square 1)

Alcohol Inks – I used Adirondack Alcohol Inks in colors Butterscotch, Sunset Orange, Latte, Cranberry and Caramel, Gold Mixative and Alcohol Blending Solution on a felt pad with the Ink Blending Tool.

Friday, October 7, 2011

eCraft Design Team Video

Today is my turn to do a eCraft tutorial video for all of you and since this is my first video on the eCraft by Craftwell blog, I had to do something extra special!  Does anyone here like BLING?….WOW!  That was a resounding Yes!  Did you all know that you can cut Rhinestone patterns with your eCraft?  AND that there are several Rhinestone patterns available for purchase on eCraftCentral.com?  If you are in Halloween mode like me, then make sure to check out the rhinestone patterns that I used in my videos. 
Ghost Rhinestones
The Ghost can be found HERE and the Spider can be found HERE.
Spider Rhinestone
Never done rhinestones before?  Don’t worry because I take you from beginning to end so you can follow along with me!


CIMG0774

CIMG0776
Isn’t it amazing how a few rhinestones can really dress up an ordinary tote bag?  You can add them onto almost any kind of fabric that you can iron.  Oh and I should probably mention that eCraftCentral.com also has some rhinestone patterns already released for Christmas!!  My mind is already coming up with all sorts of ideas for those!   Hope I inspired all of you to create something wonderful this weekend and I will be back here on the eCraft by Craftwell blog on Monday with another project for you using the awesome Square 1!

Monday, October 3, 2011

eCraft Monday Design Project

I hope all of you are in for a fun week of crafting!  This is the first week where your eCraft Design Team will be presenting projects utilizing not only the eCraft, but a special sponsor for the month!  This month our sponsor is Square 1.  Now, I will admit that I had not heard of Square 1 when we were first told that they were our sponsor, but I was immediately intrigued by this product.  Square 1 is a printable, removable adhesive fabric!  This is an amazing product, and even though it is a fabric, it is a lot like vinyl.  For this month, all of us are going to utilize this fantastic product and show you lots of ways that you can use Square 1 and your eCraft to create to your heart’s content!


This week, we are using Square 1 and our eCrafts to create something using the colors Orange and Purple.  Ahhh!  Purple…no problem for me!  When I think of Orange and Purple together, of course I think Halloween.  Halloween is a very big deal in our house, my kids look forward to it just as much as Christmas.  We actually already have our costumes and everything.  For this week’s project, I decided to show you how to use Square 1 instead of cardstock on your layered cuts.  Sometimes when using cardstock, the layers become so thick that it can be distracting.  This is not the case with Square 1! 


Since Square 1 is printable, I knew I wanted to use the Print & Cut Hinge Method with the vegetable cutting mat.  You can find a video that I did on this method HERE on my blog Purple Paper Paradise

CIMG0767

I also knew that this would be the perfect time to play with the new Printable Tiles from Lettering Delights, so in Make the Cut, I set up blocks of the colors and patterns that I wanted to use and then laid my cut layers on top of these blocks.  First, I printed out the blocks without the cuts (except for the witch’s face).  One of the sheets shown below is printed on Matte Photo Paper and the other is on Square 1.  Can you tell the difference?  The print quality of Square 1 is amazing!  The colors are so vibrant!


CIMG0757


For those of you wondering, the bottom sheet is the Square 1.  I then used the Print & Cut technique and cut out my shapes in some spare cardstock and then placed my print sheet underneath it to get it ready to be cut.


CIMG0758

This color blocking technique works really great for this because there are no white edges!  Here is my witch all assembled (underwear and all!).  Isn’t she cute?  Even though, I will be covering her up, I decided to add the underwear because Square 1 is removable which means that she may change her clothes and I wouldn’t want her to expose herself!


CIMG0760

Now it is time to get her dressed!  I cut out my Square 1 the same way I did the paper layer to make her a couple of outfits to choose from.

CIMG0767


CIMG0766

Now she has a few options for Halloween! It’s hard to see in the pictures, but the texture on the Square 1 really makes realistic looking clothes and adds that extra something special!

Hope you all enjoyed my Orange & Purple creation this week using my eCraft and Square 1, and make sure you come back here everyday this week to see what Debi, Lisa and Raven have!  I know that I am looking forward to seeing what these talented ladies have in mind for this week!  Also, on Friday, I will be back here on the eCraft by Craftwell blog with a whole new video!  If you like bling, you don’t want to miss the video! 


Supplies:

eCraft (of course!)

Square 1 printable removable fabric

Matte Photo Paper (for the witch body and the printed banner sentiments using Slap Happy font)

Papertrey Ink Orange Zest cardstock (card base)

Core’dinations cardstock (purple background) embossed with a spider web embossing folder and sanded down.  Inked edges with Distress Ink Black Soot

Lettering Delights Witch One Cut Its Set with Basic Tiles for the orange and purple patterned layers

Papertrey Ink Black Swiss Dot Ribbon

Copic Markers for inking edges of witch

Monday, September 5, 2011

eCraft Sewing Blog Hop

Welcome to the eCRAFT SEWING BLOG HOP! All of the fabulous designers on this hop are showing you a SEWING OR FABRIC THEMED project using the fabulous and versatile eCraft.


If you just arrived here from Debi Tullier’s blog then you are in the right place. If you just happened upon my blog please start at the beginning over at Raven’s Blog. That way you will be able to see all of the amazing projects and you will have more ways to win. And boy do we have a great prize in store for you! More on that later...on with my project!


Now, I have a confession...I am not very good at sewing.  Just ask my 7th grade Home Economics teacher!  I always joke that my sewing inabilities are a source of anguish to my mother, because she is a very talented and accomplished quilter.  In fact, the only reason why I have a sewing machine is because my mother insisted that I needed it.  She is not so thrilled that I use it only on paper...LOL!  When I try to use it on fabric, it ends up looking like a garbled mess, but that did not stop me from tackling this challenge.
Here is my project for the hop!  Oh and please pardon my extremely messy hairdo!  And thank you to my hubby for taking these pictures!


Those flowers that you see where created entirely out of fabric! 

Here is a list of what I used:
  • Cotton fabric (I use either scraps that my mother gave me or the quilting squares that you can get at most fabric stores) I used two coordinating fabrics for each, but you could use more if you like.
  • Heat N Bond Ultrahold
  • eCraft cutting machine of course!
  • Lettering Delights Simple Flower Shapes SVGs (I used Flower #7 and added two more layers using the Shadow Layer feature in MTC)
  • Alligator Hair Clips (purchased at Hobby Lobby)
  • Hair Combs (purchased at Hobby Lobby)
  • White Silk Ribbon (mine is from Papertrey Ink)
  • Copic Markers for coloring ribbon
  • Embroidery Floss in coordinating colors (I used two strands)
  • Hot Glue Gun and glue sticks

The first thing that I did was apply the Heat N Bond Ultrahold to the back of the fabric with my iron.  I then cut out all four of my flowers shapes with my eCraft.  I did NOT remove the paper backing from the Heat N Bond before cutting and this is crucial in the next step.  Once all the pieces are cut, it is now time to start layering the flower.  Remove the paper backing from the top layer and place it on top of the second layer and then press with your iron.  The paper backing should still be on the second layer, otherwise you will have a mess all over your ironing board!  Proceed one layer at a time until you have all the pieces adhered to one another.  You will need to keep your iron in place a little longer with each additional layer.

The next step is to apply any additional embellishments. First off, remove the paper backing off the back of the flower.  For my projects, what I did was punch a 3/16" hole in the middle of the flower.  I then used one of my buttons that has the knob on the back.  I pushed that knob through the hole.  For one of these buttons, I needed to make the hole a little bigger so I just overlapped my hole punch slightly to make it just big enough.  I then threaded some embroidery floss into a needle and inserted that needle into the hole of the knob on the back side of the flower.  I then used my Copic marker to color my silk ribbon, but you could skip this step and just go with a ribbon that is already the color that you want.  I think the thinner the ribbon you use the better for this.  I laid my ribbon on top of the thread and tied the thread in a knot around the ribbon.  I then also tied the ribbon in a knot to insure that it stayed in place.  I purposely made the length of the ribbon on each side uneven as I think it is more interesting for this project.  I also decided to leave the trailing ends of the embroidery floss hanging down.  There are lots of possibilities here on what you can do to embellish the flower so have fun with it!


Now, we are at the point where we need to heat up our hot glue guns.  For the alligator clip (pink) one, I added a few green felt leaves (that I just quickly hand cut) to help cover up the clip.  With that knob button it works best, if you position the knob in the "crook" of the barrette.  I just glued in place and let it cool off.   For the hair comb (black and white) one,  there is a curve to the hair comb, so I glued one side in place, let that cool off, and then wrapped the flower around the opposite side and glued again.  All in all, this project really did not take me long at all.


I think these would be really cute for flower girls at a wedding especially if you made them in the wedding colors!

DON'T STOP YET!!!  We have some amazing prizes in store for you, so make sure that you follow the entire hop and enter to win on everyone's blog!


Here is a list of all the designers in the hop in case you get lost along the way.

·         Raven Baca http://love4stamps.blogspot.com/
Carley Carter http://the-real-icarley.blogspot.com/ 

(Carly's post in going to be late, so please try to visit her later)
Debi Tullier http://fabric-ecraft.blogspot.com/
You are here --> Denise O'Connor http://purplepaperparadise.blogspot.com/
 Go here next --> Erika Valdez http://www.craftysprouts.com/
Lyssa Zimmerman http://bornagaincrafter.blogspot.com/
Faith Freeman http://faithfulecreations.com/ 
 KimberlyRae Forde http://kreationsbykimberlyrae.com/blog/
Rosa Ahrens www.for-micaela.blogspot.com
Zeni Pradel http://www.scrappyzeni.blogspot.com/
Don't forget to check out the new eCraft blog and you MUST sign up to follow it to be eligible for the grand prize!!!

Craftwell USA http://ecraftbycraftwell.blogspot.com/
Okay so you probably want to know what you can win, right? As some of you may have heard from this hop this amazing eCraft machine that we are all using is created by CraftwellUSA.com. This company is really amazing, their customer service is fabulous and the products are top notch. Well when they heard about our hop they decided to giveaway (1) One eCraft to (1) One lucky winner color may vary. 


Follow the instructions below to be entered in this giveaway, as well as another giveaway that I have planned for you!
1.) Please leave one comment here on my blog (Only one comment will be
qualify per person additional comments will not count.) Your comment must be posted by 9AM EST on September 10th! 
2.) Stop by eCraft’s facebook page to see more awesome projects and tutorials. Don't forget to "Like" their page while you are there!
3.) Become a follower of my blog...it's easy just click on the little button over there on the right hand side!
4.) Also make sure that you are following the new eCraft blog!  It looks amazing! http://ecraftbycraftwell.blogspot.com/

 (1) One lucky winner will be announced on Raven’s blog on in the evening on September 10th. The winner will also be listed on the eCraft Facebook page (see why it’s a good idea to like eCraft's facebook page ;).  I will also post here when the winner has been announced as well as the winner of my other giveaway.

**EDIT:  The grand prize winner of the eCraft will actually be announced on Craftwell's new blog, another good reason to become a follower http://ecraftbycraftwell.blogspot.com/.  Oh and they have a freebie for you today too!**

All are welcome to hop, however the eCraft giveaway is only open to U.S. entries. Thank you so much for your understanding.

In addition, I also have a little giveaway for you!  If you have been following my blog, then you know that I am a mom of two boys.  I know this is hard to believe, but boys don't like putting barrettes and things in their hair!!  I know...shocking!  So I am giving away my project today to one lucky winner!  I am hoping that these find their way to a little girl who will love wearing them as much as I loved making them!


Once you are done leaving your comments here, don't forget to head over to Erika's blog for even more chances to win!  Good luck to everyone!
Related Posts Plugin for WordPress, Blogger...