Showing posts with label Vinyl. Show all posts

Tuesday, January 10, 2012

eCraft Video using Make the Cut


Hi everybody!


I have a fun and quick little project today for you!  I bought a canvas on clearance that had the “Keep Calm and Carry On” phrase that has been so popular lately.  I wanted to alter it to really make it my own and that is where my eCraft and Make the Cut came into play.  Here’s the final project….

DSC_0013-4-1


and here is the video showing you how I did this using the eraser tool in Make the Cut….

As promised in the video, here is a link to the Kevin & Amanda blog.  At the top, you will see a page called Free Fonts.  That is where I get a lot of cool handwritten fonts.  You may have noticed some of them throughout my blog including in my header.  Enjoy and Have a Great Day!

Saturday, December 17, 2011

eCraft Videos Now for eCraftshop Pro


This is my second post of the day, so scroll down to see the Make the Cut video.


For my eCraftshop Pro video today, I thought I would show you all how to cut a banner from the eCraftshop Pro software.  I used the eCraft vinyl from Craftwell and used the roller end caps and everything for this video.  I hope this helps out some of you that have had questions about this!


Thursday, October 20, 2011

eCraft Video–eCraftshop Pro-Working with Long Mat Sizes


Hello everybody!  Have I mentioned that this time of year is a very busy crafting time for me?  Well it is.  Not only do I have my Halloween crafts, but my son’s birthday is shortly after Halloween.  That means that right now I am busy making invitations and party favors, all that fun stuff!  For this month’s eCraftshop Pro video, I decided to show you how to work with longer mat sizes in the software.  One of the great things about the eCraft is that even though it has a Roll mode, you can still cut longer pieces using Front mode or Tray mode.  Since the vinyl that I am using in this video comes on a roll that does not fit on the eCraft roll end caps, I decided to cut my vinyl and feed it through the front.  Works like a charm!

DSC_0080-1_edited-1

I used a glossy outdoor vinyl in black for the base layer of Darth Vader (which you will see me cut out in the video) and then if you look closely you will see that there are some accent pieces layered on top that were cut in a matte finish vinyl in black.  Very cool effect!  Works especially well for Darth Vader since his helmet is shiny!  The SVG that I used came from Katydid Creativity and Paper Adventures.  I did modify the file from a shaped card to one that would work for my purposes.  Also the background paper I got on Etsy from CocoaMint.


Hope you enjoyed the video!  And yes, in case you were wondering there will be more Star Wars stuff coming soon! 

Tuesday, October 11, 2011

Make the Cut Video for October

Hope you all are having a great week so far!  I am sharing with you today a project that has been in the works for awhile!  Today I am demonstrating how I used the Tiler feature in Make the Cut to cut the vinyl on this 30”x24” canvas.

DSC_0009_edited-1

This project was a lot of fun to do, but it takes quite a bit of time and patience!  It took several hours from beginning to end to complete it, so if you decide to do this, be prepared for that!  So now, on with the video!

Here are some pictures of the assembly process for you.


CIMG0790

Here you can see that I used some Crochet Thread to find my center point.  I would have used my hubby’s chalk line, but we could not find it, so I improvised.

CIMG0793

My center point was nestled in that flourish on the leaf and so I cut that leaf first.  I then went back and did all the brown so that I had a good foundation for the rest of the design.  Once I had that green leaf in place, I was able to remove the crochet thread.  If you look closely, you can see the seam going through the tree in this picture.  Most of this seam will be covered up later by the leaves.


CIMG0794

Here is a shot of all the brown and dark green in place.


DSC_0011

Here is a close up of one of the names on the leaves.  If I had to do this project again, I think I would have used the kelly green color that you see in this picture as well instead of the brown so that the names stand out a little more.  Even though this is a large scale design, these names are actually pretty small.  Overall I am very happy with this project and it will last me many years!

DSC_0009_edited-1


Hope you enjoyed my project today and I will be back with another video tutorial on the 20th using eCraftshop Pro!

Monday, September 26, 2011

eCraft Monday Design Team Project

Today I have another Design Team project for all of you!  Did you all sign up to follow the eCraft by Craftwell blog?  Weren’t the projects last week wonderful?  This week the Design Team was challenged to create a project using an image from eCraftCentral.com.  If you have not explored eCraftCentral.com, make sure you do!  There are a lot of images there available for purchase at a low price!  Most images are less than a dollar!


For my project, I chose this image which you can get right HERE!

Capture2

Notice that this image comes from the Banner Expressions SD card?  This is one of the things that I love about Craftwell and what they are doing with eCraftCentral.com.  If there is an image on a SD card that you want, but maybe you don’t want the entire SD card, it just may be available on eCraftCentral.com.  How awesome is that?  Not all the SD images are available, but there are quite a few that are!


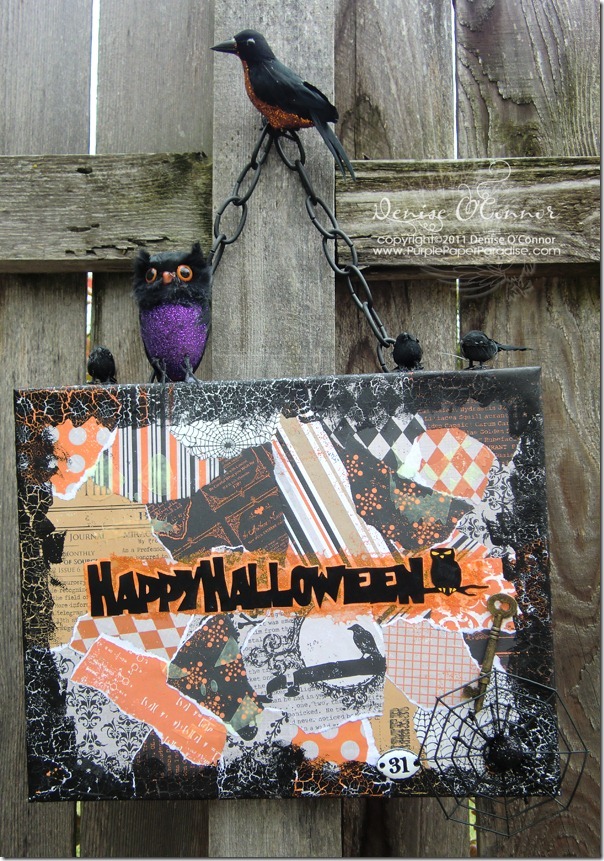
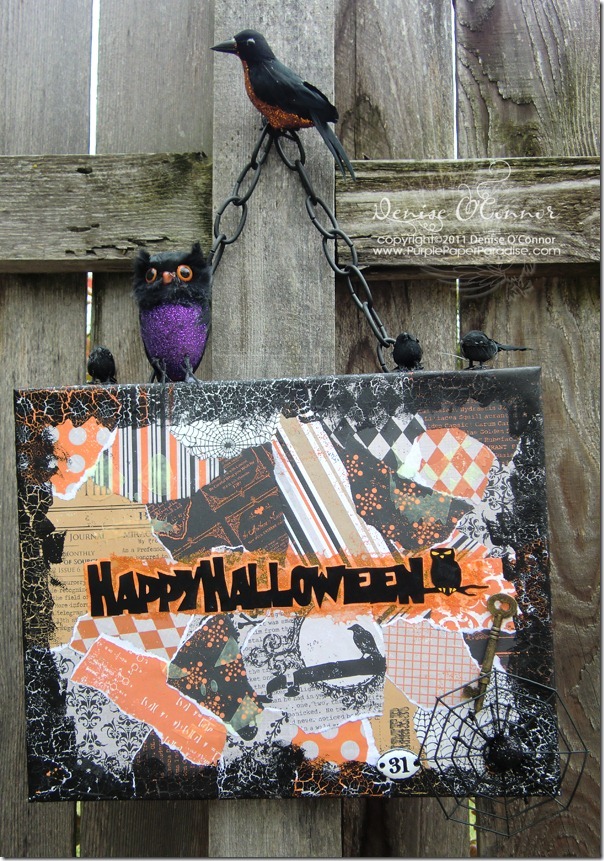
I have to tell you that I got carried away with this project!  I spent more time on it than I planned, but I just love how it turned out, and my 6 year old says that it is really spooky!
CIMG0746

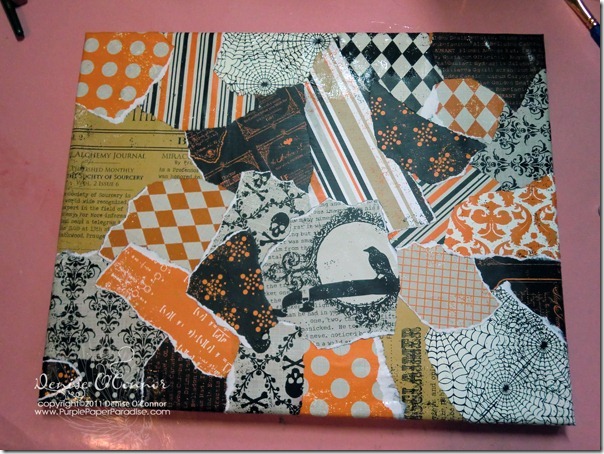
To start, I covered an 11”x14” canvas with paper from Echo Park Apothecary Emporium.  I ripped up the paper and used Glue N’ Seal from Inkssentials to adhere it down. 
CIMG0741

Next I added some Distress Crackle Paint in Black Soot to the edges.

CIMG0742

I just love how you can see the paper underneath through the crackle!  Now comes the fun part!  There is a little hidden surprise on this sign!  Can you guess what it is? Take a close look at the picture below!

CIMG0748

Using images from Lettering Delights doodlebats Jack-O-Patterns, I cut these out of removable vinyl.


For all the vinyl on this project, I used a pressure setting of 2 with my vegetable cutting mat, blade cap on, multi-cut off.

CIMG0744

I placed them sporadically on my sign, making sure that I had enough room for my title.

CIMG0745

Next I used a new product to paint in my stencils, and I have to say that I am loving this stuff.  I used Marta Stewart’s Glow in the Dark Effect from her new paint line (exclusively at Michaels).  The Glow in the Dark is available in a few colors, but I just used the uncolored one so that my paper could glow. I added about 4 coats of the Glow in the Dark effect and then very carefully removed the vinyl. This next picture is not the best, and it really does not do it justice, but I hope you get the idea anyways!

CIMG0754

This is why my son says that this sign is really spooky!  But of course, I am not done!  I still have to add my eCraftCentral.com title to it!  To do this, I decided that I needed to dress it up too!  First, I made a shadow blackout layer in eCraftshop Pro using some white vinyl.  After cutting that out, I covered it with some glitter paint from Martha Stewart’s new line.  This paint is amazing.  It works on glass, metal, wood, so I thought why not vinyl!

CIMG0743

Notice in the picture above how the paint pools on the backing paper.  This is a really neat effect.  I added 3 or 4 coats of the paint until I got the orange color that I was going for and then I added that onto my sign with the extra paint pooling on the edges.  After seeing the surface that the glitter paint left on the vinyl, I decided to cut the black layer out of outdoor vinyl because it adheres stronger.  If I had to do this over, I might just do this in cardstock and use a strong liquid adhesive.  Some parts of the outdoor vinyl did not stick as well as I would have liked them to and so I added a little liquid adhesive in some spots.
CIMG0746

The eyes and toes on the owls were also cut out of vinyl.  When you get the image from eCraftCentral.com those parts are actually set to draw with the pen.  In eCraftshop Pro, this is easy to change to cut instead and that is what I did here. I just love how you can take an image like this and change it around to suit your project!  For a low investment, I got a one of a kind stand out title for my sign!


To finish the sign off, I used some Halloween embellishments that I got at Michaels and the black chain I got at Ace Hardware.


Hope everyone enjoyed this project as much as I enjoyed making it!  If you haven’t signed up to follow the eCraft by Craftwell blog yet, by all means do it now!  The entire Design Team has projects all week long for you!

Monday, August 15, 2011

eCraft Back to School Blog Hop

Welcome to the BACK TO SCHOOL BLOG HOP! All of the fabulous designers on this hop are showing you a BACK TO SCHOOL project using the fabulous and versatile eCraft.

If you just arrived here from Debi Tullier’s blog then you are in the right place. If you just happened upon my blog please start at the beginning over at Raven’s Blog. That way you will be able to see all of the amazing projects and you will have more ways to win. And boy do we have a great prize in store for you!  More on that later...on with my project!

Here is my project for the hop!


This is a gift for my son's teacher and I hope she likes it!  I have so much fun doing vinyl projects and this one was no exception!  I made videos to document the creation of this project so that you can easily scraplift it from me! I broke it up into 3 videos to make it easier for you to find what you are looking for!

First up, this video will show you how I used various tools in Make the Cut to create multi-layers out of a single layer image.  This is so much fun to do!


In this next video, I used the new Conical Warp feature in MTC to get the vinyl to wrap onto the tumbler nice and smooth.  I also show how to do this when you are using multiple colors on the tumbler!


In this last video, I show you how I apply vinyl onto rounded objects like this. 


Here is a list of what I used:

  • Small paint can from Michael's
  • Patterned Paper from Papertrey Ink It's Official Patterned Paper Pack
  • Glossy Outdoor Permanent Adhesive Vinyl - this is essential for the tumbler so that it does not come off, and just a note that it is also safe to wash in the top rack of the dishwasher...BONUS!!  Less dishes always make me happy!
  • eCraft Cutting Machine - of course!
  • Make the Cut Software
  • Lettering Delights fonts (LD Modern Sans and LD Typeset)
  • Lettering Delights Cut Its file - Desk Supplies
  • Scor Tape (for adhering the glitter)
  • Diamond Dust Glitter
  • Ribbon - Papertrey Ink Saddle Stitch in Ripe Avocado,Spring Moss and Pinefeather


Here is a list of all the designers in the hop in case you get lost along the way.


You are here
Go to Erika's blog next
-->Erika Valdez http://www.craftysprouts.com/ <--


Okay so you probably want to know what you can win, right? As some of you may have heard from this hop this amazing eCraft machine that we are all using is created by CraftwellUSA.com. This company is really amazing, their customer service is fabulous and the products are top notch. Well when they heard about our hop they decided to giveaway (1) One eCraft to (1) One lucky winner color may vary.

1.) Please leave one comment here on my blog (Only one comment will be
qualify per person additional comments will not count.)  Your comment must be posted by 6AM tomorrow 8/16/11!
2.) Stop by eCraft’s facebook page  to see more awesome projects and tutorials.  Don't forget to "Like" their page while you are there!
3.) Become a follower of my blog...it's easy just click on the little button over there on the right hand side!


We are also having another blog hop on September 5th. ALL comments left today and on the September 5th blog hop will be eligible to win the eCraft so this will give you more chances to win. (1) One lucky winner will be announced on Raven’s blog(link to my blog) on September 10th. The winner will also be listed on the eCraft Facebook page (see why it’s a good idea to like eCraft's facebook page ;)

All are welcome to hop, however the eCraft giveaway is only open to U.S. entries. Thank you so much for your understanding.
In addition you can win three clear tumblers which are PERFECT for your vinyl art!  I will announce the winner of the tumblers right here on my blog on August 20th!  This prize is also only available to US entries!

Once you are done leaving your comments here, don't forget to head over to Erika's blog for even more chances to win!


Saturday, April 16, 2011

Working with Small Elements in Make the Cut

One of the trickiest things that paper crafters come across is cutting out small elements.  Even when you can get a good cut, once adhered in place, it doesn't always look so good.  Today's tutorial is all about one method to overcome this problem.  Instead of cutting these small elements out of cardstock or paper, you can get a much cleaner cut and overall a cleaner look when you cut it out of vinyl.


In tomorrow's tutorial, I will show you another way to work with these small elements that I personally like even better then the vinyl method I demonstrated today.

Here is the card that I made using the vinyl method.  Have a great day everyone!

Sunday, October 24, 2010

I Have Been One Busy Woman!

I have been SO very busy lately between taking care of my kids, the house, and my husband who is recovering very well from his surgery!  In spite of all of that, I have found some time for crafting, just not a lot for blogging.  Here is an update on what I have been working on!  First off, since Halloween is just around the corner, I had to get cracking on my Halloween treats.  Last year, my son and I started this tradition where we "dress up" the candy that we will be handing out on Halloween to all the trick or treaters that come to our house.  Here is a look at the candy bowl...


I used THIS free SVG file from SVGCuts.com.  This SVG cut beautifully in the eCraft using the eCraftshop Pro software and even though I had to cut out a lot of these, it really didn't take that long to get them all cut.


The papers are from Martha Stewart and Cloud 9 Design.  The ribbons are from Hobby Lobby and Michaels.  To create the tag, I used a digital paper (Haunted Halloween Background Paper Pack) from Lettering Delights, and then digitally used the DB Jack o Patterns doodlebat (also from Lettering Delights) on top of the digital paper so that Frank's head had the digital paper shown through.  I enlarged it so that I could use my 1-3/4" circle punch.  I then used my new die set from Papertrey Ink called Limitless Layers to die cut the four different mats for my digital tag.  Since this set comes with 4 mats as well as 1 plain circle, I was able to cut all 4 mats at one time, so it was really quick to get all of these cut.  On the back of the tag is my personal stamp.  The tag was attached with just a little bit of embroidery floss.  These really turned out so cute, I just wished I started earlier so I would have time to make more.  I have a feeling that I won't have enough for all the trick or treaters.  The candy inside is a mixture of Snickers, Milky Way and Twix fun size bars.

Another thing that I have been working on is the Disney sweatshirts for our extended family for our upcoming Disney World trip.  Here are two more of these, and I have to tell you that even though I have made several of these now, every time I finish one I am just amazed every time.  They turn out so good!  I just love this t-shirt vinyl!  First up is another Tinkerbell.  The first one was one that I made for myself, this one is for my wonderful MIL.  I just know that she is going to love this!


This next one is just darling.  This is for my niece, who is only 18 months old, so this sweatshirt is tiny!  This just goes to show you that this stuff can be intricately cut at small sizes and look amazing!  She is the only little girl in our family, so naturally she is our own Cinderella!


I still have not had a chance to play with my new eCraft SD card, but I will be doing that soon, and I will share what I create.  I can't wait to do this, but I had to get these other things out of the way first!

Tuesday, October 12, 2010

Can You Stand A Little More Disney?

For the two projects I am going to show you, I used designs that I got online.  None of them came from a Cricut cartridge.  In fact, I created one myself from a image that I found online (and yes, I will share!)  This first sweatshirt, came from the Make The Cut Gallery.  Thank you user #2363, don't know who you are, but I love the design!  It is close to a design that is on the Wall Decor & More Cricut cartridge.  All I did to this file, was create the shadow which I used Make the Cut to do.


The background color is the Siser Easyweed Pale Blue, and the top layer is Chemica Hotmark Galaxy White Glitter, and it is gorgeous!  Both of these vinyls I got from http://www.specialty-graphics.com/. They have a lot of options in t-shirt vinyl there.

For this next one, there is a bit of a story here.  The first time, we took Jared to Disney World, I was worried about taking him on the Haunted Mansion.  He was only 2, and I thought that it would be too scary for him.  Imagine my surprise when not only was he not scared, but he loved it!  Haunted Mansion has always been a favorite of my husband's too.  When I saw THESE files by Mardenz, I just knew that I had to make the two of them some matching t-shirts.  Here is the front of the shirt.

I just loved this way that this turned out!  The only problem with it is that unless you are Disney enthusiasts like us, you might not get it.  I decided that I need to come up with something for the back of the shirt that identified this as the Haunted Mansion.  I found an image online, and traced it into Make the Cut, did some minor tweaking, and this is what I came up with.


If you would like the file, click here.  Also if you are interested in other Disney files, make sure to check out Mardenz's blog, she has several great files, and I am going to be using some more of them!

Sunday, October 10, 2010

More Disney Sweatshirts...

My friend and I are having so much fun making these sweatshirts!  They look so much better in person than in pictures, but I just have to share anyways.  This t-shirt vinyl is just amazing, and we are addicted!

I have two sons, and my youngest Mason (2 1/2 yrs old) is starting to really get into Mickey Mouse (although he says Gicky).  It is too cute!  So I had decided that I would make him a Mickey Mouse sweatshirt.  I then asked my oldest son Jared (almost 6) who he wanted on a sweatshirt, and he also said Mickey Mouse.  So I made two of these, and I think it will just be adorable when they wear these at the same time!

This Mickey Mouse image came from the Mickey & Friends Cricut Cartridge.  I then made this sweatshirt for my husband.  I used the Happily Ever After Cricut Cartridge for Grumpy here.


This one did not turn out as well as I had hoped.  The maroon parts are actually supposed to be a tan color, but the tan color that I had ordered was way too yellow, so I improvised with the maroon.  It doesn't look bad, but it would have been better with a different color. 

This week is going to be insane for my family.  My husband is having back surgery on Thursday (any prayers are appreciated), and we have a lot of last minute things that we need to take care of.  I do have some things planned for the blog here, so be sure to check back!

Sunday, October 3, 2010

Disney is in the House!

Sorry that I haven't been around much this week.  We have all been sick at some point here in the past week.  Right now my son Mason is starting to get better, but still has a stuffed nose.  On top of that the weather here dropped like it always seems to do in Chicago.  We went from highs in the lower 70's to highs in the lower 50's in a 24 hour period.  Whenever this happens, it usually brings with it someone not feeling well, in this case my husband.  We are all looking forward to fall though, so it is worth it.  I wanted to share with you a couple of the Disney sweatshirts that Desiree and I are doing.  Her family is planning on going to Disney World after Thanksgiving, and we are planning on January right after my husband is done with his physical therapy.  I am really looking forward to a family vacation, because it has been such a difficult time this past year and a half with his back that it will be so nice for all of us to do something fun together and hopefully he won't be in any pain at all! I have to tell you that Desiree and I are having SO much fin doing these, and it is official, we are addicted to this stuff.  We originally planned on doing 1 for each person in our families.  We have now expanded this, and to be honest with you, I have no idea how many we are going to do.  I already have two more planned for each member of my family!  Desiree is still trying to decide what she wants to do.  On top of the two more that I am doing for each member of my family (which is another 8 sweatshirts), my husband wants me to make one for each person that is going on the Disney trip with us, which is my in-laws, his brother and wife and their two kids.  Which means that I am going to be making 14 more of these sweatshirts!  Yikes!  I have to say that Desiree and I have learned a couple of tricks along the way, and I will share those after these pictures!

Here is the sweatshirt that we made for Desiree's son.  This looks AMAZING in person!


All of the t-shirt vinyl on this sweatshirt came from http://www.craftvinyl.com/.  Here is the sweatshirt that I made for myself, and it is gorgeous!!!!


It is hard to see in the picture, but Tink's dress is made out of a green foil that looks so much better in person.  Her wings were cut from Rainbow Deco Sparkle heat transfer vinyl that we got from http://www.specialty-graphics.com/ and it is beautiful!  It really sparkles, and again it looks so much better in person.

Now for some tips...

1.  When working with t-shirt vinyl, it is better if each piece with the plastic backing can cover the entire image, since there are so many small pieces here, we did not want to do that.  Instead what we did was use a leftover sheet of plastic to cover the piece under our Teflon sheet.  This helps prevent the vinyl that has already been applied from getting too hot.
2. A heat press REALLY works well for this.  The first few that we did was with the iron, and it took a long time to get even one sweatshirt done.  My mom has a heat press and she happens to be out of town, so I went to her house and stole borrowed it! Now, I don't want to give it back!  I will, but it sure makes this go faster!
3.  When using glitter or any of the specialty vinyls like the DecoSparkle, you want to apply these pieces last,  They are NOT made to be layered upon like the others.  Also the glitter does have a bit of glitter that will remain on your transfer sheet and may then transfer onto your sweatshirt in an unintended spot.  Typically this is not even noticeable, but we ran into a problem where there were pieces of glitter on an area where we still had to put another piece of the regular vinyl.  When we went to lay down that vinyl, it would not stick and we could actually feel the glitter that melted onto the back of that piece, so always do your glitter last.

I have more of these to share, and in addition to this, I am working on my Halloween crafts.  Of course, I am anxiously awaiting the eCraft software update, hope that comes soon!

Friday, September 24, 2010

T-shirt Vinyl FUN!!!!

Ok, so I haven't posted anything in awhile, but that does not mean that I haven't been working on it!  I am currently working on cutting some felt with the eCraft, and fortunately Gabriella at Craftwell is helping me out with it.  Hopefully I will have something to report next week for you.  I am getting there, so we are on track!

The other thing that I am working on is a rather large project with my friend Desiree.  After working a little bit with T-shirt (heat transfer) vinyl, we came up with this idea to make Disney sweatshirts for everyone in our families.  Quite an undertaking especially considering how detailed the Disney cuts are.  For most of the cuts, we are using the Disney cartridges from Cricut.  We actually got one of them finished today, so I thought I would share a quick picture for you.  1 down 8 to go!  Here is Desiree's Mulan sweatshirt, and this picture does not give this justice at all!


Most of the t-shirt vinyl used here is from www.craftvinyl.com including the pink and blue glitters.  The skin is actually from the Siser Easyweed line and the color is called Cream.  I got this from http://www.specialty-graphics.com/ and I think that Desiree and I actually prefer this product for only one reason.  The Siser Easyweed is a hot or cold peel product and the others were all cold peel.  It look a lot longer to put it all together because we had to wait in between colors to peel off the acrylic sheet to make sure that it adhered well.  With the Siser, after we ironed it on, we instantly peeled it off.  Instant gratification!  These glitter vinyls are absolutely stunning, and this looks so great!

The Mulan cut was from the Happily Ever After cartridge and I cut out all the pieces on my Cricut Expression.

I will be posting pictures of all the other ones that we are making, and we are having so much fun putting these together!  We were joking that we will end up not only any clothing that hasn't been "vinyled up".  Actually that just may end up being true! 

Thursday, September 16, 2010

Vinyl Wall Art

Awhile ago, I posted about a vinyl wall art project that I was working on for my MIL.  For part of it, I used alcohol inks to color some white vinyl.  Well I finally got around to putting it up for her.  I put this over the doorway to her living room in the foyer.  This picture really does not do it justice, I had to stand on her stairs to get a good shot of it, and her lights were reflecting off of it.


She was thrilled, and it looks so much better in person.  I did learn one more thing about using the alcohol inks on the vinyl.  Don't put your transfer tape on it until you are ready to put it up.  I had cut the vinyl and put the transfer tape on it to protect it.  When I went to install it, some of the ink came off with the transfer tape.  It was not enough to cause me to want to re-cut those parts, but I think it would overall look even better if those parts were just a smidge darker.  This entire project was created in Make the Cut on a small scale.  I then enlarged it to where that flourish would fit on one 12x24 mat at a diagonal.  I then broke apart all the words and fit them on the mats.  I then had to assemble all the pieces as I was installing it.  Overall this is about 3-1/2 feet long and about 15" tall.

Tomorrow I will have another update on a project that you have seen a part of!

Saturday, August 28, 2010

Two New eCraft Videos!

I have been cutting up a storm around here!  I have two new videos for you.  First off, cutting vinyl with the eCraft.  I did this cutting Oracal 631 vinyl, and used a pressure setting of 4, and tab density of 0.


Next, I decided to see if I could cut some fabric!  It went great, I am very happy with the results! The key to doing this is to apply Heat and Bond Ultahold Iron On Adhesive to the back of your fabric.  Other iron on adhesives may work as well, but I did not test any other after realizing that this one worked!  Remove the backing paper.  Put your fabric (Heat and Bond side down) on top of a piece of cardstock.  Load into the eCraft.  I used a pressure setting of 8, and tab density of 0.  Here is the video demonstrating this.


Here is a picture of some of the flowers that I cut using this method.


I have more results that I will share with you tomorrow.  I am also planning on launching the eCraft Settings Chart tomorrow as well!  If you are new to my blog, check out the GIVEAWAY!

Thursday, August 19, 2010

Coloring Your Vinyl! Part 2

So the other day, I showed you how I had airbrushed some vinyl with my Copics.  Well here is a sample using the Alcohol Ink technique, click HERE for a tutorial on this method.  Since my shapes were taking up an entire 12x24 sheet of vinyl, I decided to try something a little different.  With the airbrushing, I had airbrushed first, then cut, and then weeded the design.  I decided to try to cut the design first on this sample.  I was curious how well this would work because by doing it this way, I would be able to see the cut lines and could apply the ink over only those parts of the sheet that needed it.  I figured if this worked well, I would save not only time but ink as well.  I was concerned that the ink would bleed into the backing paper and then would it bleed onto my Cricut mat as well?  I thought that this could make a really big mess, but decided to try it anyway!  Here are some pictures (sorry for the poor quality of these pictures, I am having issues with my camera!)


Before weeding.


After weeding.

So if you look closely at the second picture, you can see that the ink did bleed into the cut lines into the backing paper.  The suprising thing is that the ink did NOT bleed through the backing paper!  My Cricut mat is not horribly stained and ruined.  I should tell you that I think if I had used more ink, bleed through onto the mat may be the case.  I used enough ink to get solid coverage throughout.  I did go back through to touch up areas, but only after waiting a few minutes to allow the ink to completely dry.

My goal today is to get this wall art piece up on the wall at my MIL's house because her birthday is today!  This is her birthday present and I am on pins and needles.  I really hope that she likes this.  She is a very difficult person to shop for because she buys anything that she thinks she wants!  So when it comes to holidays, finding a present is very hard because she already has everything that she wants.  In the past, she has responded well to my crafted items, so hopefully she will love this!

Thanks for stopping by and wish me luck!  Here is the GIVEAWAY post, don't forget to sign up!

Tuesday, August 17, 2010

Coloring Your Vinyl!

Since I have an eCraft on its way, I have been toying with the idea of buying rolls of vinyl instead of the sheets that I normally buy now because the rolls are so much cheaper.  I have steered away from buying rolls because buying 1 roll in every color that I want would cost an arm and a leg.  Recently I saw a blog post somewhere and unfortunately didn't bookmark it.  This blogger used THIS method on a piece of vinyl and then cut a shape out of it in her Cricut to apply to a Frisbee. (If you know who this blogger is, please let me know, I would LOVE to thank her for this!) I have used this technique before and love the results, so it got me thinking.  This technique uses the Adirondack Alcohol Inks, so what other items out there use alcohol inks?  Copics.  You have to love the Copic markers.  I also happen to have the Copic Airbrush system, so I thought that I could probably airbrush white vinyl.  It works like a charm, and the effect is so beautiful!

For this example, I used Copic V17 and RV19.  First I airbrushed a layer of V17 and here is what it looks like after 1 coat.


I then applied a layer of RV19.


The inks dry almost instantaneously.  By the time I put the markers and the air compressor away, the inks are dry and ready to be cut.


Now, the first time I used transfer tape (or in my case Contact paper that I de-stickied a little by pressing it against my jeans), I was concerned that there might be problems.  Would the ink come off with the contact paper?  Would the contact paper even release from the vinyl?  I had no problems whatsoever.  It works perfectly.  And here is the finished product...


I just love the effect that this airbrushed vinyl gives this wall art piece.  I think that I can comfortably buy a roll of white vinyl and use this more in the future.  I have a vinyl wall art piece that I am going to make for my MIL as a birthday present, and have been having trouble finding just the right color for it.  I will be using this technique for sure on it now!

On a side note:  I am not in love with the contact paper as a transfer tape.  The transfer tape that I have also is not great.  If you know of a great transfer tape at a reasonable price, please let me know. I could really use some crafty advice on this!

Thanks everybody! 

Here's the GIVEAWAY!

Monday, August 16, 2010

Laser Level...a crafting tool?

A couple of weeks ago, I was looking through my hubby's tools looking for something and I came across this laser level.  I had completely forgotten that he had it, and to my knowledge, I don't think he ever really used it.  So I snatched it!


I decided that this would be perfect to make sure that my vinyl lettering was straight.  I do not do well with eye balling this kind of thing!  After looking at this particular model, there are two pins that eject from the base and those pins go into the wall to hold it in place.  I tested this in a closet because I wanted to see the holes that were left behind.  I was right to do this, because these holes are noticeable, and when next to a wall art piece, they would bother me. I don't know if this is how all laser levels work, but I certainly did not want to spend money on another.  So I had to come up with a different method.


I found some Picture Hanging Strips made by 3M with the Command adhesive. This is the same adhesive that is used on those hooks where you just pull down on the tab and it releases cleanly from the wall.  The Picture Hanging Strips are different in that there is no hook, each piece is like a piece of plastic Velcro.  They are used so that you can hang pictures on the wall by attaching the strips onto the back of the picture frame.  I took one of these strips and attached it to the base of my laser level. 


I then took another strip and inverted it so that the two Velcro like sides are touching.  When you push the strips together they kind of lock into place, and you can actually hear a snapping sound.


I then removed the protective paper off the strip and took it to the wall.  I used the level to make sure it was straight, and when it was I just pushed the laser level to the wall and applied some pressure to make sure I got some good adhesion.  The laser level stayed perfectly in place!   


I then turned on the light and proceeded with applying the vinyl.  Another tip, when you are done only remove the strip from the wall.  The strip that is on the laser level can be re-used over and over, so there is no need to remove it.


This picture only shows part of the wall art piece.  I still have more to do on it, but I will share it when I am done.

Thanks for stopping by and if you are new to my blog, you can sign up for the GIVEAWAY here!
Related Posts Plugin for WordPress, Blogger...