Showing posts with label Lettering Delights. Show all posts

Monday, January 21, 2013

Another CHA Project!


It is time for me to share another project that I created for the Craftwell booth at CHA!  This one came together so nicely that it almost shocked me that I didn’t need to alter my original plan.

20121231-DSC_0027-2

To start with I cut out a rosette from the Lettering Delights Accordian Folded Rosettes Cut-Its Set using my trusty eCraft.  I purposely made a larger rosette because I really wanted it to be the centerpiece of the card.  After cutting the rosette, I embossed it using Craftwell’s Delicate Dots embossing folder with my eBosser. After assembling the rosette and topping it with a small circle of yellow cardstock, I added some Stickles and a button to dress it up.


Then directly on my white card base, I stamped one of the frame images from Papertrey Ink’s Framed Out stamp set and added the coordinating sentiments from the same set.  I decided to make this a Mother’s Day card since the flower reminded me so much of spring, and I thought this is something that any Mother would like to see.


All I had to do after that was add my flower on top, blocking part of the frame so that you only see the bottom half, and I was done!  Have a great day everyone!

Monday, October 1, 2012

A Quick Halloween Decoration


Halloween is coming and my kids can hardly stand it!  Each year, we order costumes extra early (in fact we have had them for a few weeks now) and they begin counting down the days until I start to decorate the house.  They love Halloween probably more than Christmas so what is a mom to do?  Get crafty!


For my project today, I used some awesome shrink film made by Cooler Concepts and my trusty eBosser to whip up a quick decoration.  In fact, it was so quick that I started to think that these would make amazing placeholders or party favors for a Halloween party.

20120927-DSC_0009-1

To start with, I printed some digital paper from Lettering Delights (Haunted Halloween) and the RIP sentiment onto my shrink film.  This is pretty easy to do with Photoshop or most photo editing software since the digital paper is a picture file.  Just import your digital paper and then add your text on top.  I used a light orange for the text because once you shrink it down, it will darken.  After letting the shrink film dry (i.e. time to clear off my desk LOL) I set to work.  I used a die from Papertrey Ink called Mat Stack 5 and lined it up so that the sentiment was in place and taped it down so it would not shift.  Then I ran it through my eBosser using the sandwich appropriate for that die.  In this case, the thin metal die sandwich.  It cut just as clean as any paper I have thrown at it.  Love that eBosser!

20120927-DSC_0003-1

You can see here that some of the ink from the printing actually transferred to the die, but no worries…it cleans up easily with a baby wipe and did not affect the look at all. Next, I punched a 5/8” hole in the top and then started to shrink it with my heat gun.

20120927-DSC_0005-1

Here you can see how much it shrunk down compared to the die itself.  Next, I threaded my label with some homemade crinkled ribbon and tied it around the black plastic rose (which I found at Target).  I took a strand of Halloween lights and fed as many as it would hold in a glass container and then added my rose.

20120927-DSC_0010-1

I am thinking that I will have to make some more of these, I think they would be awesome lined up on my fireplace mantel.  Anyone care to share some quickie Halloween decorations that you make?  I’d love to hear them!

Monday, August 27, 2012

Back 2 School Blog Hop


Hi everyone!!!  Welcome to the Back 2 School Blog Hop!!  If you came here from Cassie’s Blog….you are in the right place!  If you just happened upon the Blog Hop, please start over at Cassie’s Blog so that you don’t miss out.  There are giveaways along the way and Craftwell is giving away an eCraft Machine!!


When I get my boys ready to go back to school, we always come up with a little gift to give the teacher to welcome him or her back as well.  Usually we like to include some school supplies because teachers can’t seem to get enough school supplies!  A couple of weeks ago, I was contacted by State Line Bag Company and they asked me to try out some of their new Premium Muslin bags.  I just knew that these would be perfect for my teacher gift.  These bags are perfect for packaging so many kinds of things.  They are made from a high quality muslin and come in lots of different sizes.


To start my project, I turned to a Lettering Delights Cut Its Set called Toad-ally School.  I selected my image and then using Make the Cut, manipulated it by using the Boolean Join function so that I actually created a stencil of each color.  Then I cut out each one in vinyl.  Next, I took some scrap cardstock and placed it inside the bag.  I applied the first vinyl stencil.

20120819-DSC_0004-1

Then I painted it in…

20120819-DSC_0005-1

Then removed the stencil…

20120819-DSC_0006-1

Once the paint is dry, apply the next layer and repeat until all done.

Now, I couldn’t stop there.  I decided to add the teacher’s name to the bag using a thin metal die and fabric and to do that I used my trusty eBosser.  I am guessing that you want to see how I did that, so I made you a little video…

Here is the final project!

20120819-DSC_0011-1


GIVEAWAY TIME!!

Now, on with some fun stuff!  State Line Bag Company has given me some bags to give away!  To win the bags, you must be a follower of my blog and you must leave me a comment below!  That’s it! Easy Peasy!


And you don’t want to miss out on that eCraft giveaway, so make sure you continue on with the hop by going to Kelly’s blog next.  Here is the whole lineup in case you get lost!

Cassie Box http://www.somethingfromcassie.com/

Denise O’Connor: http://purplepaperparadise.blogspot.com/ <—YOU ARE HERE

Kelly Feldman: http://www.wannabeescrapper.blogspot.com/ <—GO HERE NEXT

Kim Gaughan: http://www.craftypinkanchor.blogspot.com/

Carrie Walz http://everydaymoments-carrie.blogspot.com/

KimberlyRae Forde: http://kreationsbykimberlyrae.com/blog/

Aimee Maddern: http://aimeesarmoire.typepad.com/

Jodi Baune: http://dancingintherainjb.blogspot.com/

Debi Tullier: http://fabric-ecraft.blogspot.com/

Lowri McNabb: http://www.papervinenz.com/

Craftwell Blog: http://blog.craftwellusa.com/


Happy Hopping Everyone!

Monday, August 20, 2012

Sweet Teacher Cookie Basket and another eBosser Video


So, I got the Papertrey Ink Berry Basket Die a few months ago and haven’t even used it yet…and I was sitting there thinking what can I make with this that is Back to School?  The problem was that none of the ideas that I thought of really worked with those classic back to school colors.  Then I thought…DUH!!!  I don’t have to use the classic colors if I don’t want to!

20120815-DSC_0001-1

I went with my gut and drove myself over to our neighborhood bakery.  They make these wonderful sprinkled butter cookies and I could just envision a bag of them sitting in that berry basket.  After I bought the cookies (way more than I needed), I went home and got to work.  I cut the Berry Basket die four times from Aqua Mist cardstock and scored and adhered the four sides together to create the basket.  I added some pink shredded paper to the basket and then a clear bag and filled it with the cookies.  I knew that I wanted to make a tag to be tied in with the ribbon that I was using to hold the bag closed.  Again my eBosser came to the rescue!  I cut PTI’s Tag Sale 5 from Hibiscus Burst Cardstock, My Favorite Things Fancy Flourish from Aqua Mist, PTI Doily Details from Dark Chocolate, PTI Ad Sense from Dark Chocolate Gingham pattern paper and PTI Double Ended Banner from Hibiscus Burst. Now for my sentiment…

20120815-DSC_0003-1

For the sentiment, I went through my stash of sentiment stamps and did not find something that I wanted to use.  So that is when I decided that I would just need to create my own.  Using my computer and the Lettering Delights LD Carefree Black font, I printed out my sentiment onto a piece of PTI Aqua Mist Damask patterned paper.  Then I picked out a Spellbinders Label #4 die that I wanted to cut it with.  The question was how to do that so that my sentiment was perfectly lined up.  That is when the experimenting started with different sandwiches in the eBosser.  I finally found one that allowed me to get that cut perfectly lined up and so that is what today’s video is all about!


Now, what to do with these leftover cookies…LOL!!!

Monday, August 13, 2012

Back to School Chalkboard Countdown and Another eBosser Video


So we are in big time Back to School mode in our house!  My son Jared is going to be starting 2nd grade and he is a little nervous about it.  Part of the reason why he is so nervous is that for Kindergarten and 1st Grade, he had the same teacher whom he just loved!  Now with 2nd Grade he is about to get a new teacher and he is worried that he won’t like her as much as his last teacher.  To get him prepared for 2nd grade and maybe even excited about it, I decided that we needed to have a Countdown to the first day of school.


When thinking about how I wanted to do this project, I knew that I wanted to make something that could be used for other occasions as well.  So, my trusty wonderful eBosser helped me to create some bottle cap magnets for the title.  My eCraft has been a little lonely since the eBosser came home, so I had to show my eCraft some love too.  My eCraft cut out the green vinyl for the letters in the bottle caps as well as the “Countdown” out of the white vinyl.

20120808-DSC_0001-1

The very first step was to prepare my surface…do you recognize what it was?  It is actually a cookie sheet.  I got a three pack of Chefmate cookie sheets from Target and decided to use the smallest one for this project.  I began by painting the back of the cookie sheet with some Martha Stewart Chalkboard Paint.  While my cookie sheet was drying, I cut out all my vinyl using the Lettering Delights font called LD Mon Cherie.  I set those to the side, and set out to flatten some bottle caps with my eBosser.


I experimented with a couple of sandwiches and finally found one that works great with the No More Shims Embossing Mat made by Scor Pal.  Want to see how it works?  Check out the video below!

After flattening the bottle caps, I used a 1” punch to punch circles from the My Mind’s Eye School Daze 6x6 paper pad.  I added one letter to each circle and then using a little Glossy Accents adhered the paper inside the bottle cap.  I added an epoxy sticker on top of each one and then once that was dry, I adhered a magnet onto the back of the bottle cap.  The cookie sheet is still magnetic through the chalkboard paint.  You just want to make sure the magnet is strong enough for it.  Once my cookie sheet was dry, I added the “Countdown” vinyl onto the chalkboard and then using my Big Bite punched a hole into the Cookie Sheet so that I could attach my ribbon.  I made the ribbon kind of on the long side so that my son can erase the numbers and write in the new one each day.

20120808-DSC_0005-1

I just love that when Halloween comes around, I can make a new set of bottle caps that say Halloween to add on the board.  Also by using the back of the cookie sheet, the Back 2 School bottle caps can be stored on the other side for next year.  So easy! 


I think this just may work because when I was taking the above pictures, Jared asked me if he could be in the picture with it, and of course I said YES!

20120808-DSC_0007-1

What do you think?  Have I won this Mommy battle? 

Monday, July 9, 2012

A few tricks to cutting intricate pieces in your eCraft


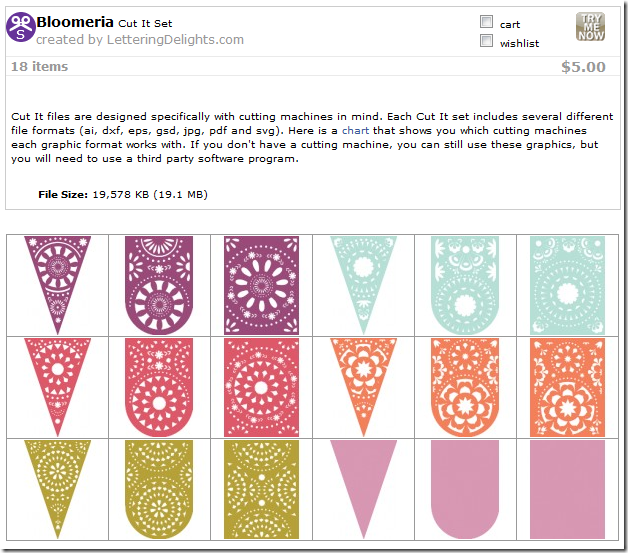
A few months ago, Lettering Delights released a Cut-Its Set called Bloomeria and I immediately purchased it.  Even though I loved it, I had trouble figuring out just what I wanted to do with it.  Then I saw the new Summer Seasonal Distress Inks from Tim Holtz.  These three ink colors are a limited edition and they are bright and bold colors.  I fell in love with these colors and that is all it took to inspire another birthday card to add to my inventory.  On top of that, the card came together SO quickly!

image

Now, I am going to tell you that this was a tricky file to cut, BUT it is not impossible!  So if you run across a file like this and you have trouble getting it to cut well, I am going to share with you a few tips and tricks that I used to get this to cut.  First, because there are so many interior pieces that are cutting, I used BOTH a veggie mat stabilizer and tabs.  The veggie mat stabilizer helps to keep the paper in the rollers tight and the tabs keep those interior cut outs in place.  If you cut this without the tabs, those interior pieces will most likely come loose and then you have a good chance of one of those pieces getting caught under the blade trolley and that is a recipe for a bunch of shredded paper!!  With a file like this, you can kind of imagine how much the eCraft rollers and blade trolley have to move around to get everything to cut, so because I figured that this file would take a while to cut and with all that movement of the rollers and the blade trolley and that means that there is a great chance of the paper slipping even with the veggie mat, so I added a little temporary spray adhesive (I like Quilt basting spray) to the back of the paper before I placed it on the veggie mat.  DO NOT spray your veggie mat with the adhesive!!  That adhesive will gum up your rollers.  The other thing that I did was check my pressure to make sure that I used the lowest possible pressure.  To do that, you need to feed some of your cutting paper in and just test the setting using a small shape that has lots of twists and turns in it.  I like to use the tree from the Fundamentals 1 SD card.  Since we are going to cut with the veggie mat, we cannot rely on the blue light, so we have to test the pressure manually.  I start with a pressure that I think will work.  If it cuts cleanly, I lower the pressure a 1/2 step and cut again to see if I get the same results.  If the cut does not come out of your paper, then you need to increase the pressure.  Once you get a sense of what pressure setting will work on which paper, these test cuts go pretty quick and with minimal waste.  I don’t do this for every cut, just the ones that I think will be tricky like this one.


So now that I have my veggie mat prepared, and the pressure settings figured out, I’m ready to cut. Using my favorite eCraft Diecutable Cardstock (White Flour) into my trusty purple eCraft and then have it start cutting out my Bloomeria cut.  While it was cutting I took another piece of white cardstock and did the Wrinkle Free Distress technique using the gorgeous Summer colors of Picked Raspberry, Mowed Lawn and Salty Ocean.  Look how pretty that came out!!!  And the purple color that was created in there is even more gorgeous in person.

20120702-DSC_0002-1

After my eCraft was finished cutting, I stamped my sentiment from Papertrey Ink Cupcake Collection onto the cut using the Salty Ocean color. Then all I had to do was add some dimensional adhesive to the back of the die cut and then layer it onto my Summer Distress background. 

20120702-DSC_0011-1

After I made this card, I started to imagine it in other color combinations and the possibilities are endless!  What colors would you pick?

Monday, June 25, 2012

Sweetly Chic Birthday


Ever since my son got out of school for the summer, it seems like I have less and less time for crafting!  I’m sure all moms feel that way, and although I love my crafting, I so enjoy having my boys with me and doing all sorts of fun things with them.  Right before school let out, I realized that I was running low on birthday cards, so I have had birthdays on the brain lately and have been making some birthday cards to replenish my stash.


When I saw the Sweetly Chic collection from Glimpses by Signify Pink, I knew exactly what I wanted to do.  Now, this collection offers a lot of wedding and anniversary themed embellishments, but the paper is all in black, white and gray so that means you can do almost anything with it.  Since I don’t have any wedding or anniversary occasions coming up that require a card, I decided to make a birthday card with it to fill up my stash.  Since the papers are all black, white and gray, I knew that I wanted to add a pop of a a bright color.


20120612-DSC_0006-1


I decided to use an older collection of SVG files from Lettering Delights called Deliliah Tags.  The first thing I did was take “tag2” and place it on my mat in Make the Cut.  Then I created the part that I cut out of a black pinstripe by using the Boolean Join feature.  To create it all I needed was another”tag2” bottom layer only and a rectangle to get this pretty tag with the decorative bottom edge.  I cut that out of the Sweetly Chic paper and the original tag from eCraft Diecutable Cardstock in Bubble Gum and White Flour using my trusty purple eCraft of course.


Once all my cutting was done, I stamped the rose image on my white square in Archival Magenta Hue ink.  This stamp is from Papertrey Ink Rosie Posie stamp set and then I stamped the sentiment (from Papertrey Ink Tag-its #10) in black.


Before putting it all together, I added the polka dot paper so that it completely filled up my card front.  Love this paper!  Now, if you would like to get your hands on some Sweetly Chic (or any of the Glimpses by Signify Pink paper) RUN because they are selling out their stock of these collections and once they are gone….they are gone!!!!  If you are a wholesaler, you can purchase from HERE


I hope all of you have a great week, but before I go….I have a question for all of you.


Am I the only one that is busting out of my seams with excitement that the eBosser is almost here????  We are almost in July and that means the eBosser is right around the corner!!!  Can’t wait!  Be sure to check in at the Craftwell blog often to get more sneak peeks and info about the eBosser!

Monday, June 18, 2012

Americana Project for the eCraft Design Team!


Well the 4th of July is right around the corner!  I love this holiday! When I saw the Pages of Honor collection from Glimpses by Signify Pink, I just knew that I had to make something inspired by America with it.  Somewhere deep in the recesses of my brain, I remembered seeing a Statue of Liberty SVG file so I went searching.


Sure enough, I came across it.  It was a freebie from SVGCuts.com from two years ago (you can find the file HERE)

20120612-DSC_0004-1

My first step in making this card was to cut out a card from Core’dinations cardstock.  I used the Card G set from Lettering Delights which gives me a final card size of 9 1/2” tall by 4 1/8” wide.  Perfect size so that I can really highlight the tall, stately look of Lady Liberty!  I added strips of the Pages of Honor collection to the curved front flap in various widths.  After adding those strips, I topped it off with a ric rac broder and added the Statue of Liberty on top of that.  I then remembered a stamp set that I bought over a year ago that was just perfect to add to this and that is from Papertrey Ink and it is called est. 1776.  I made a banner and stamped the distressed waves from that set in dark blue ink.  Then I die cut a Fillable Frames #10 die cut (from Papertrey Ink) and did some collage stamping.  Using a tone on tone look, I stamped some background images from the same stamp set (the eagle and the stars) and then topped it off with the sentiment in red ink.


I have to tell you that even though I had quite a few eCraft die cuts, they came together so quick.  Since I don’t have to adhere the paper to a sticky mat, I was able to get my cuts done quickly so that I could put the card together.  I love not wasting my crafty time, don’t you?


Now, I know that not all eCrafters are American, we have quite a few International friends and I would love to learn more about how you celebrate or honor your country in your paper crafting adventures, so please leave a comment and share with me!

If you are American and would like to get your hands on this Pages of Honor collection (which is gorgeous!), you better hurry up!  You can go to the Signify Pink website HERE because they are selling out their stock and once it is gone, it is gone!  If you are a wholesaler, you can purchase from HERE!

Monday, June 11, 2012

Maximize your eCraft Cuts!


Today, I thought I would show you a quick and easy way to maximize your die cuts. As you all should know by now, the eCraft is eco-friendly.  There are no sticky mats that need to be replaced, so that not only saves you money, but it saves our landfills.  If you are a paper hoarder like me, you don’t like to waste any paper.  Using the Spring Fling collection from Glimpses by Signify Pink, I created 3 cards using the same cuts on two sheets of paper.


Using Make the Cut, I created the following using MTC’s basic shapes (Rounded Rectangle) and some butterflies from Lettering Delights (Oh Hello Flutter and Mother’s Day Album).  The butterflies were joined with the rounded rectangle and the plain rounded rectangle is an inset shadow of the other rounded rectangle to make it easier for layering.

image

I cut this out of a butterfly patterned paper from Spring Fling and also from a piece of White Flour eCraft Diecutable Cardstock.


20120605-DSC_0004-1

On my first card, I used the Simple Stripes impression plate from Papertrey Ink on the white layer after I stamped the little butterfly from PTI’s Sweet Spring Stamp Set.  The frame and the sentiments were from the Framed Out #1 stamp set from PTI with the coordinating dies.  By laying the white layer on top of the the patterned layer with dimensional foam adhesive, I created a really nice effect.

Other Supplies Used:

Melon Berry cardstock from Papertrey Ink (just a scrap to cut the frame)

Melon Berry Ink from Papertrey Ink

Spring Moss Ink from Papertrey Ink

Winter Wisteria Cardstock from Papertrey Ink (card base)

20120605-DSC_0006-1

On the second card, I used many of the exact same stamps from the first card.  This time, I layered the patterned layer with the cut out butterflies on a white card base and stamped a trail of butterflies on top.  You might notice that there is a bit of glare (LOL!) on top of the sentiment frame.  That is actually a coordinating epoxy sticker from the Spring Fling collection from Glimpses by Signify Pink.  There is such a nice shine on these, that they just would not photograph well!


Other Supplies Used:

White cardstock (card base and some scraps for the frames)

Melon berry Ink from Papertrey Ink

Spring Moss Ink from Papertrey Ink


20120605-DSC_0008-1

My last card, takes all those left over butterflies that were cut out and layers them directly on the card base.  I also added one of the Spring Fling border stickers going up the side along with some more frames using the same set from Papertrey Ink.


Other Supplies Used:

White Cardstock (scrap for frame)

Spring Moss Ink from Papertrey Ink

Winter Wisteria Ink from Papertrey Ink

Spring Moss cardstock from Papertrey Ink (card base)


Out of the eCraft cuts that I made, the only one that I did not use was the plain white rounded rectangle (which you know I have saved and will use it soon!).  I got great use out of the patterned paper because I really only used up half a sheet of 12x12 paper.  Easy peasy and very green too!

Monday, June 4, 2012

Summer Flowers that won’t Die!


Summer is finally starting to show itself around here and that puts me in a really good mood!  Barbecues, swimming, vacations, and of course…flowers.  I just love to see those pops of color in nature especially after a long drab winter, so I decided to create a beautiful summer bouquet that I can enjoy all summer long as well as in dreary winter.

20120530-DSC_0139-1

My bouquet idea is one that I have been tossing around for awhile, but it finally came to life when Signify Pink sent us some collections from their Glimpses line.  The Life’s A Party collection was absolutely perfect for my idea with the bright beautiful summer colors.


The first thing that I did was go through my cardstock and found colors that matched (or were really close) to the colors in the Glimpses paper.  Then I started to cut my flowers.  I used various petals from the Sherri Cut Flower Bundle from Lettering Delights. Cutting all of these flowers is a breeze with the eCraft using the tray feature.  Just love doing that for mass production!


While my flowers were cutting, I had to figure out exactly how I was going to assemble my flowers.  Going through all my supplies, I came across some lollipop sticks that I had used last fall for my Cheater Cake Pops.  I pulled out some of them and some of my spray inks (Adirondack Color Wash in Meadow and Dylusions in Cut Grass and Fresh Lime) and sprayed them up.

20120528-DSC_0117-1

Since these lollipop sticks are paper, they soak up the ink easily and after I sprayed I just rolled each one through the ink that puddled up on my craft sheet and then set them off the side to dry.  I then gathered my other supplies (pearlized pins, small crystals beads, and small silver toned beads, and some liquid adhesive).

20120530-DSC_0129-1

After all my cutting was done (with some done in the patterned paper and some in solid colored cardstock), I set about to pick out my combinations of petals.  After that, I started to bend my petals.  To do that I used a paintbrush handle and treated the petal like I was curling ribbon.  Some of the petals were bent up and some bent down.

20120530-DSC_0130-1

Then I started assembling each flower.  I threaded a crystal onto a pearlized pin and then added the smallest petal.  I then added a small silver bead and then another petal and kept repeating until I was done adding petals.  Then I added a bead of liquid glue to the top of the lollipop stick and then stuck the pin into the lollipop stick.


To complete it, I used a candle holder that I found at Michaels.  I filled it with some glass gems.  I then started to arrange the flowers to my liking.  The gems hold everything in place nicely.  I then added the banner on the front using the coordinating Penant Stickers and Alphabet Stickers from Glimpses by Signify Pink.  Such a nice touch.

20120530-DSC_0142-1

I also added this really cute pinwheel that also coordinates with the Life’s A Party collection from Glimpses by Signify Pink.

20120530-DSC_0145-1


Interested in some Signify Pink goodies?  Better hurry because they are running close out prices right now at (Glimpses by Signify Pink) and if you are a wholesaler there are great deals for you too! (Signify Pink Wholesale)


This is one of those projects that just makes me happy to see everyday!  Happy Summer!

Monday, May 14, 2012

I’m back…


Hi everyone, I hope everyone had a great weekend…especially all the Moms out there!!!  Before I get started with my post for today, I want to give a big shout out to Lyssa Beth Zimmerman!  Lyssa was a big help to me last week when she filled in for me on the eCraft Design Team blog.  Unfortunately, we had a death in the family and I also had some computer problems, so I really appreciate Lyssa filling in for me and her project was just adorable!  Thank you Lyssa!!


Since, I did not get to post a Mother’s Day project last week, I decided to show you my project today.  I always make the moms in my life a card for Mother’s Day to go along with their gift.  This year due to my computer problems and limited time to crank these out, I used the same design for each card, but I changed up the color scheme to fit each mother.  This was super easy to do using PaperLayerz by Megan Elizabeth.  These pattern papers are made using the same base as the eCraft Diecutable Cardstock which you all know is a favorite of mine.  On the front are 9 blocks (4”x4” each) and then the back is a larger pattern that fills the entire sheet.  All of the colors on each sheet coordinate, so all I needed to do was pick a sheet per mom and then start cutting.


I used a frame image from Lettering Delights Butterflies & Blossoms set.  This frame was pre-designed with the attached flowers, so again it was super easy to put together.  Using Make the Cut, I set up each layer in a separate square to coordinate with the paper.  I then placed the background layer in an area big enough for it to be cut so that I could use the backside pattern.  The black and white layers were cut separately.


Here’s an example of what one of the mats looked like before I cut…

image


On the white panel I used a stamp from Unity Stamps (Kit of the Month January 2012).  I used my Distress Markers to color directly on the stamp and then huffed on it and stamped.  I picked colors for the stamp that coordinate with each card.  I then topped it off with a sentiment from Papertrey Ink Fillable Frames #4 in black ink.  Then all that was left to do was to assemble each card using my Zig 2 Way Glue Pen and my Xyron Mega Runner.  I used a Papertrey Ink Rustic White card base for each card.  Here are the finished cards…


For my husband’s grandmother…

20120508-DSC_0024-1


For my mother in law…


20120508-DSC_0022-1


And for my mom…


20120508-DSC_0023-1

Hope you all have a great week!!!

Monday, April 30, 2012

My favorite eCraft Design Team Project to Date!

Well, I hope all of you are prepared for a long post…if not, take a moment and get comfy and your beverage of choice. I have an extra-special project to share with you today. This may even be my favorite Design Team project to date. Normally when I make something, I make it for someone else and I rarely make something for myself, but today’s project is just that. I made something that is just for me, and it is something that I will use just about every day.

I am an avid reader. So much so that over 3 years ago, my husband surprised me with a Kindle 2. At the time, the Kindle 2 was incredibly expensive, but he said that we needed it because we had completely run out of room for books. He was right, and since I cannot bear to throw out or give away a book that I enjoyed, the books had piled up. So much so that we have boxes full of books stored in our garage. Since getting the Kindle, I have read over 100 books on it and fell in love with it. Well, a few weeks ago I celebrated my birthday and my husband and kids got me a new Kindle Touch. My Kindle 2 still works just fine, but my husband said that he would like to read some books every now and then, but couldn’t bear to tear the Kindle 2 out of my hands. So, now he gets to read on the Kindle 2 and I get to use the Kindle Touch. I had to laugh at this because is it a present for him or me? I am not complaining though, because I am loving the Kindle Touch. So, after getting the Kindle Touch I started searching for a cover for it and was getting discouraged. Most of the covers were not very pretty and the ones that were are crazy expensive and none of them really felt like “me”. So I decided to make my own.

Don’t have a Kindle Touch? No worries, you can do this with any eReader or Tablet. So the first step is to start with the basic structure. Using medium weight chipboard, batting, canvas, and elastic, I constructed this.


To do this, I measured my Kindle Touch and cut one chipboard piece that was slightly larger than my Kindle Touch. I ran this piece through my Xyron 9” Creative Station and covered it in the canvas and I attached the elastic strips in the corners to hold my Kindle Touch. Now I made two covers that were slightly larger than that base layer for the front and back of my cover. I also cut a piece for the spine. I covered the front and back pieces in batting (again running the chipboard through my Xyron, attaching batting and then just trimming) to provide a little cushion just in case I should drop my Kindle Touch and then I proceeded to cover both covers and the spine in one piece of canvas so that all three pieces were connected. I left a gap in between each piece to allow me to be able to fold the front back. Once this was done, I added a strap piece that I sewed in my sewing machine that also has a Basic Grey magnetic disc in it. The other magnet will be added during the decoration of the covers so that this strap can hold it all together when not in use. I added more canvas on the inside that had been hemmed with the sewing machine to prevent fraying. Now that that was done, I could add my base unit on the inside. I have to give it up for my Xyron, it worked overdrive on this project for me. Love how much easier it made this part of my project. With that, the basic construction was done and now comes the fun part…


Using Glue N Seal Matte (Michaels’s), I added some Dearest Jane patterned paper from Papertrey Ink. I then cut some Claudine Hellmuth Sticky Back Canvas in my eCraft (pressure of 8, blade cap on, no stabilizer, no tabs) in my eCraft for the spine. I just used a rectangle and added a border from Lettering Delights Scalloped Border set. I also used some Frayed Burlap ink refill watered down in a mini mister to dye that canvas to coordinate with the brown in the paper and added that on the spine once dry. Next I found some images online for some of my favorite books. Since I had a vintage feeling going with this, I stuck with some of my favorite classic novels. I added these on the front and on the back of the cover. I also adhered my Basic Grey magnetic piece in a spot where I knew it would be covered by my focal point. Here is the back cover…


To complete this project, I knew I needed something really special. I contacted one of the designers over at Craftwell and asked them to create an Ella image of her reading a book. I was so thrilled when they not only created one, but that it was exactly what I had wanted! Thank you Craftwell, I think it is absolutely perfect and I know that I will be using it again!


Now, I have a little surprise for you. I asked Craftwell if they would please make this image available to you on eCraftCentral.com, and they agreed! Starting today you can get this image. Just so you know, I flipped this image, the original has Ella facing the other way. This is another great thing about these images, the versatility.

So head on over to eCraftCentral.com and get this image available HERE! While you are there, take a look around and see what else you might like, there is a ton of images available!

Monday, April 9, 2012

eCraft Monday Design Team Project


Ummm…..Denise where is the die cut?

20120404-DSC_0107-1

Hear me out!  Yes, I did use my eCraft!  Most of the time when we think of using our eCrafts, we think of die cuts.  But, sometimes you just need to try something new and that is what I did here today.  My eCraft played a big role in this card and it was SO much fun to do!!  I know I will be doing more things like this! Get yourself comfy with your favorite beverage of choice because there are lots of pictures coming up!


I recently got the new Dylusions Spray Inks from Ranger and they are gorgeous!  After watching Dyan Reaveley the designer behind this product on You Tube demonstrating these, I just had to give it a try.  Dyan does art journals and they are amazing.  I decided to start smaller and with something that I am familiar with…a card.


First, I cut an A2 card base from thick white cardstock and decided to try masking it so that I could have the front of the cardbase.  I have to be honest here and say that I did not know if this would work because you have to add water to the project and since the inks are liquid, I didn’t know if the tape would lose it’s stickiness or not, but still worth trying.

20120331-DSC_0089-1

Next, I added some blotches of the spray inks.  I used the Lemon Zest, Cut Grass, and London Blue colors here.  I then added some water along the way so that the inks would bleed and blotch.  I dried it in between each layer.  This really helps so that it doesn’t get too muddy.

20120331-DSC_0091-1

As you can see, the tape is totally not sticking!!!  Oh well!  I seriously was having too much fun to care.

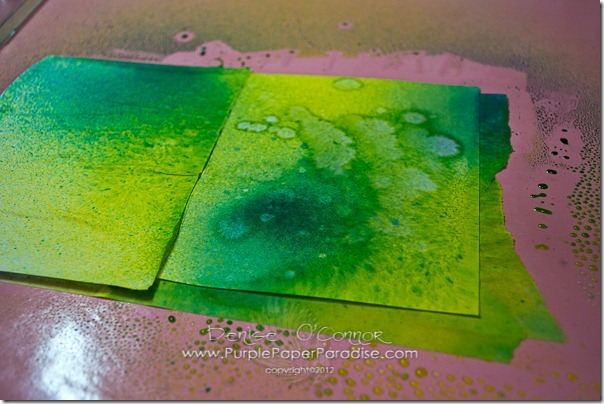
Next, I took a paintbrush dipped in water and splattered the water on top.  Since these inks are water-based, they react with water and in fact kind of have a bleaching effect.
20120331-DSC_0092-1

Seriously love this as is, but I was not done yet.  This is where the eCraft comes into play!

20120331-DSC_0093-1

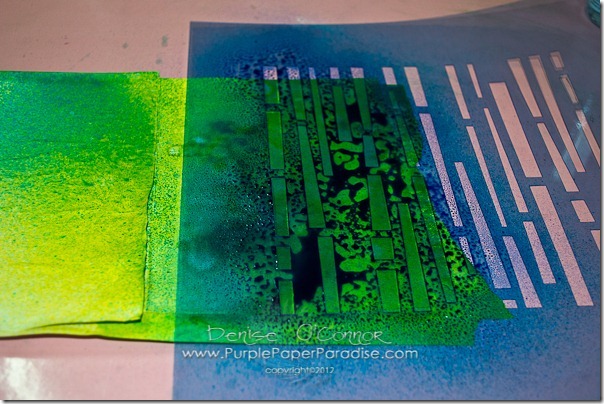
See, that stencil???  Well, I created that from the Segments Box Cover file from Lettering Delights.  I did some modifications to the file in Make the Cut so that I only cut what I wanted for my stencil.  I used the Blue Stencil Film made by Grafix Arts and purchased at Hobby Lobby.   This film is very slippery, so I taped it to my veggie mat stabilizer on all four sides before cutting and then cut it with a pressure of 4 1/2.  Now that I have the stencil in place, time to spray more ink!
20120331-DSC_0094-1

Now to see what we got….

20120331-DSC_0095-1

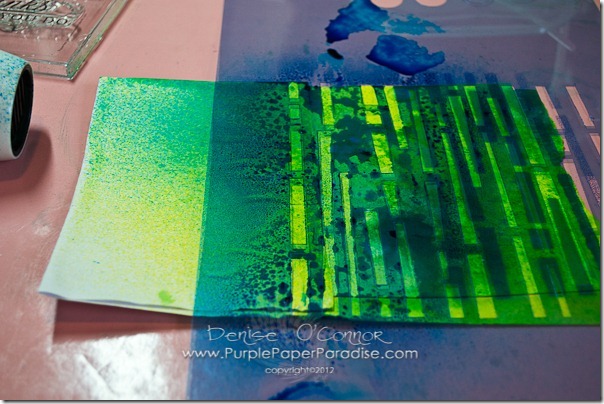
So cool!  But, I can’t stop there because there is a ton of ink on top of that stencil, so I did something that I had seen Dyan do…flip the stencil over and press that inky side onto the paper.
20120331-DSC_0096-1

Can you see all the blotchy ink under the stencil? Oh, and you can see here that my heat gun got a little inky in the process, but no worries.  I just sprayed a little water on it and it wiped clean.

20120331-DSC_0097-1

All that is left is to do some collage type stamping in various colors on top.  Most of these are Tim Holtz stamps, but the sentiment is from Papertrey Ink’s Think Big Favorites series.  I used Archival Inks from Ranger for the stamping to make sure that the stamps didn’t run or bleed.  Now to take off that tape….

20120331-DSC_0099-1

Obviously the tape did not work, but no worries, I just trimmed it down to a 4”x5 1/4” cardfront.  I added some Distress Black Soot ink on the edges and mounted it to a card base (with my new Xyron Mega Runner) made from Papertrey Ink Pure Poppy cardstock.

20120404-DSC_0107-1

I cannot tell you how much fun it was to just get messy!  The stencil that I created is wonderful and I am already thinking of other stencils that I want to cut on my eCraft.  Have a great week everybody!

Related Posts Plugin for WordPress, Blogger...