Showing posts with label Tim Holtz. Show all posts

Tuesday, April 16, 2013

Getting Ready Early!


I recently went through a bunch of my pictures and realized that I had one card that I had created for the Craftwell booth at CHA in January that I had never posted.  Fortunately it is a Father’s Day card so that means that since we are all starting to look forward to Summer time, it is perfect for me to post now.

20121231-DSC_0028

The first step with this card was to stamp my background onto the Craftwell embossing folder (it is called Perseverance) and then quickly embossed it.  This allowed me to stamp only the debossed sections while leaving the embossed section plain.  This folder is one of those that is great to create that vintage look and you can definitely use it to emboss smaller sheets of paper and pick out which section works best for your project. After my stamping and embossing, I started to get messy and play.  I used a paint dabber and roughly smeared paint in some sections.  I did not go heavy handed with it so that the stamped areas would show through.  The created a whole different effect because once I started applying Distress inks with my ink blending tool, the paint resisted the ink.  Definitely a cool messy look.

Once I was happy with the background, I cut out the Hanging Sign and Hardware with the Tim Holtz die using Grunge paper.  I used the Rusted Metal technique on the hardware and applied Distress Inks to the sign.  The sentiment was created with my Dymo label maker.

This is one of those cards that I had a lot of fun creating and just getting messy.  What I love about doing this, is you never know what you are going to end up with!  Have a great day everyone!

Monday, July 9, 2012

A few tricks to cutting intricate pieces in your eCraft


A few months ago, Lettering Delights released a Cut-Its Set called Bloomeria and I immediately purchased it.  Even though I loved it, I had trouble figuring out just what I wanted to do with it.  Then I saw the new Summer Seasonal Distress Inks from Tim Holtz.  These three ink colors are a limited edition and they are bright and bold colors.  I fell in love with these colors and that is all it took to inspire another birthday card to add to my inventory.  On top of that, the card came together SO quickly!

image

Now, I am going to tell you that this was a tricky file to cut, BUT it is not impossible!  So if you run across a file like this and you have trouble getting it to cut well, I am going to share with you a few tips and tricks that I used to get this to cut.  First, because there are so many interior pieces that are cutting, I used BOTH a veggie mat stabilizer and tabs.  The veggie mat stabilizer helps to keep the paper in the rollers tight and the tabs keep those interior cut outs in place.  If you cut this without the tabs, those interior pieces will most likely come loose and then you have a good chance of one of those pieces getting caught under the blade trolley and that is a recipe for a bunch of shredded paper!!  With a file like this, you can kind of imagine how much the eCraft rollers and blade trolley have to move around to get everything to cut, so because I figured that this file would take a while to cut and with all that movement of the rollers and the blade trolley and that means that there is a great chance of the paper slipping even with the veggie mat, so I added a little temporary spray adhesive (I like Quilt basting spray) to the back of the paper before I placed it on the veggie mat.  DO NOT spray your veggie mat with the adhesive!!  That adhesive will gum up your rollers.  The other thing that I did was check my pressure to make sure that I used the lowest possible pressure.  To do that, you need to feed some of your cutting paper in and just test the setting using a small shape that has lots of twists and turns in it.  I like to use the tree from the Fundamentals 1 SD card.  Since we are going to cut with the veggie mat, we cannot rely on the blue light, so we have to test the pressure manually.  I start with a pressure that I think will work.  If it cuts cleanly, I lower the pressure a 1/2 step and cut again to see if I get the same results.  If the cut does not come out of your paper, then you need to increase the pressure.  Once you get a sense of what pressure setting will work on which paper, these test cuts go pretty quick and with minimal waste.  I don’t do this for every cut, just the ones that I think will be tricky like this one.


So now that I have my veggie mat prepared, and the pressure settings figured out, I’m ready to cut. Using my favorite eCraft Diecutable Cardstock (White Flour) into my trusty purple eCraft and then have it start cutting out my Bloomeria cut.  While it was cutting I took another piece of white cardstock and did the Wrinkle Free Distress technique using the gorgeous Summer colors of Picked Raspberry, Mowed Lawn and Salty Ocean.  Look how pretty that came out!!!  And the purple color that was created in there is even more gorgeous in person.

20120702-DSC_0002-1

After my eCraft was finished cutting, I stamped my sentiment from Papertrey Ink Cupcake Collection onto the cut using the Salty Ocean color. Then all I had to do was add some dimensional adhesive to the back of the die cut and then layer it onto my Summer Distress background. 

20120702-DSC_0011-1

After I made this card, I started to imagine it in other color combinations and the possibilities are endless!  What colors would you pick?

Monday, May 14, 2012

I’m back…


Hi everyone, I hope everyone had a great weekend…especially all the Moms out there!!!  Before I get started with my post for today, I want to give a big shout out to Lyssa Beth Zimmerman!  Lyssa was a big help to me last week when she filled in for me on the eCraft Design Team blog.  Unfortunately, we had a death in the family and I also had some computer problems, so I really appreciate Lyssa filling in for me and her project was just adorable!  Thank you Lyssa!!


Since, I did not get to post a Mother’s Day project last week, I decided to show you my project today.  I always make the moms in my life a card for Mother’s Day to go along with their gift.  This year due to my computer problems and limited time to crank these out, I used the same design for each card, but I changed up the color scheme to fit each mother.  This was super easy to do using PaperLayerz by Megan Elizabeth.  These pattern papers are made using the same base as the eCraft Diecutable Cardstock which you all know is a favorite of mine.  On the front are 9 blocks (4”x4” each) and then the back is a larger pattern that fills the entire sheet.  All of the colors on each sheet coordinate, so all I needed to do was pick a sheet per mom and then start cutting.


I used a frame image from Lettering Delights Butterflies & Blossoms set.  This frame was pre-designed with the attached flowers, so again it was super easy to put together.  Using Make the Cut, I set up each layer in a separate square to coordinate with the paper.  I then placed the background layer in an area big enough for it to be cut so that I could use the backside pattern.  The black and white layers were cut separately.


Here’s an example of what one of the mats looked like before I cut…

image


On the white panel I used a stamp from Unity Stamps (Kit of the Month January 2012).  I used my Distress Markers to color directly on the stamp and then huffed on it and stamped.  I picked colors for the stamp that coordinate with each card.  I then topped it off with a sentiment from Papertrey Ink Fillable Frames #4 in black ink.  Then all that was left to do was to assemble each card using my Zig 2 Way Glue Pen and my Xyron Mega Runner.  I used a Papertrey Ink Rustic White card base for each card.  Here are the finished cards…


For my husband’s grandmother…

20120508-DSC_0024-1


For my mother in law…


20120508-DSC_0022-1


And for my mom…


20120508-DSC_0023-1

Hope you all have a great week!!!

Monday, April 16, 2012

eCraft Challenge Week


Earth Day is upon us, so with that in mind Craftwell decided to challenge the Design Team to use some recycling in our projects this week!  I just love doing this and I really should do it more often!

20120409-DSC_0012-1

I decided to create a tag that would be appropriate for so many different occasions and one that is gender neutral too.  To start off with, I stamped a background from the Tim Holtz “Remnants” stamp set on a Kraft colored tag from Inkssentials with some Distress Embossing Ink and embossed it with some clear Embossing Powder.

20120409-DSC_0007-1

I then used a brown Faber-Castell Gelato to color in the non embossed area.  Gelatos come in a chapstick like container and they are a creamy pigment colorant.  I applied them directly onto the tag, rubbed them in a bit with my finger and applied a little water.  This gave the background the perfect aged look that I was going for. 

20120409-DSC_0009-1

I then took a piece of chipboard from a Lucky Charms cereal box and cut the star from the eCraft Fundamentals 1 SD card.  I stamped the same background stamp onto the star and embossed it with clear powder.  I did not apply any additional color on the star, so that you can see the contrast.  I glued the star in place on the tag so that the backgrounds line up.

20120409-DSC_0015-1

I then took an old pair of jeans (that never fit me right…ugh I hate that) and hand cut a strip of the denim.  I ran that strip through my Xyron 1 1/2” X sticker maker and adhered it onto the tag and trimmed off the ends.  I then used a Dymo label maker that embosses the greeting and created the “You are a” part of the sentiment and added that on top of the denim.  I then added the two brads on the ends and pounded on them with the Tim Holtz Texture Hammer.


Now, for the “STAR”, I pulled out something that I pilfered a long time ago.  These letters are from an old computer keyboard.  When we replaced the keyboard, I went through and popped off all the keys and saved them in a baggie that was stuffed in a drawer in my craft room.  As I was going through my supplies, I came across these and knew that they were just perfect for what I wanted on this tag.

20120409-DSC_0016-1

To add the final touch, I cut a few more strips of denim and added some homemade crinkle ribbon and inserted it in the hole.  I love how this all looks and how it came together!  Make sure you stop by the eCraft by Craftwell blog everyday this week to see some more recycling techniques from Kim, KimberlyRae, Debi, and Jennifer!  I know that I can’t wait to see what they come up with!

Monday, April 9, 2012

eCraft Monday Design Team Project


Ummm…..Denise where is the die cut?

20120404-DSC_0107-1

Hear me out!  Yes, I did use my eCraft!  Most of the time when we think of using our eCrafts, we think of die cuts.  But, sometimes you just need to try something new and that is what I did here today.  My eCraft played a big role in this card and it was SO much fun to do!!  I know I will be doing more things like this! Get yourself comfy with your favorite beverage of choice because there are lots of pictures coming up!


I recently got the new Dylusions Spray Inks from Ranger and they are gorgeous!  After watching Dyan Reaveley the designer behind this product on You Tube demonstrating these, I just had to give it a try.  Dyan does art journals and they are amazing.  I decided to start smaller and with something that I am familiar with…a card.


First, I cut an A2 card base from thick white cardstock and decided to try masking it so that I could have the front of the cardbase.  I have to be honest here and say that I did not know if this would work because you have to add water to the project and since the inks are liquid, I didn’t know if the tape would lose it’s stickiness or not, but still worth trying.

20120331-DSC_0089-1

Next, I added some blotches of the spray inks.  I used the Lemon Zest, Cut Grass, and London Blue colors here.  I then added some water along the way so that the inks would bleed and blotch.  I dried it in between each layer.  This really helps so that it doesn’t get too muddy.

20120331-DSC_0091-1

As you can see, the tape is totally not sticking!!!  Oh well!  I seriously was having too much fun to care.

Next, I took a paintbrush dipped in water and splattered the water on top.  Since these inks are water-based, they react with water and in fact kind of have a bleaching effect.
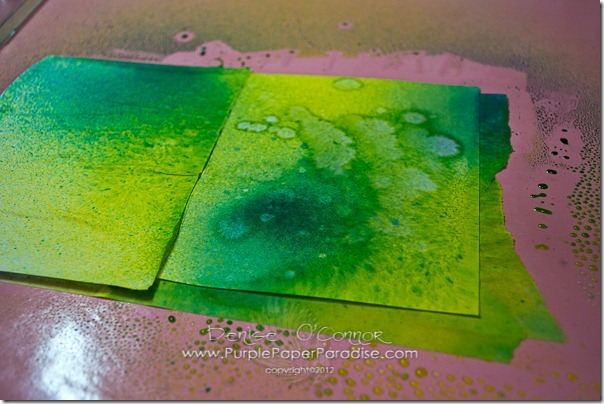
20120331-DSC_0092-1

Seriously love this as is, but I was not done yet.  This is where the eCraft comes into play!

20120331-DSC_0093-1

See, that stencil???  Well, I created that from the Segments Box Cover file from Lettering Delights.  I did some modifications to the file in Make the Cut so that I only cut what I wanted for my stencil.  I used the Blue Stencil Film made by Grafix Arts and purchased at Hobby Lobby.   This film is very slippery, so I taped it to my veggie mat stabilizer on all four sides before cutting and then cut it with a pressure of 4 1/2.  Now that I have the stencil in place, time to spray more ink!
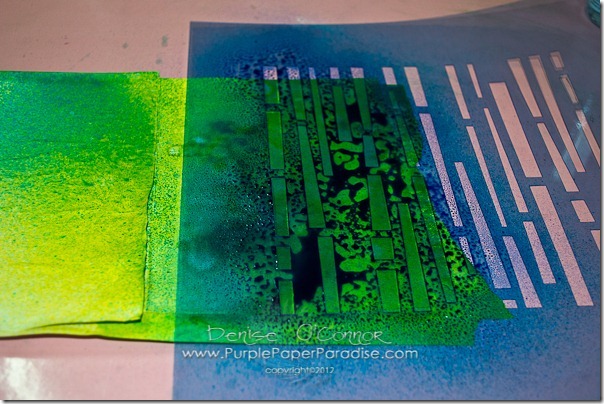
20120331-DSC_0094-1

Now to see what we got….

20120331-DSC_0095-1

So cool!  But, I can’t stop there because there is a ton of ink on top of that stencil, so I did something that I had seen Dyan do…flip the stencil over and press that inky side onto the paper.
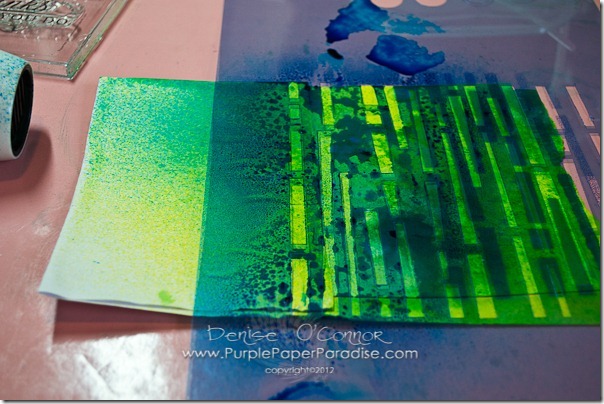
20120331-DSC_0096-1

Can you see all the blotchy ink under the stencil? Oh, and you can see here that my heat gun got a little inky in the process, but no worries.  I just sprayed a little water on it and it wiped clean.

20120331-DSC_0097-1

All that is left is to do some collage type stamping in various colors on top.  Most of these are Tim Holtz stamps, but the sentiment is from Papertrey Ink’s Think Big Favorites series.  I used Archival Inks from Ranger for the stamping to make sure that the stamps didn’t run or bleed.  Now to take off that tape….

20120331-DSC_0099-1

Obviously the tape did not work, but no worries, I just trimmed it down to a 4”x5 1/4” cardfront.  I added some Distress Black Soot ink on the edges and mounted it to a card base (with my new Xyron Mega Runner) made from Papertrey Ink Pure Poppy cardstock.

20120404-DSC_0107-1

I cannot tell you how much fun it was to just get messy!  The stencil that I created is wonderful and I am already thinking of other stencils that I want to cut on my eCraft.  Have a great week everybody!

Thursday, December 29, 2011

My Christmas Traditions Christmas Card for Friends & Family


For about three years now, I have been making Christmas cards to send to friends and family.  This year, I did was all about Tim Holtz.  I always enjoy making the card and this year was no exception.


DSC_0017-2


The picture is one that I took of the boys on Thanksgiving day and I sized it so that it would fit in the die from Papertrey Ink. I then inked the edges with a little Bundled Sage Distress Ink. The background paper is all from the Christmas Kraft Resist paper pack from Tim Holtz.  I used Distress Stains to color the background and then spritzed it with some red Perfect Pearls spray.  The edges were distressed.  The sentiment (also from Papertrey Ink) was stamped on vellum using Archival Ink and then I heavily inked it with Old Paper Distress Ink and heat set it.  Then I tore the vellum into strips and inked the edges with Vintage Photo Distress Ink.  I slid the vellum strip into a memo pin that was stuck into the foam adhesive behind the picture.


DSC_0020-2


I will be sharing a few other Christmas Traditions tomorrow, see you then!

Monday, November 21, 2011

eCraft Monday Design Team Project

Calling all eCrafters!  Today I have 3 BIG goodies for you!  The first is my project for this week using the fabulous Pink by Design Stamps!  We have all been challenged this week to create a 3-D object for you using our eCrafts and our Pink by Design Stamp sets.  I have been using the Beary Merry Christmas set and it is just so adorable!!  I decided to try to vintage up this stamp set with my project this week (and of course this is another food gift item as well).


DSC_0025 copy

I made these cute little triangle boxes!  The ornament on the front is cut out of Tim Holtz Seasonal Paper and then I stamped my reindeer right on the patterned paper with some Walnut Stain Distress Ink and heat embossed it.  I then used some watered down Distress Inks to color in the reindeer (with a few Perfect Pearls mixed in for shimmer).  I love how you can see the patterned paper through the transparent color.  The tag is from the Laina Lamb Office Essentials eCraft Design Card.  I just love that SD card, so many things that can add that extra little touch!


I also added some Heirloom Gold Perfect Pearls to the ornament toppers.  I used some coordinating ribbons from Papertrey Ink in Pinefeather, Spring Moss, and Scarlet Jewel.  Oh and that sentiment on the tag is also from the Beary Merry Christmas stamp set from Pink by Design Stamps and I heat embossed it in vanilla embossing powder.  Even though it is a small sentiment, it embosses just perfectly!  And I love the font combination too!


Now, for the second goodie for you!  This box was designed by yours truly and made specifically for the eCraft!  I have the SVG for the box and also the ornament overlay available to you FREE!  The box SVG even has the draw lines in it so that the eCraft pen can draw in those score lines for you.  Just make sure when you cut it out, that you cut the paper upside down so that the pen lines are hidden inside the box.  I made it so that there are two pieces that overlap in the middle so you have a reinforced bottom.

DSC_0021 copy

Just score the two pieces, adhere them together and then tie it up.  Super simple and quick to do when time is at a minimum during the Christmas season.


CLICK HERE TO DOWNLOAD THESE FREE SVG FILES


Now, I have one last goodie for you!  You may have noticed the treats that were packaged up in these little boxes…well, these are a family tradition that goes back many generations.  In fact, we don’t even know for sure how far back it goes.  My Grandma Elsie would make these and always at Christmas.  My mom started to make them especially because we were not always with Grandma Elsie at Christmas time and the recipe became so requested that now they are made on both sides of my family.  My husband’s family always request these at Christmas, so I usually make at least one Double Batch a season.  I give a few to co-workers and neighbors and I always get asked for this recipe.  I have seen other recipes similar to this out there, but they are never quite the same.  Could be because of all of my childhood memories of these, but I don’t think so!  My Grandma Elsie passed away in 1990 and I miss her greatly and whenever I make these, I think of her.  So in honor of her, I am naming this recipe after her, and I hope you enjoy them as much as me and my family do.


Grandma Elsie’s Buckeye Balls

1 1/2 cups creamy peanut butter

1/2 cup butter (softened)

16 oz. Powdered Sugar

1 tsp. Vanilla

6 oz. package semi-sweet chocolate chips

2 TB solid vegetable shortening


Line a baking sheet with wax paper.  In a bowl, mix peanut butter, butter, powdered sugar and vanilla with hands to form a smooth dough.  Mixture will be very stiff.  Shape dough into 2 tsp. for each ball.  Place on wax paper and refrigerate overnight.  When cool, melt chocolate and shortening together in a small bowl or a glass measuring cup.  Insert wooden toothpick into ball and dip in chocolate to cover half the ball.  Refrigerate on wax paper for 30 min or longer until chocolate is firm.  Store in plastic containers with wax paper between the layers.  Can freeze.


These are truly wonderful!  It just so happens that I am snacking on one as I type. Smile  Have a great week everybody and I want to wish all of you a Happy Thanksgiving!  Don’t forget to follow me, Debi, Lisa and Raven on the eCraft by Craftwell blog we have a lot of great things in store for you and you won’t want to miss it!

Friday, July 29, 2011

CHA Inspiration with Ranger and Tim Holtz!

Sorry for the delay in getting this post to you, but there has been sickness in the house, so that has stolen a lot of my time lately.  Whatever free time I had, I have spent crafting and playing with all the cool new features on Make the Cut.  I will share more on that later, because today, I just have to share my experience in the Ranger booth at CHA.

First off, I just love the eclectic style that Ranger and Tim Holtz put together in the booth.  Just amazing!!


I think I am in love with this tote from the new District Market line!

I thought that this was such a creative way to introduce that they are now selling Distress Stain in all the Distress colors and added a white color called Picket Fence.  While I was exploring all the goodies at the booth, I was able to catch Tim himself doing a demo with Distress Stain and the new Picket Fence color.  Simply amazing!  I can't wait to get it and play for myself!  Tim was such a sweetheart and even let me get a picture with him!


What a great day at CHA!!  I will have another CHA post here soon with some of the other wonderful things at the show!

Thursday, November 25, 2010

Papertrey November Blog Hop Challenge

HAPPY THANKSGIVING!


TAG TIME


Recently the design team and I put together a variety of holiday tags that are perfect to keep on hand
for quick wrap options. Now it's your turn to inspire us and the rest of the Papertrey community! Design a holiday tag or two using all of your favorite goodies and share it with all of us! We will all have plenty of inspiration to create a large stash and try to get ahead of the hustle and bustle of the season!


I actually have been working on my Christmas tags for a few weeks now.  I have made close to 20 different tags, so I decided to show you today my two most favorite out of the bunch.  Tomorrow I will have a rather large post where I show you all of the tags that I have made and also how I am packaging those tags to give as gifts!
 

For this tag, I cut out the tag using the Tag Sale #2 die from Papertrey Ink in their wonderful Kraft cardstock.  I then used PTI's Fancy Flourishes stamp set to randomly stamp some flourishes in both Aqua Mist and Fresh Snow Ink.  The Let It Snow circle was stamped using the 2010 Holiday Tag Collection stamp set.  I used a 1-3/4" circle punch to punch out the circle and then applied a dot of white Liquid Applique in the middle of the snowflake.  After adhering the circle to the tag, I applied a bead of Glossy Accents to the edge and sprinkled on some of this wonderful snow like glitter from Martha Stewart that I got last year on clearance from Michaels.

For this tag, I again used the Tag Sale #2 die in Kraft cardstock.  For the circle tag I distressed a piece of white cardstock using some green and red Distress Inks from Tim Holtz.  I stamped the holly image from the 2010 Holiday Tag Collection in Pine Needles Distress Ink (which is a good match to PTI's Pinefeather color).  The sentiment was stamped in black ink.  I then painted in the berries with some red Perfect Pearls mixed with a little water.  The Perfect Pearls add such wonderful shine to the berries.  I die cut the scalloped circle using Pure Poppy cardstock and PTI's Limitless Layers dies.  I then tied a piece of PTI's Pinefeather twill ribbon onto the tag with a Pure Poppy button and some Pure Poppy Baker's Twine.


Saturday, August 21, 2010

Enabler Alert!

Well I did not make it to the Scrapbook Expo yesterday, and it is not looking good for me getting there today.  Oh well, such is life.  I have however gotten to Hobby Lobby twice this week, and found something there that I think you all might like.  As you may or may not know, I love most of the products that Tim Holtz comes out with.  I especially like his rubber stamps, I don't have very many though because they can be quite pricey.  On Monday, I was at Hobby Lobby to get something to complete a project that I will share soon, and I just happened to notice that in the rubber stamping aisle, they set up a little section of Tim Holtz items.  There were quite a few things there that they never had before, and my eye was instantly drawn to these.


These are acrylic mini sets of some of Tim's most popular stamps priced at $14.99.  Using a 40% off coupon got the price down to $8.99 each!  Now you know why I went back a 2nd time! The one on the left is called Purely Random and the one on the right is called French Connection.  My Hobby Lobby had places set up for 6 of these sets, but unfortunately they only had these 2 in stock. Since not everyone has access to a Hobby Lobby, I went ahead and looked online to see if there are in the online store and they are! Here is a LINK to the online store showing all 6 of these stamp sets!  Also you can use your coupons at the online store!

See you all tomorrow!

The GIVEAWAY is still going on, don't forget to sign up!

Tuesday, August 3, 2010

PTI Impression Plates with Tim Holtz

By now, you all should know that I love Papertrey Ink.  When I was at CHA, I purchased some of the PTI Impression  Plates, and an idea dawned on me to use these Impression Plates in combination with Tim Holtz's Distress Inks.


First I ran a piece of PTI Vintage Cream cardstock through my Cuttlebug using the Sunshine Impression Plate.  I then used Worn Lipstick, Peeled Paint, Spun Sugar, Broken China and Faded Jeans Distress Inks to blend them into the background.  I also used the same colors to stamp various images from the Tim Holtz Rubber Stamp Set called Bitty Grunge. I just love how this technique enhances the Impression in the paper!  I then had to top it off with the Absolutely Fabulous sentiment from PTI Mega Mixed Messages stamp set.  I was tempted to add more to this, but decided against it.  I was worried that it would just get too busy for my taste.  Since this is a 1 layer card, there won't be any issues mailing it!

Make sure you sign up for the GIVEAWAY, I have added a few suprises to it too!

Have a great day everybody, and I will share something new tomorrow!
Related Posts Plugin for WordPress, Blogger...