Showing posts with label Make The Cut. Show all posts

Monday, August 27, 2012

Back 2 School Blog Hop


Hi everyone!!!  Welcome to the Back 2 School Blog Hop!!  If you came here from Cassie’s Blog….you are in the right place!  If you just happened upon the Blog Hop, please start over at Cassie’s Blog so that you don’t miss out.  There are giveaways along the way and Craftwell is giving away an eCraft Machine!!


When I get my boys ready to go back to school, we always come up with a little gift to give the teacher to welcome him or her back as well.  Usually we like to include some school supplies because teachers can’t seem to get enough school supplies!  A couple of weeks ago, I was contacted by State Line Bag Company and they asked me to try out some of their new Premium Muslin bags.  I just knew that these would be perfect for my teacher gift.  These bags are perfect for packaging so many kinds of things.  They are made from a high quality muslin and come in lots of different sizes.


To start my project, I turned to a Lettering Delights Cut Its Set called Toad-ally School.  I selected my image and then using Make the Cut, manipulated it by using the Boolean Join function so that I actually created a stencil of each color.  Then I cut out each one in vinyl.  Next, I took some scrap cardstock and placed it inside the bag.  I applied the first vinyl stencil.

20120819-DSC_0004-1

Then I painted it in…

20120819-DSC_0005-1

Then removed the stencil…

20120819-DSC_0006-1

Once the paint is dry, apply the next layer and repeat until all done.

Now, I couldn’t stop there.  I decided to add the teacher’s name to the bag using a thin metal die and fabric and to do that I used my trusty eBosser.  I am guessing that you want to see how I did that, so I made you a little video…

Here is the final project!

20120819-DSC_0011-1


GIVEAWAY TIME!!

Now, on with some fun stuff!  State Line Bag Company has given me some bags to give away!  To win the bags, you must be a follower of my blog and you must leave me a comment below!  That’s it! Easy Peasy!


And you don’t want to miss out on that eCraft giveaway, so make sure you continue on with the hop by going to Kelly’s blog next.  Here is the whole lineup in case you get lost!

Cassie Box http://www.somethingfromcassie.com/

Denise O’Connor: http://purplepaperparadise.blogspot.com/ <—YOU ARE HERE

Kelly Feldman: http://www.wannabeescrapper.blogspot.com/ <—GO HERE NEXT

Kim Gaughan: http://www.craftypinkanchor.blogspot.com/

Carrie Walz http://everydaymoments-carrie.blogspot.com/

KimberlyRae Forde: http://kreationsbykimberlyrae.com/blog/

Aimee Maddern: http://aimeesarmoire.typepad.com/

Jodi Baune: http://dancingintherainjb.blogspot.com/

Debi Tullier: http://fabric-ecraft.blogspot.com/

Lowri McNabb: http://www.papervinenz.com/

Craftwell Blog: http://blog.craftwellusa.com/


Happy Hopping Everyone!

Monday, June 25, 2012

Sweetly Chic Birthday


Ever since my son got out of school for the summer, it seems like I have less and less time for crafting!  I’m sure all moms feel that way, and although I love my crafting, I so enjoy having my boys with me and doing all sorts of fun things with them.  Right before school let out, I realized that I was running low on birthday cards, so I have had birthdays on the brain lately and have been making some birthday cards to replenish my stash.


When I saw the Sweetly Chic collection from Glimpses by Signify Pink, I knew exactly what I wanted to do.  Now, this collection offers a lot of wedding and anniversary themed embellishments, but the paper is all in black, white and gray so that means you can do almost anything with it.  Since I don’t have any wedding or anniversary occasions coming up that require a card, I decided to make a birthday card with it to fill up my stash.  Since the papers are all black, white and gray, I knew that I wanted to add a pop of a a bright color.


20120612-DSC_0006-1


I decided to use an older collection of SVG files from Lettering Delights called Deliliah Tags.  The first thing I did was take “tag2” and place it on my mat in Make the Cut.  Then I created the part that I cut out of a black pinstripe by using the Boolean Join feature.  To create it all I needed was another”tag2” bottom layer only and a rectangle to get this pretty tag with the decorative bottom edge.  I cut that out of the Sweetly Chic paper and the original tag from eCraft Diecutable Cardstock in Bubble Gum and White Flour using my trusty purple eCraft of course.


Once all my cutting was done, I stamped the rose image on my white square in Archival Magenta Hue ink.  This stamp is from Papertrey Ink Rosie Posie stamp set and then I stamped the sentiment (from Papertrey Ink Tag-its #10) in black.


Before putting it all together, I added the polka dot paper so that it completely filled up my card front.  Love this paper!  Now, if you would like to get your hands on some Sweetly Chic (or any of the Glimpses by Signify Pink paper) RUN because they are selling out their stock of these collections and once they are gone….they are gone!!!!  If you are a wholesaler, you can purchase from HERE


I hope all of you have a great week, but before I go….I have a question for all of you.


Am I the only one that is busting out of my seams with excitement that the eBosser is almost here????  We are almost in July and that means the eBosser is right around the corner!!!  Can’t wait!  Be sure to check in at the Craftwell blog often to get more sneak peeks and info about the eBosser!

Monday, May 14, 2012

I’m back…


Hi everyone, I hope everyone had a great weekend…especially all the Moms out there!!!  Before I get started with my post for today, I want to give a big shout out to Lyssa Beth Zimmerman!  Lyssa was a big help to me last week when she filled in for me on the eCraft Design Team blog.  Unfortunately, we had a death in the family and I also had some computer problems, so I really appreciate Lyssa filling in for me and her project was just adorable!  Thank you Lyssa!!


Since, I did not get to post a Mother’s Day project last week, I decided to show you my project today.  I always make the moms in my life a card for Mother’s Day to go along with their gift.  This year due to my computer problems and limited time to crank these out, I used the same design for each card, but I changed up the color scheme to fit each mother.  This was super easy to do using PaperLayerz by Megan Elizabeth.  These pattern papers are made using the same base as the eCraft Diecutable Cardstock which you all know is a favorite of mine.  On the front are 9 blocks (4”x4” each) and then the back is a larger pattern that fills the entire sheet.  All of the colors on each sheet coordinate, so all I needed to do was pick a sheet per mom and then start cutting.


I used a frame image from Lettering Delights Butterflies & Blossoms set.  This frame was pre-designed with the attached flowers, so again it was super easy to put together.  Using Make the Cut, I set up each layer in a separate square to coordinate with the paper.  I then placed the background layer in an area big enough for it to be cut so that I could use the backside pattern.  The black and white layers were cut separately.


Here’s an example of what one of the mats looked like before I cut…

image


On the white panel I used a stamp from Unity Stamps (Kit of the Month January 2012).  I used my Distress Markers to color directly on the stamp and then huffed on it and stamped.  I picked colors for the stamp that coordinate with each card.  I then topped it off with a sentiment from Papertrey Ink Fillable Frames #4 in black ink.  Then all that was left to do was to assemble each card using my Zig 2 Way Glue Pen and my Xyron Mega Runner.  I used a Papertrey Ink Rustic White card base for each card.  Here are the finished cards…


For my husband’s grandmother…

20120508-DSC_0024-1


For my mother in law…


20120508-DSC_0022-1


And for my mom…


20120508-DSC_0023-1

Hope you all have a great week!!!

Monday, March 5, 2012

Blinged Out Create Shirt


PrintOnIt.com has some great products, and this week I decided to create some a t-shirt perfect for crops or any other crafty get together.

20120229-DSC_0003-1

First off, I took to Photoshop and created this design using some Digi Stamps.  I printed it out on Print On It’s Inkjet Opaque Transfer Paper.  I then cut out a rectangle with the eCraft around the design using the Print & Cut-Hinge Method.  When I adhered this down on my veggie mat, I made sure to tape it down really well because this paper has a real slick feel to it and that means that the rollers can have trouble gripping it, but if it is taped to the veggie mat, then no worries!


Now, while this was very nice…it still needed something.  Well I went in search of some inspiration by looking through my stamps and I came across some flourishes that I thought might make for some good rhinestone patterns and decided to see if I could make a rhinestone pattern from a stamped image.  Since this is a totally new to me technique, I decided to go ahead and make a little video for you so you can see how I did it. First a closer look at those rhinestones…

20120229-DSC_0006-1

And now for those videos…first off, using Make the Cut and my scanner how I turned a stamp into a rhinestone pattern…

Next up how I applied the rhinestones right next to the Transfer Paper without ruining the transfer paper…

Hope you enjoyed my project this week!  Don’t forget to watch the eCraft on HSN on March 11th & 13th.

Monday, February 20, 2012

eCraft Monday Design Team


Color Blocking is all the rave right now in fashion.  Here is a picture from Pinterest to give you an idea of what I am talking about.


So, I thought what a perfect effect for us paper crafters to apply to our projects!  Now, our lovely sponsor Unity Stamps sent me the Going Retro stamp set which is just PERFECT for this technique.  I also was inspired by our other sponsor eCraft Diecutable Cardstock from the Paper Mill Store.  When they sent us our paper, they also sent us a little swatch book that has a small sample of each color of paper.


Well, that little swatch book has gone everywhere with me and it is wonderful!  With this little gem, when I am at a store and wonder if that ribbon will match…all I have to do is pull that little number out of my purse.  I decided to expand on this little idea of a swatch book and create an expanded version so that I can come up with color combinations on the fly. 


20120216-DSC_0001-1


I get inspired by color all the time so I figured if I have something that will help me see all the colors together I can create color combinations on a whim.  Just the other night, I came up with a new color combination while I was waiting for my son to finish up his karate class because I had this handy.


Here is how this works…


20120216-DSC_0003-1


The colors shown here are Lemongrass, Mint, Key Lime Pie, Purple Cabbage, and White Flour.  I will certainly be making something with this color combination soon!


So now, how did I create this little gem?  Well I have made it super easy for you.  Below is a link to download the SVG files for this project!


I cut out the Insert file on each of the 26 colors of eCraft Diecutable Cardstock. I used a pressure of 4 on a veggie mat. Then I cut out the cover to use as a template because for this project I made I wanted to use a really thick chipboard.  This chipboard is more than 1 mm thick so it won’t fit in the rollers of the eCraft for cutting.  I also cut out my 3 color blocking layers in Key Lime Pie, Mint, and Lemongrass.


20120216-DSC_0001-1


Now it is assembly time!  I used my Stamp-a-ma-jig (available at Michaels) to stamp my lovely lady on the chipboard cover and all three color blocking layers in the exact same place.  I then used Scor-Tape to adhere each layer of the color blocking layers onto the chipboard cover.


Then I threaded some handmade crinkle ribbon through both covers and the inserts and tied off each section of ribbon.  I topped them each off with a coordinating button threaded with some rustic twine.


I just LOVE this color blocking look and thought that all of you might want to see how I created it, so here is a little video for you!


Now, the next time I find inspiration I can pull this little number out of my purse and put together a color combination.  It really helps to see the colors right next to each other so you will know that they work before cutting.


Have a great week everybody!  Oh, and before I forget HERE are your free SVG files so you can duplicate this project!

Monday, January 16, 2012

eCraft Monday Design Team Project

I’m back with another project made using the fabulous Die Cuts With A View (DCWV) Collage Musings Stack and Mr. Cricut Crazy Stamps over on the eCraft by Craftwell blog!


DSC_0012-4


To see the entire project go HERE and make you that you are following the eCraft by Craftwell blog! Debi, Lyssa, Raven, and Jen have some more amazing projects for you this week!  And don’t forget about the special Saturday post too!

Tuesday, January 10, 2012

eCraft Video using Make the Cut


Hi everybody!


I have a fun and quick little project today for you!  I bought a canvas on clearance that had the “Keep Calm and Carry On” phrase that has been so popular lately.  I wanted to alter it to really make it my own and that is where my eCraft and Make the Cut came into play.  Here’s the final project….

DSC_0013-4-1


and here is the video showing you how I did this using the eraser tool in Make the Cut….

As promised in the video, here is a link to the Kevin & Amanda blog.  At the top, you will see a page called Free Fonts.  That is where I get a lot of cool handwritten fonts.  You may have noticed some of them throughout my blog including in my header.  Enjoy and Have a Great Day!

Monday, January 9, 2012

eCraft Design Team Project


New Year!  New Design Team!  New Inspiration!

There are some very exciting changes coming this term of the eCraft Design Team!!  Be sure to not miss a minute of the fun!  We will have posts Monday-Friday every week and then there will be a super special post on Saturdays!


This month, we have two amazing sponsors.  First off, we have Die Cuts With A View paper!  They have some gorgeous paper packs!  Take a look at the paper pack that I am using!

collage-musings-main

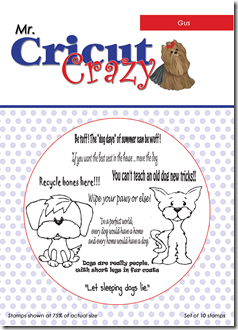
We also have Mr. Cricut Crazy Stamps!  They have some really cute stamps, as well as some other crafting necessities!  This month, I am going to be using the stamp set called “Gus”.  So cute!
Gus

Now, I have a confession to make…we don’t have a dog.  In fact, I have never had a dog.  I have nothing against dogs, love them, just never had the opportunity to have one!  We have talked about getting a dog for our sons, but we want to wait until they are old enough to assume the responsibility of taking care of a dog.   Since, I don’t have a dog, I admit that I was feeling a little daunted at the thought of pairing up this paper with a dog stamp set.  Once I had both products in hand, I took some time to brainstorm, and then the ideas started coming.  It just goes to show you that even something that you think don’t pair well together can be used together! 

DSC_0004-6 copy

The first thought that I had was that I just had to use my Copics to color in this cute little dog!  Come on, isn’t he adorable?  I used a flicking technique that was demonstrated in the Copic Coloring Guide. (Note: I got this book from Cutters Creek, and it is not currently offered in the store, but Kim said that she can special order them, so if you are interested you can e-mail her at kimberlyjbush@gmail.com.  She also sells everything eCraft and has eBossers available for pre-order!) Now since this was my first time doing this technique, I made some mistakes, but even in spite of them, I think it turned out pretty well.  Oh and that sentiment is from the Gus stamp set too!  The original sentiment says “Wipe Your Paws Or Else!”.  I just cut that sentiment to take off the “Or Else” so that it would fit on my doggie door mat.  Since I still have the “Or Else”, I can easily butt the two together to use them again as was originally intended.  Easy Peasy!

DSC_0005-6

I made a die cut of the stamp using a technique that I demonstrated in THIS video.  That gorgeous background paper is from Die Cuts With A View Collage Musing stack of course!  That plant and butterflies are glittered and they add just the perfect amount of shimmer!

DSC_0007-4

I just love that shine to this paper!  The dog house is a modified version of the one from the Feliz Navi-Dog SVG set from Lettering Delights. The SVG was clearly designed for Christmas, but with a few quick modifications in Make the Cut, I was able to change the entire look of the doghouse!  Want to see how I did it?  Here is a quick little picture tutorial for you!

Capture1

First, bring in the SVG onto your mat.

Capture2

On your layers panel, do a right mouse click on the main layer and then select "To Each It’s Own”.  You should end up with something like what we see above.

Capture4

Next, delete all the unnecessary layers.  In my case, this includes all the light colors and the entire white layer.  Don’t worry about the name on the plaque, we will get to that soon!

Capture5

Select the shapes in the black layers that has the roof and the plaque and do a Split.  This will separate the roof and the plaque so that you can select only the plaque.  Select the plaque and then go to the Edit menu and select Copy.  Then go back to the Edit menu and select Paste in Place.  Then go back to your layers panel, and select the “Selection to New Layer” button.  It is the one at the bottom of the layer panel that has the small green plus sign inside a dashed line square.  In the picture above, I recolored this new layer to white so that you can see what your layers panel should look like.
Capture6

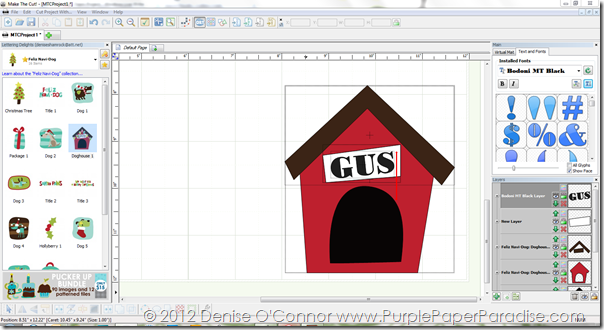
Then go your Text and Fonts tab (top right hand side) and select the font that you want to use from the drop down menu.  I selected Bodoni MT Black, and then click on the Add a group of characters button (Ctrl I) and type in the name of the dog.  I chose to use Gus in honor of the stamp set from Mr. Cricut Crazy! I then sized the text and rotated it to fit on the plaque.


Now, at this point, we have three layers for the plaque.  There are two options to cut this down.  The first is to remove the plain black plaque.  That would leave you with a white plaque and your black letters layered on top.  The only issue with this is that then you have to glue down those letters onto the plaque and be extra careful about placement.  I prefer to avoid that so I am going to show you what I do when faced with this.

Capture7

Hide all of your layers except for the white plaque and the black letters.  Select all the visible shapes by hitting Ctrl A.  Then go to this icon on your bottom tool bar (also known as Boolean Join) Capture8


Capture9

When you select this button, you will get a window with a drop down menu that gives you several options. For this situation, I used the B-A Difference. This will give us one layer that has the letters cut out of it as shown in the picture above.
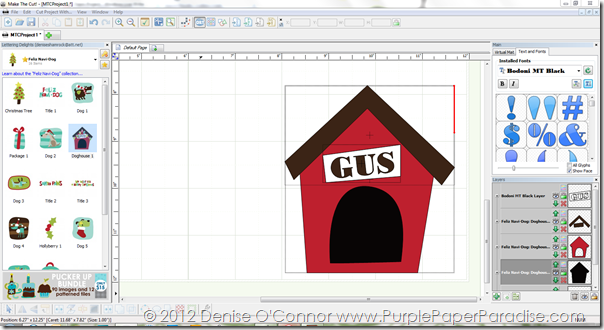
Capture10

From there, all I had to do was change the color of that layer to white and then I am all set to get cutting! It is really that easy!!

DSC_0004-6 copy

That is it for me today, but make sure you go to the eCraft by Craftwell blog everyday this week to see what my fellow Design Team members have created, and don’t forget about that special Saturday post too!  Have a great day!!

Saturday, December 17, 2011

eCraft Videos–First off Make the Cut


Hi everybody!  As promised, I have two videos to share with you today.  The first is my Make the Cut video.  In this video, I show you some tips on how to create your own rhinestone patterns in Make the Cut.  So much fun to do!


Here are some rhinestone videos that I did for the eCraft Design Team showing you how to do the entire process from cutting the rhinestone rubber, applying the rhinestones, etc.  In these videos I used a rhinestone patterns from eCraftCentral.com.  They have some really great patterns in case you don’t want to make them yourself! 

Monday, November 14, 2011

eCraft Monday Design Team Project


I am back with some eCrafty goodness today!  This week the Design Team was challenged to make another Christmas project using our wonderful Pink by Design Stamps and incorporate a sky element into the project, such as stars, clouds, sun, moon, planets, etc.  Continuing on with my personal challenge to make every project this month a food gift, I am incorporating one of my favorite ways to give food gifts.  This is so quick and easy to do and really makes a simple food gift special!

DSC_0202 copy

For this project, I started with a simple aluminum pan that you can find at any grocery store.  The ones that I got came 3 in a package, so while my Zucchini Bread was baking in 2 of the pans I used the third one to create my wrap.  These pans came with clear lids, so I attached the lid and took some measurements.  I used a flexible sewing tape measure to get my measurements.

DSC_0134-1 copy

All the way around, my measurement came in at 14 1/4” so I knew that I would have to paper piece the wrap.  I then proceeded to take some measurements of the sides and where I would need to score to get a nice clean fit.  Then I started to create the wrap.  I knew that I needed a panel on the top that measured 3 1/2” wide and then added 1/2” so that I would have something to attach to the rest of my wrap on each side.  I decided to use my computer to print my sentiment directly on this panel.  To do this I used Microsoft Publisher and set up a 8 1/2”x11” page document and used the Layout Guides to see the finish area.  This will also be where I want to cut this paper after it is done printing.

publisher set up print sentiment

I printed my sentiment onto Papertrey Ink Soft Stone cardstock and used Lettering Delights Deck the Halls font for the sentiment.  Once I had it printed out I was ready to add my elements onto it.  The first thing that I did was use my eCraft to cut a large 7” circle out of Papertrey Ink Aqua Mist cardstock and then used my Xacto knife to cut a sliver off of it to create the ground on which my Polar Bears will stand.  These Polar Bears from the Pink by Design stamp set Beary Merry Christmas are just so cute that I had to use them again!


The next thing that I did was create the mat for my Polar Bears.  I actually did a video on how to do this that you can find HERE.  You will need Make the Cut and a scanner to do this.  Once I had my mat cut out, I used my Stamp a Ma Jig to line it up the stamp onto the mat.  Sometimes I skip this step and just eyeball it, but I made a small shadow on this mat and did not want to chance it.

DSC_0193 copy

The Stamp a ma jig really makes this easy to do.  To make sure that my mat did not move around on me, I used a little removable adhesive from 3L Adhesives to adhere it to my craft mat.  I then went to coloring in my bears with some Copics.


DSC_0195 copy

Nothing too fancy here, since I just needed a little color on the scarves and the sign.  The Copic colors that I used are RV34, BG11, BG13, BG18, T1 and T4.


Next step was to create my sky element.  Wouldn’t you know that the very day that I was figuring out what to do, eCraftCentral.com came out with THIS star?  It was just perfect for my project, and so I cut it out of American Crafts white glitter paper.  To add a little more pizazz to the star, I used my white Signo gel pen to add some lines to reflect the shining star.  Since my cardstock is a very light gray color, the white shows up very nicely.

DSC_0209 copy

I used some Foam Squares from 3L Adhesives to adhere my star and the Polar Bears and then created the rest of my wrap.  I used Papertrey Ink Smokey Shadow for the rest of the wrap and Papertrey Ink Autumn Rose for the side accent pieces which were punched with a Martha Stewart border punch.

DSC_0196 copy

I also added some Crafty Power Tape from 3L Adhesives onto the accent pieces and added some Martha Stewart crystal fine glitter to add a little more shimmer.  As you can see in the picture above, my entire wrap was created before my bread was done!  I let my bread cool overnight and the next morning, I simply put the rest of it together.

DSC_0205 copy

Oh and in case you are wondering, the Zucchini Bread recipe that I used was from Paula Deen!  Can you tell that I love her recipes?


Are you following us on the eCraft by Craftwell blog?  If not, you really should be!!  Debi, Lisa and Raven have some more amazing projects this week and let’s not forget about our Friday video tutorials!  I’ll be back next Monday with another project for you and this is definitely a project you will not want to miss! 

Monday, October 24, 2011

eCraft Monday Design Team Project


It’s Monday again, and that means another eCraft Design Team Project! This week the Design Team was tasked with making some Halloween Home Décor using the wonderful Square 1! When I saw the Cut-Its Set from Lettering Delights called Monster Lights, I knew exactly what I wanted to do!

DSC_0070-2_edited-1

Spooky huh?  I used the Print & Cut Hinge Method to cut this entire design out of one piece of Square 1 by printing blocks of colors and textures with Make the Cut.

DSC_0067-1

I cut these out using a pressure of 2 1/2 to get a great kiss cut on the pieces.  I did not cut out the end pieces on the bolts because I wanted to experiment with using Perfect Pearls on Square 1.

DSC_0071-1_edited-1

To start with I mixed a little Pewter colored Perfect Pearls with some water on my non-stick craft mat.

DSC_0072-1_edited-1

I then masked off the end bolt with a post it note and painted my Perfect Pearls on.

DSC_0073-1

Here they are all painted on!  Love that shimmer!


DSC_0070-2_edited-1

I used my Copic Multiliner to color in the pupils and make him a little bit silly!  The Perfect Pearls worked well, but I think it would work better if the Square 1 was not printed already.  I did have a little flaking on this after my son was playing with it, so this may also not be great on something like this which will come in contact with little fingers.


One of the things that I just love about Square 1 is that it is removable, so that means when Halloween is over, I can peel this off the light fixture and place it back on the backing paper and save it for next year!


Since this is my last Design Team project using Square 1, I just have to say that I LOVE this stuff!  I will definitely be using it again in the future, and it is now a new staple in my craft room.  My oldest son is also enjoying that his mommy can make any kind of stickers that he wants.  I actually have to limit him on this, because the requests have just gone crazy!  If you have not ordered some Square 1, be sure to do it!


Debi, Lisa and Raven will be sharing some more Square 1 projects with you this week, so make sure that you are following us on the eCraft by Craftwell blog, and then next week we will have a new fabulous sponsor that you will not want to miss!  Have a great week everybody!

Related Posts Plugin for WordPress, Blogger...