Showing posts with label eCraft. Show all posts

Monday, January 21, 2013

Another CHA Project!


It is time for me to share another project that I created for the Craftwell booth at CHA!  This one came together so nicely that it almost shocked me that I didn’t need to alter my original plan.

20121231-DSC_0027-2

To start with I cut out a rosette from the Lettering Delights Accordian Folded Rosettes Cut-Its Set using my trusty eCraft.  I purposely made a larger rosette because I really wanted it to be the centerpiece of the card.  After cutting the rosette, I embossed it using Craftwell’s Delicate Dots embossing folder with my eBosser. After assembling the rosette and topping it with a small circle of yellow cardstock, I added some Stickles and a button to dress it up.


Then directly on my white card base, I stamped one of the frame images from Papertrey Ink’s Framed Out stamp set and added the coordinating sentiments from the same set.  I decided to make this a Mother’s Day card since the flower reminded me so much of spring, and I thought this is something that any Mother would like to see.


All I had to do after that was add my flower on top, blocking part of the frame so that you only see the bottom half, and I was done!  Have a great day everyone!

Monday, December 3, 2012

This card was SO quick!


So in my quest to make clean, simple and fast cards, I could not resist using some of the great snowflakes that are included on the Jen Allyson Celebrates eCraft SD Design Card.  Of course, I have to do it a little different.

20121114-DSC_0091

First thing that I did was cut the snowflake at 5” in my eCraft using a pressure setting of 4 with a veggie mat stabilizer.  Then using my paper trimmer, I cut the snowflake in half.   I also cut some Papertrey Ink Hawaiian Shores cardstock with their Edgers #3 dies and then a simple strip of Pure Poppy Large Dot patterned paper.  The large sentiment from Think big Favorites stamped in red ink ties the whole card together.


This card came together so quickly, that you could make several of these in no time flat!  Hope all is going well with your Christmas crafts!  Please share what you are working on and what kinds of special crafts you do for the Christmas season!

Monday, August 27, 2012

Back 2 School Blog Hop


Hi everyone!!!  Welcome to the Back 2 School Blog Hop!!  If you came here from Cassie’s Blog….you are in the right place!  If you just happened upon the Blog Hop, please start over at Cassie’s Blog so that you don’t miss out.  There are giveaways along the way and Craftwell is giving away an eCraft Machine!!


When I get my boys ready to go back to school, we always come up with a little gift to give the teacher to welcome him or her back as well.  Usually we like to include some school supplies because teachers can’t seem to get enough school supplies!  A couple of weeks ago, I was contacted by State Line Bag Company and they asked me to try out some of their new Premium Muslin bags.  I just knew that these would be perfect for my teacher gift.  These bags are perfect for packaging so many kinds of things.  They are made from a high quality muslin and come in lots of different sizes.


To start my project, I turned to a Lettering Delights Cut Its Set called Toad-ally School.  I selected my image and then using Make the Cut, manipulated it by using the Boolean Join function so that I actually created a stencil of each color.  Then I cut out each one in vinyl.  Next, I took some scrap cardstock and placed it inside the bag.  I applied the first vinyl stencil.

20120819-DSC_0004-1

Then I painted it in…

20120819-DSC_0005-1

Then removed the stencil…

20120819-DSC_0006-1

Once the paint is dry, apply the next layer and repeat until all done.

Now, I couldn’t stop there.  I decided to add the teacher’s name to the bag using a thin metal die and fabric and to do that I used my trusty eBosser.  I am guessing that you want to see how I did that, so I made you a little video…

Here is the final project!

20120819-DSC_0011-1


GIVEAWAY TIME!!

Now, on with some fun stuff!  State Line Bag Company has given me some bags to give away!  To win the bags, you must be a follower of my blog and you must leave me a comment below!  That’s it! Easy Peasy!


And you don’t want to miss out on that eCraft giveaway, so make sure you continue on with the hop by going to Kelly’s blog next.  Here is the whole lineup in case you get lost!

Cassie Box http://www.somethingfromcassie.com/

Denise O’Connor: http://purplepaperparadise.blogspot.com/ <—YOU ARE HERE

Kelly Feldman: http://www.wannabeescrapper.blogspot.com/ <—GO HERE NEXT

Kim Gaughan: http://www.craftypinkanchor.blogspot.com/

Carrie Walz http://everydaymoments-carrie.blogspot.com/

KimberlyRae Forde: http://kreationsbykimberlyrae.com/blog/

Aimee Maddern: http://aimeesarmoire.typepad.com/

Jodi Baune: http://dancingintherainjb.blogspot.com/

Debi Tullier: http://fabric-ecraft.blogspot.com/

Lowri McNabb: http://www.papervinenz.com/

Craftwell Blog: http://blog.craftwellusa.com/


Happy Hopping Everyone!

Monday, June 18, 2012

Americana Project for the eCraft Design Team!


Well the 4th of July is right around the corner!  I love this holiday! When I saw the Pages of Honor collection from Glimpses by Signify Pink, I just knew that I had to make something inspired by America with it.  Somewhere deep in the recesses of my brain, I remembered seeing a Statue of Liberty SVG file so I went searching.


Sure enough, I came across it.  It was a freebie from SVGCuts.com from two years ago (you can find the file HERE)

20120612-DSC_0004-1

My first step in making this card was to cut out a card from Core’dinations cardstock.  I used the Card G set from Lettering Delights which gives me a final card size of 9 1/2” tall by 4 1/8” wide.  Perfect size so that I can really highlight the tall, stately look of Lady Liberty!  I added strips of the Pages of Honor collection to the curved front flap in various widths.  After adding those strips, I topped it off with a ric rac broder and added the Statue of Liberty on top of that.  I then remembered a stamp set that I bought over a year ago that was just perfect to add to this and that is from Papertrey Ink and it is called est. 1776.  I made a banner and stamped the distressed waves from that set in dark blue ink.  Then I die cut a Fillable Frames #10 die cut (from Papertrey Ink) and did some collage stamping.  Using a tone on tone look, I stamped some background images from the same stamp set (the eagle and the stars) and then topped it off with the sentiment in red ink.


I have to tell you that even though I had quite a few eCraft die cuts, they came together so quick.  Since I don’t have to adhere the paper to a sticky mat, I was able to get my cuts done quickly so that I could put the card together.  I love not wasting my crafty time, don’t you?


Now, I know that not all eCrafters are American, we have quite a few International friends and I would love to learn more about how you celebrate or honor your country in your paper crafting adventures, so please leave a comment and share with me!

If you are American and would like to get your hands on this Pages of Honor collection (which is gorgeous!), you better hurry up!  You can go to the Signify Pink website HERE because they are selling out their stock and once it is gone, it is gone!  If you are a wholesaler, you can purchase from HERE!

Monday, June 11, 2012

Maximize your eCraft Cuts!


Today, I thought I would show you a quick and easy way to maximize your die cuts. As you all should know by now, the eCraft is eco-friendly.  There are no sticky mats that need to be replaced, so that not only saves you money, but it saves our landfills.  If you are a paper hoarder like me, you don’t like to waste any paper.  Using the Spring Fling collection from Glimpses by Signify Pink, I created 3 cards using the same cuts on two sheets of paper.


Using Make the Cut, I created the following using MTC’s basic shapes (Rounded Rectangle) and some butterflies from Lettering Delights (Oh Hello Flutter and Mother’s Day Album).  The butterflies were joined with the rounded rectangle and the plain rounded rectangle is an inset shadow of the other rounded rectangle to make it easier for layering.

image

I cut this out of a butterfly patterned paper from Spring Fling and also from a piece of White Flour eCraft Diecutable Cardstock.


20120605-DSC_0004-1

On my first card, I used the Simple Stripes impression plate from Papertrey Ink on the white layer after I stamped the little butterfly from PTI’s Sweet Spring Stamp Set.  The frame and the sentiments were from the Framed Out #1 stamp set from PTI with the coordinating dies.  By laying the white layer on top of the the patterned layer with dimensional foam adhesive, I created a really nice effect.

Other Supplies Used:

Melon Berry cardstock from Papertrey Ink (just a scrap to cut the frame)

Melon Berry Ink from Papertrey Ink

Spring Moss Ink from Papertrey Ink

Winter Wisteria Cardstock from Papertrey Ink (card base)

20120605-DSC_0006-1

On the second card, I used many of the exact same stamps from the first card.  This time, I layered the patterned layer with the cut out butterflies on a white card base and stamped a trail of butterflies on top.  You might notice that there is a bit of glare (LOL!) on top of the sentiment frame.  That is actually a coordinating epoxy sticker from the Spring Fling collection from Glimpses by Signify Pink.  There is such a nice shine on these, that they just would not photograph well!


Other Supplies Used:

White cardstock (card base and some scraps for the frames)

Melon berry Ink from Papertrey Ink

Spring Moss Ink from Papertrey Ink


20120605-DSC_0008-1

My last card, takes all those left over butterflies that were cut out and layers them directly on the card base.  I also added one of the Spring Fling border stickers going up the side along with some more frames using the same set from Papertrey Ink.


Other Supplies Used:

White Cardstock (scrap for frame)

Spring Moss Ink from Papertrey Ink

Winter Wisteria Ink from Papertrey Ink

Spring Moss cardstock from Papertrey Ink (card base)


Out of the eCraft cuts that I made, the only one that I did not use was the plain white rounded rectangle (which you know I have saved and will use it soon!).  I got great use out of the patterned paper because I really only used up half a sheet of 12x12 paper.  Easy peasy and very green too!

Monday, June 4, 2012

Summer Flowers that won’t Die!


Summer is finally starting to show itself around here and that puts me in a really good mood!  Barbecues, swimming, vacations, and of course…flowers.  I just love to see those pops of color in nature especially after a long drab winter, so I decided to create a beautiful summer bouquet that I can enjoy all summer long as well as in dreary winter.

20120530-DSC_0139-1

My bouquet idea is one that I have been tossing around for awhile, but it finally came to life when Signify Pink sent us some collections from their Glimpses line.  The Life’s A Party collection was absolutely perfect for my idea with the bright beautiful summer colors.


The first thing that I did was go through my cardstock and found colors that matched (or were really close) to the colors in the Glimpses paper.  Then I started to cut my flowers.  I used various petals from the Sherri Cut Flower Bundle from Lettering Delights. Cutting all of these flowers is a breeze with the eCraft using the tray feature.  Just love doing that for mass production!


While my flowers were cutting, I had to figure out exactly how I was going to assemble my flowers.  Going through all my supplies, I came across some lollipop sticks that I had used last fall for my Cheater Cake Pops.  I pulled out some of them and some of my spray inks (Adirondack Color Wash in Meadow and Dylusions in Cut Grass and Fresh Lime) and sprayed them up.

20120528-DSC_0117-1

Since these lollipop sticks are paper, they soak up the ink easily and after I sprayed I just rolled each one through the ink that puddled up on my craft sheet and then set them off the side to dry.  I then gathered my other supplies (pearlized pins, small crystals beads, and small silver toned beads, and some liquid adhesive).

20120530-DSC_0129-1

After all my cutting was done (with some done in the patterned paper and some in solid colored cardstock), I set about to pick out my combinations of petals.  After that, I started to bend my petals.  To do that I used a paintbrush handle and treated the petal like I was curling ribbon.  Some of the petals were bent up and some bent down.

20120530-DSC_0130-1

Then I started assembling each flower.  I threaded a crystal onto a pearlized pin and then added the smallest petal.  I then added a small silver bead and then another petal and kept repeating until I was done adding petals.  Then I added a bead of liquid glue to the top of the lollipop stick and then stuck the pin into the lollipop stick.


To complete it, I used a candle holder that I found at Michaels.  I filled it with some glass gems.  I then started to arrange the flowers to my liking.  The gems hold everything in place nicely.  I then added the banner on the front using the coordinating Penant Stickers and Alphabet Stickers from Glimpses by Signify Pink.  Such a nice touch.

20120530-DSC_0142-1

I also added this really cute pinwheel that also coordinates with the Life’s A Party collection from Glimpses by Signify Pink.

20120530-DSC_0145-1


Interested in some Signify Pink goodies?  Better hurry because they are running close out prices right now at (Glimpses by Signify Pink) and if you are a wholesaler there are great deals for you too! (Signify Pink Wholesale)


This is one of those projects that just makes me happy to see everyday!  Happy Summer!

Monday, May 28, 2012

School is Almost Out!


Do you have a mess like this?

20120517-DSC_0001-1

In case you were wondering, that is my scrap drawer and it is overflowing.  These are just the patterned paper scraps and I hate to hoard my scraps so when the drawer stopped closing nicely for me, I knew I had to do something.  At the same time, I also was trying to come up with a little something to make for my son’s teacher on the last day of school.  I like to give the teacher a gift card to an office supply store so that they can get supplies that they need for the classroom, but I really like to add a little crafty something.  I always try to make it something that is useful to them.  Kill two birds with one stone right?  Well here is what I did.

20120520-DSC_0007-1

First off, I cut down some scraps to 4”x6” (this could really be any size you want) and then I went through my stamps and found a bunch of “Take Note” or “Just A Note” stamps.  I also used some of my school themed stamps.  On each sheet, I stamped something so that each sheet was different and unique.  I then cut a piece of medium weight chipboard to the same size and stacked the papers. I ended up having enough sheets that I opted to make 2 sets.  Once I had the papers all stacked, I backed them with the chipboard and then used binder clips on the sides to keep them all together.

20120520-DSC_0008-1

I then (using a paintbrush) added 2 layers of Padding Compound sold by Chica & Jo on Amazon and let it dry.  A little bit of this goes a long way.  When it was all dry…I had custom made note pads.  I love these!

20120521-DSC_0011-1

Now, of course since this is a gift, I have to package it up!  So using my eCraft, I cut out a couple of shapes from eCraftCentral.com and layerd a circle tag stamped with Papertrey Ink’s Tag-Its #6 mini set.  Then I tied a pretty red ribbon in a bow around the two notepads and using Scor-Tape attached the label that I made right to the ribbon so that it could easily be removed from the notepads.

20120523-DSC_0017-1

Well I couldn’t stop there, I had to make a coordinating card (after all I need something to put that gift card in) and using some more scraps, I created a simple patterned paper background and then used some more shapes from eCraftCentral.com to frame my stamped tag.  I think I will put all of this together in a cute little gift bag with some black felt tip pens to go with the notepads.

20120523-DSC_0021-1

This project was really easy to do and I think I am going to make up some more of these for me!

Monday, May 21, 2012

Dressing Up a Gift with the eCraft


One of the things that I love about my eCraft is that it allows me to take something that is bland and boring and turn it into something beautiful.  That is one of the things that I did with my eCraft for Mother’s Day, but this is something that can be done for any gift-giving holiday.  For Mother’s Day I got my mom and my mother-in-law a necklace and they came in these silver metallic boxes.  With boxes like these, I don’t need to get out the wrapping paper, but I did feel like they needed to be dressed up, so my trusty eCraft came to my rescue!

20120513-DSC_0004-1

Using the Gift Bow file from the Christmas Gift Bags & Boxes collection at SVGCuts.com, I imported it into my eCraftshop Pro software and I was off cutting.  I used double sided papers from K&Company (from Citronella and Poppy Seed) so that you get that little peek of color inside the bow.  Such a nice touch.

20120513-DSC_0013-1

To assemble the bow, I followed the video that SVG Cuts created to go with it.


20120513-DSC_0008-1

The doily underneath is the My Favorite Things High Tea Party Doily die and I also die cut the Tim Holtz ticket strips to make the “tags”.  Using Distress Inks to match the colors found in the patterned paper, I colored the tags and then used some Tim Holtz Visual Artistry Seamless Experience stamps to embellish the tags.  I then handwrote the “To” and “From” for a more personal touch.  (We affectionately call my MIL “Gal” in case you were wondering).  Once the bow was assembled and everything else was ready to go, all I needed to do was adhere it on the box.

20120513-DSC_0010-1


To finish off this post, I thought I would share with all of you a story about my Mother’s Day.  First off, I am leery of Mother’s Day.  Every single Mother’s Day that I have had since becoming a mother…something has gone wrong.  From the grill catching on fire, to a flat tire on the car, to baby Jared spitting up all over me and having to spend the rest of the day in borrowed clothes…Mother’s Day has not been kind to me.  Mother’s Day for 2012 actually wasn’t half bad!  Did something go wrong?  Yes, but it could have been so much worse.  We were leaving the house to go to our Mother’s Day lunch with all the moms and extended family.  I put these boxes in a white plastic grocery bag along with the cards to bring along.  I needed to drive that day, so I handed the bag to my husband so that the kids didn’t smash them up.  We stopped at a local store to get flowers for my husband’s grandmother and I ran in the store leaving him in the car with the kids.  When I got back to the car, I noticed that the car was cleaner.  I admit that my car is not the cleanest thing and usually the cup holders have old drinks sitting there which it did that day.  My husband turned to me and said, I cleaned up for you.  I said thank you and then asked him where the bag with the presents was.  The look on his face was….well you can guess.  Turned out that he used that white plastic grocery bag to throw away some of the garbage and did not take the gifts out of the bag!  Quickly he fished the boxes and cards out, but it was too late.  The bows and cards were wet.  Yuck!  Fortunately they did not get soaked and he spent the rest of the drive cleaning them off so that at least we had something to give the moms.  So overall, not a bad Mother’s Day…at least for me.

Monday, May 14, 2012

I’m back…


Hi everyone, I hope everyone had a great weekend…especially all the Moms out there!!!  Before I get started with my post for today, I want to give a big shout out to Lyssa Beth Zimmerman!  Lyssa was a big help to me last week when she filled in for me on the eCraft Design Team blog.  Unfortunately, we had a death in the family and I also had some computer problems, so I really appreciate Lyssa filling in for me and her project was just adorable!  Thank you Lyssa!!


Since, I did not get to post a Mother’s Day project last week, I decided to show you my project today.  I always make the moms in my life a card for Mother’s Day to go along with their gift.  This year due to my computer problems and limited time to crank these out, I used the same design for each card, but I changed up the color scheme to fit each mother.  This was super easy to do using PaperLayerz by Megan Elizabeth.  These pattern papers are made using the same base as the eCraft Diecutable Cardstock which you all know is a favorite of mine.  On the front are 9 blocks (4”x4” each) and then the back is a larger pattern that fills the entire sheet.  All of the colors on each sheet coordinate, so all I needed to do was pick a sheet per mom and then start cutting.


I used a frame image from Lettering Delights Butterflies & Blossoms set.  This frame was pre-designed with the attached flowers, so again it was super easy to put together.  Using Make the Cut, I set up each layer in a separate square to coordinate with the paper.  I then placed the background layer in an area big enough for it to be cut so that I could use the backside pattern.  The black and white layers were cut separately.


Here’s an example of what one of the mats looked like before I cut…

image


On the white panel I used a stamp from Unity Stamps (Kit of the Month January 2012).  I used my Distress Markers to color directly on the stamp and then huffed on it and stamped.  I picked colors for the stamp that coordinate with each card.  I then topped it off with a sentiment from Papertrey Ink Fillable Frames #4 in black ink.  Then all that was left to do was to assemble each card using my Zig 2 Way Glue Pen and my Xyron Mega Runner.  I used a Papertrey Ink Rustic White card base for each card.  Here are the finished cards…


For my husband’s grandmother…

20120508-DSC_0024-1


For my mother in law…


20120508-DSC_0022-1


And for my mom…


20120508-DSC_0023-1

Hope you all have a great week!!!

Monday, April 30, 2012

My favorite eCraft Design Team Project to Date!

Well, I hope all of you are prepared for a long post…if not, take a moment and get comfy and your beverage of choice. I have an extra-special project to share with you today. This may even be my favorite Design Team project to date. Normally when I make something, I make it for someone else and I rarely make something for myself, but today’s project is just that. I made something that is just for me, and it is something that I will use just about every day.

I am an avid reader. So much so that over 3 years ago, my husband surprised me with a Kindle 2. At the time, the Kindle 2 was incredibly expensive, but he said that we needed it because we had completely run out of room for books. He was right, and since I cannot bear to throw out or give away a book that I enjoyed, the books had piled up. So much so that we have boxes full of books stored in our garage. Since getting the Kindle, I have read over 100 books on it and fell in love with it. Well, a few weeks ago I celebrated my birthday and my husband and kids got me a new Kindle Touch. My Kindle 2 still works just fine, but my husband said that he would like to read some books every now and then, but couldn’t bear to tear the Kindle 2 out of my hands. So, now he gets to read on the Kindle 2 and I get to use the Kindle Touch. I had to laugh at this because is it a present for him or me? I am not complaining though, because I am loving the Kindle Touch. So, after getting the Kindle Touch I started searching for a cover for it and was getting discouraged. Most of the covers were not very pretty and the ones that were are crazy expensive and none of them really felt like “me”. So I decided to make my own.

Don’t have a Kindle Touch? No worries, you can do this with any eReader or Tablet. So the first step is to start with the basic structure. Using medium weight chipboard, batting, canvas, and elastic, I constructed this.


To do this, I measured my Kindle Touch and cut one chipboard piece that was slightly larger than my Kindle Touch. I ran this piece through my Xyron 9” Creative Station and covered it in the canvas and I attached the elastic strips in the corners to hold my Kindle Touch. Now I made two covers that were slightly larger than that base layer for the front and back of my cover. I also cut a piece for the spine. I covered the front and back pieces in batting (again running the chipboard through my Xyron, attaching batting and then just trimming) to provide a little cushion just in case I should drop my Kindle Touch and then I proceeded to cover both covers and the spine in one piece of canvas so that all three pieces were connected. I left a gap in between each piece to allow me to be able to fold the front back. Once this was done, I added a strap piece that I sewed in my sewing machine that also has a Basic Grey magnetic disc in it. The other magnet will be added during the decoration of the covers so that this strap can hold it all together when not in use. I added more canvas on the inside that had been hemmed with the sewing machine to prevent fraying. Now that that was done, I could add my base unit on the inside. I have to give it up for my Xyron, it worked overdrive on this project for me. Love how much easier it made this part of my project. With that, the basic construction was done and now comes the fun part…


Using Glue N Seal Matte (Michaels’s), I added some Dearest Jane patterned paper from Papertrey Ink. I then cut some Claudine Hellmuth Sticky Back Canvas in my eCraft (pressure of 8, blade cap on, no stabilizer, no tabs) in my eCraft for the spine. I just used a rectangle and added a border from Lettering Delights Scalloped Border set. I also used some Frayed Burlap ink refill watered down in a mini mister to dye that canvas to coordinate with the brown in the paper and added that on the spine once dry. Next I found some images online for some of my favorite books. Since I had a vintage feeling going with this, I stuck with some of my favorite classic novels. I added these on the front and on the back of the cover. I also adhered my Basic Grey magnetic piece in a spot where I knew it would be covered by my focal point. Here is the back cover…


To complete this project, I knew I needed something really special. I contacted one of the designers over at Craftwell and asked them to create an Ella image of her reading a book. I was so thrilled when they not only created one, but that it was exactly what I had wanted! Thank you Craftwell, I think it is absolutely perfect and I know that I will be using it again!


Now, I have a little surprise for you. I asked Craftwell if they would please make this image available to you on eCraftCentral.com, and they agreed! Starting today you can get this image. Just so you know, I flipped this image, the original has Ella facing the other way. This is another great thing about these images, the versatility.

So head on over to eCraftCentral.com and get this image available HERE! While you are there, take a look around and see what else you might like, there is a ton of images available!

Monday, April 23, 2012

2 Cards with only 1 eCraft Cut!


I don’t know if all of you are like me, but sometimes I just don’t seem to have enough hours in the day to get everything done that I need to get done.  Sometimes I really just need to make a card QUICK!!!  Well today, I am going to show you how I was able to create 2 cards using only ONE eCraft cut in less than 15 minutes.  That is right, this is so super easy and can seriously be done by anybody!


The first thing that you will need is a silhouette image.  I have been really drawn to silhouettes lately and the Ella series on eCraftCentral.com are just perfect.  They can fit into any kind of style, so if your style is vintage, shabby chic, whimsical, cutesy, clean and simple…it really doesn’t matter because you can do just about anything to these!  For my project today, I decided to use the Simply Ella image.

image

The next thing that you will need is some watercolor paper (I used a brand called Arches that I bought a long time ago at Joann’s).  We will also need some dye water-based re-inkers.  In my cards today, I used Distress Ink re-inkers in Barn Door, Spiced Marmalade, Mustard Seed, Peeled Paint,  Broken China, and Dusty Concord, but really and dye water-based re-inker will work.  I also used the new Tim Holtz flat water brush.  If you don’t have a water brush, you can use a paintbrush with some water.


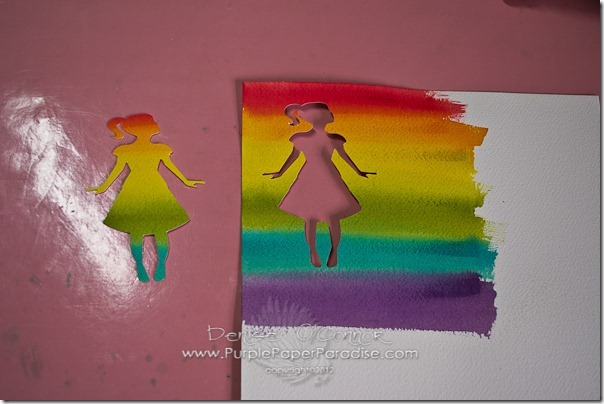
I took my re-inkers and added a drop of each into a ink palette.  I then dipped my water brush into the ink palette and swiped it across the watercolor paper.  You could just add a drop onto a non-stick craft sheet and dip your wet paintbrush into it for the same effect.  My way is just a little bit cleaner and it allows me to save the palette so I don’t waste the ink.  I continued on with this until I finished my rainbow, cleaning off the water brush in between colors.  Once I was done with that, I dried my watercolor paper with my heat tool.  You could wait and let it dry naturally, but remember that I was in a rush!  I could not wait, had to do it fast!
20120415-DSC_0017-1

Once my paper was dry, it was time to cut!  Since it had been a long time since I used this watercolor paper for cutting in the eCraft, I had to do a quick pressure test to find the right setting.  I feed in the uncolored side of the paper and set my pressure at 1 with the blade cap on and selected the tree from the Fundamentals 1 SD card and hit cut.  As I cut the tree, I moved the pressure dial up looking for the blue light.  This paper is quite thick and I did not get the blue light, so that meant that I needed to do the same thing, but this time with the blade cap off. (Quick Tip: when you remove your blade cap, raise your console screen and put it in the well behind the screen so you don’t lose it.  Don’t ask me how many times I have crawled around on my hands and knees looking for that cap on the floor LOL!) I got my blue light at a pressure of 3 1/2 with the blade cap off.  Once I knew my pressure setting, I simply re-inserted the paper so that I would be cutting on the colored part of my watercolor paper and cut out Ella.


Now that I had Ella all cut out, I realized that none of the purple in the rainbow actually appeared on Ella.  I can’t have a rainbow card without purple!!!  So I grabbed a piece of crochet thread and spritzed it with some Crushed Grape Dylusions Spray Ink and dried it with my heat tool and tied that around Ella’s ponytail.  If you are not a purple-lover like I am, you could totally skip this step!  Since we did not add that much ink and water to the paper, I had a very distinctive white edge along the sides of the cut out.  I decided to use the coordinating Distress Markers to ink the sides and then I just blended them in with my water brush.  You could use any water based marker for this or just skip this step all together.

20120418-DSC_0023-1

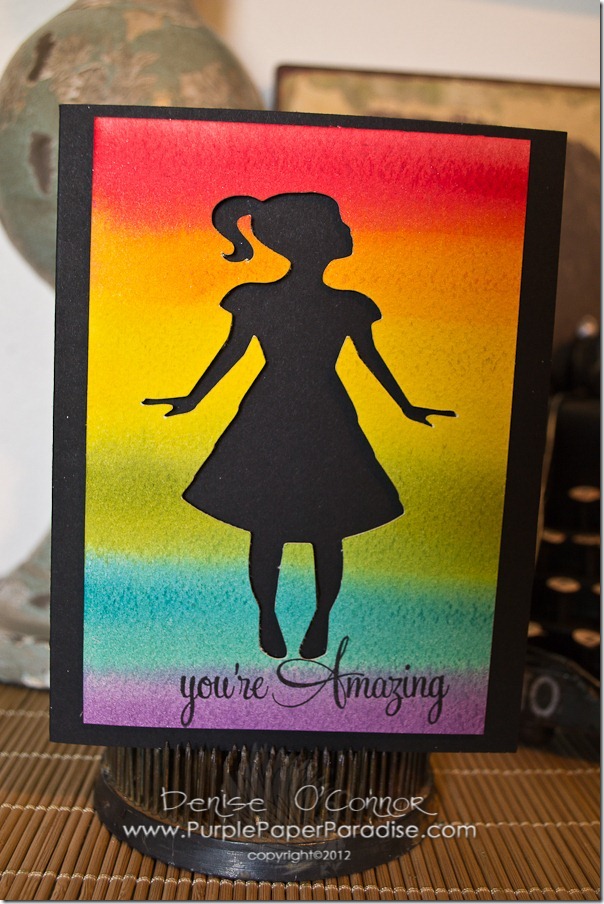
Next I fed Ella through my Xyron Sticker Maker (love how the adhesive goes right to the edge) and adhered her onto a black panel.  I stamped my sentiment from Papertrey Ink’s Script Sentiments onto the black panel using Papertrey Ink Fresh Snow ink and then adhered the panel to a white card base.  One card done, but now on to the second card.


Did you notice how pretty the negative part of my eCraft Ella cut is?  What a shame it would be to waste that watercolored rainbow, so I simply cut down the negative image to fit on my card base.  I stamped the same sentiment on using black Archival ink and attached that to a black card base with some foam adhesive and I am done!
20120418-DSC_0025-1

The great thing about these cards (in addition to how quickly they came together) is that they will go in the mail quite nicely without extra postage since there are not a lot of layers and embellishments on them.  But, you could also add more onto them if you want to.


As I made these cards too, I thought of several ways that I could do something similar.  I could use my spray inks instead of re-inkers, or Distress Stains, or even just a pretty patterned paper.  Ooohh…I could add a couple of spritzes with some Perfect Pearls Mists to get some shimmer.  Really the sky is the limit! Please leave me a comment letting me know how you would do these cards?  I can’t wait to hear some of your ideas!

Monday, April 16, 2012

eCraft Challenge Week


Earth Day is upon us, so with that in mind Craftwell decided to challenge the Design Team to use some recycling in our projects this week!  I just love doing this and I really should do it more often!

20120409-DSC_0012-1

I decided to create a tag that would be appropriate for so many different occasions and one that is gender neutral too.  To start off with, I stamped a background from the Tim Holtz “Remnants” stamp set on a Kraft colored tag from Inkssentials with some Distress Embossing Ink and embossed it with some clear Embossing Powder.

20120409-DSC_0007-1

I then used a brown Faber-Castell Gelato to color in the non embossed area.  Gelatos come in a chapstick like container and they are a creamy pigment colorant.  I applied them directly onto the tag, rubbed them in a bit with my finger and applied a little water.  This gave the background the perfect aged look that I was going for. 

20120409-DSC_0009-1

I then took a piece of chipboard from a Lucky Charms cereal box and cut the star from the eCraft Fundamentals 1 SD card.  I stamped the same background stamp onto the star and embossed it with clear powder.  I did not apply any additional color on the star, so that you can see the contrast.  I glued the star in place on the tag so that the backgrounds line up.

20120409-DSC_0015-1

I then took an old pair of jeans (that never fit me right…ugh I hate that) and hand cut a strip of the denim.  I ran that strip through my Xyron 1 1/2” X sticker maker and adhered it onto the tag and trimmed off the ends.  I then used a Dymo label maker that embosses the greeting and created the “You are a” part of the sentiment and added that on top of the denim.  I then added the two brads on the ends and pounded on them with the Tim Holtz Texture Hammer.


Now, for the “STAR”, I pulled out something that I pilfered a long time ago.  These letters are from an old computer keyboard.  When we replaced the keyboard, I went through and popped off all the keys and saved them in a baggie that was stuffed in a drawer in my craft room.  As I was going through my supplies, I came across these and knew that they were just perfect for what I wanted on this tag.

20120409-DSC_0016-1

To add the final touch, I cut a few more strips of denim and added some homemade crinkle ribbon and inserted it in the hole.  I love how this all looks and how it came together!  Make sure you stop by the eCraft by Craftwell blog everyday this week to see some more recycling techniques from Kim, KimberlyRae, Debi, and Jennifer!  I know that I can’t wait to see what they come up with!

Monday, April 9, 2012

eCraft Monday Design Team Project


Ummm…..Denise where is the die cut?

20120404-DSC_0107-1

Hear me out!  Yes, I did use my eCraft!  Most of the time when we think of using our eCrafts, we think of die cuts.  But, sometimes you just need to try something new and that is what I did here today.  My eCraft played a big role in this card and it was SO much fun to do!!  I know I will be doing more things like this! Get yourself comfy with your favorite beverage of choice because there are lots of pictures coming up!


I recently got the new Dylusions Spray Inks from Ranger and they are gorgeous!  After watching Dyan Reaveley the designer behind this product on You Tube demonstrating these, I just had to give it a try.  Dyan does art journals and they are amazing.  I decided to start smaller and with something that I am familiar with…a card.


First, I cut an A2 card base from thick white cardstock and decided to try masking it so that I could have the front of the cardbase.  I have to be honest here and say that I did not know if this would work because you have to add water to the project and since the inks are liquid, I didn’t know if the tape would lose it’s stickiness or not, but still worth trying.

20120331-DSC_0089-1

Next, I added some blotches of the spray inks.  I used the Lemon Zest, Cut Grass, and London Blue colors here.  I then added some water along the way so that the inks would bleed and blotch.  I dried it in between each layer.  This really helps so that it doesn’t get too muddy.

20120331-DSC_0091-1

As you can see, the tape is totally not sticking!!!  Oh well!  I seriously was having too much fun to care.

Next, I took a paintbrush dipped in water and splattered the water on top.  Since these inks are water-based, they react with water and in fact kind of have a bleaching effect.

20120331-DSC_0092-1

Seriously love this as is, but I was not done yet.  This is where the eCraft comes into play!

20120331-DSC_0093-1

See, that stencil???  Well, I created that from the Segments Box Cover file from Lettering Delights.  I did some modifications to the file in Make the Cut so that I only cut what I wanted for my stencil.  I used the Blue Stencil Film made by Grafix Arts and purchased at Hobby Lobby.   This film is very slippery, so I taped it to my veggie mat stabilizer on all four sides before cutting and then cut it with a pressure of 4 1/2.  Now that I have the stencil in place, time to spray more ink!

20120331-DSC_0094-1

Now to see what we got….

20120331-DSC_0095-1

So cool!  But, I can’t stop there because there is a ton of ink on top of that stencil, so I did something that I had seen Dyan do…flip the stencil over and press that inky side onto the paper.

20120331-DSC_0096-1

Can you see all the blotchy ink under the stencil? Oh, and you can see here that my heat gun got a little inky in the process, but no worries.  I just sprayed a little water on it and it wiped clean.

20120331-DSC_0097-1

All that is left is to do some collage type stamping in various colors on top.  Most of these are Tim Holtz stamps, but the sentiment is from Papertrey Ink’s Think Big Favorites series.  I used Archival Inks from Ranger for the stamping to make sure that the stamps didn’t run or bleed.  Now to take off that tape….

20120331-DSC_0099-1

Obviously the tape did not work, but no worries, I just trimmed it down to a 4”x5 1/4” cardfront.  I added some Distress Black Soot ink on the edges and mounted it to a card base (with my new Xyron Mega Runner) made from Papertrey Ink Pure Poppy cardstock.

20120404-DSC_0107-1

I cannot tell you how much fun it was to just get messy!  The stencil that I created is wonderful and I am already thinking of other stencils that I want to cut on my eCraft.  Have a great week everybody!

Related Posts Plugin for WordPress, Blogger...