Showing posts with label Halloween. Show all posts

Monday, October 8, 2012

The Boys are getting anxious!


As you all probably know by now, I am the mom of two wonderful boys.  They are my pride and joy and I feel very blessed to be their mom.  They cannot wait for Halloween so I thought why not make them some t-shirts to express that!  Here are my two little munchkins, Jared and Mason, showing off the shirts that I made for them.

20121004-DSC_0003-1

I used some of Cooler Concepts’ Dark t-shirt transfer film to make these and have to say it…love this stuff.  It is nice and thin once ironed on.  Now, I wanted to make these using my eBosser of course (because I am addicted) so here is how I did it.


First off, I printed some digital paper onto the transfer film. I used Echo Park’s Apothecary Emporium Collection which you can get digitally at JessicaSprague.com.  Then I turned to a die from Papertrey Ink called Modern Alphabet (Upper Case).  Here is how the die comes.

20121003-DSC_0001-1

It comes on this sheet of magnet and also notice that the letters are attached with a thin piece of metal.  The reason for this is that you can break them apart.  No tools needed , just a little bending back and forth and they come apart.  That means that you can cut only the letters that you need.  When you do that, just put them on the magnet sheet for storage so you don’t lose any of them.


The eBosser cut the transfer paper like butter and in no time at all, I had all my letters ready to iron onto the shirts.  After removing the backing paper from each letter, I laid them out on my shirts.  I decided to go with a wonky line up just to add a little interest.  Here are all the letters laid out.

20121003-DSC_0002-1

All I had to do at this point was place some parchment paper on top and them iron on.  So Easy!  My sons loved them and had to wear them the very next day.  Jared even told me that one of his teachers told him that she loved his shirt.

20121004-DSC_0006-1

Now to survive the next 23 days until Halloween!

Monday, October 1, 2012

A Quick Halloween Decoration


Halloween is coming and my kids can hardly stand it!  Each year, we order costumes extra early (in fact we have had them for a few weeks now) and they begin counting down the days until I start to decorate the house.  They love Halloween probably more than Christmas so what is a mom to do?  Get crafty!


For my project today, I used some awesome shrink film made by Cooler Concepts and my trusty eBosser to whip up a quick decoration.  In fact, it was so quick that I started to think that these would make amazing placeholders or party favors for a Halloween party.

20120927-DSC_0009-1

To start with, I printed some digital paper from Lettering Delights (Haunted Halloween) and the RIP sentiment onto my shrink film.  This is pretty easy to do with Photoshop or most photo editing software since the digital paper is a picture file.  Just import your digital paper and then add your text on top.  I used a light orange for the text because once you shrink it down, it will darken.  After letting the shrink film dry (i.e. time to clear off my desk LOL) I set to work.  I used a die from Papertrey Ink called Mat Stack 5 and lined it up so that the sentiment was in place and taped it down so it would not shift.  Then I ran it through my eBosser using the sandwich appropriate for that die.  In this case, the thin metal die sandwich.  It cut just as clean as any paper I have thrown at it.  Love that eBosser!

20120927-DSC_0003-1

You can see here that some of the ink from the printing actually transferred to the die, but no worries…it cleans up easily with a baby wipe and did not affect the look at all. Next, I punched a 5/8” hole in the top and then started to shrink it with my heat gun.

20120927-DSC_0005-1

Here you can see how much it shrunk down compared to the die itself.  Next, I threaded my label with some homemade crinkled ribbon and tied it around the black plastic rose (which I found at Target).  I took a strand of Halloween lights and fed as many as it would hold in a glass container and then added my rose.

20120927-DSC_0010-1

I am thinking that I will have to make some more of these, I think they would be awesome lined up on my fireplace mantel.  Anyone care to share some quickie Halloween decorations that you make?  I’d love to hear them!

Monday, September 17, 2012

Can you Smell Autumn in the Air?


Here in Chicago, the weather can play lots of tricks on us.  For example, a few days ago, the weather got cool making us think summer is over, welcome Fall.  While it was cool out, I started to think of all the things that we like to do in the fall, like eat chili, go to the pumpkin farm, etc.  Not so fast Denise!  You got WAY too ahead of yourself!  Summer came back and the temps got up into the mid 80’s again!  While I was in my “Fall” mood, I made a Halloween card.  I don’t normally do Halloween cards, but I had this idea to make a shaped card with the eBosser using one of my dies and the Tim Holtz Pumpkin Jack die was just beckoning me!

20120912-DSC_0035-1

Making a shaped card with a die is SUPER easy with the eBosser.  I took a piece of Worldwin Petallic’s Copper Ore paper and folded it in half.  I have to say…this paper is PERFECT for my pumpkin!  It is a gorgeous orange color and it has the perfect amount of shimmer on it.  Just love it!  After I folded the paper in half, I got my plates ready for the eBosser and placed my die down and then my paper.  I had the fold in the paper slightly off so that the die did not cut through that edge.  Added my A plate on top and ran it through the eBosser 1 time!  Yes, only once and it cut through both layers perfectly.  I then ran the same die through with some Worldwin CutMates in Olive Oil for the pumpkin stem.  Then I decided to add some more die cuts on this card and cut some Worldwin CutMates in Black Licorice using Memory Box Creepy Web and Creepy Spider dies.  Using my Xyron (love it!) I adhered the web onto the die so that edges were overhanging and then the spider so that he was hanging from the web.  I then used my scissors and snipped off the edges of the web that were overhanging.


After this was done, I cut a 1 3/4” circle from Worldwin CutMates in White Flour and stamped the little pumpkin and the sentiment from Papertrey Ink’s Tag-Its #7 using PTI Canyon Clay ink and True Black ink.  I then cut the pinking circle in Worldwin CutMates Olive Oil using PTI Limitless Layers dies.


My son has already staked claim to this card!  He loves Halloween and can’t wait!

Monday, October 24, 2011

eCraft Monday Design Team Project


It’s Monday again, and that means another eCraft Design Team Project! This week the Design Team was tasked with making some Halloween Home Décor using the wonderful Square 1! When I saw the Cut-Its Set from Lettering Delights called Monster Lights, I knew exactly what I wanted to do!

DSC_0070-2_edited-1

Spooky huh?  I used the Print & Cut Hinge Method to cut this entire design out of one piece of Square 1 by printing blocks of colors and textures with Make the Cut.

DSC_0067-1

I cut these out using a pressure of 2 1/2 to get a great kiss cut on the pieces.  I did not cut out the end pieces on the bolts because I wanted to experiment with using Perfect Pearls on Square 1.

DSC_0071-1_edited-1

To start with I mixed a little Pewter colored Perfect Pearls with some water on my non-stick craft mat.

DSC_0072-1_edited-1

I then masked off the end bolt with a post it note and painted my Perfect Pearls on.

DSC_0073-1

Here they are all painted on!  Love that shimmer!


DSC_0070-2_edited-1

I used my Copic Multiliner to color in the pupils and make him a little bit silly!  The Perfect Pearls worked well, but I think it would work better if the Square 1 was not printed already.  I did have a little flaking on this after my son was playing with it, so this may also not be great on something like this which will come in contact with little fingers.


One of the things that I just love about Square 1 is that it is removable, so that means when Halloween is over, I can peel this off the light fixture and place it back on the backing paper and save it for next year!


Since this is my last Design Team project using Square 1, I just have to say that I LOVE this stuff!  I will definitely be using it again in the future, and it is now a new staple in my craft room.  My oldest son is also enjoying that his mommy can make any kind of stickers that he wants.  I actually have to limit him on this, because the requests have just gone crazy!  If you have not ordered some Square 1, be sure to do it!


Debi, Lisa and Raven will be sharing some more Square 1 projects with you this week, so make sure that you are following us on the eCraft by Craftwell blog, and then next week we will have a new fabulous sponsor that you will not want to miss!  Have a great week everybody!

Monday, October 17, 2011

eCraft Monday Design Team Project

Happy Monday everyone!  This week, the Design Team has been given free reign!  That’s right, we have each been tasked with making a project of our choice using the amazing Square1!  I am absolutely loving this material especially since it helped me out with a Halloween tradition here in our house!


My eldest son, who is about to turn 7 is in LOVE with Halloween.  I asked him if he liked Christmas or Halloween better, and he could not decide!  This year marks the third year that we have “dressed up” our Halloween candy to pass out to the trick or treaters and of course to share with his friends at school. I always like to do this project so that he can help me with it!  He loves to help Mommy, but sometimes it gets too complicated for him.  This year, I decided to do something pretty easy so that it would keep his interest.  I did all the prep work ahead of time, and then invited him to help me with the assembly.  Here is what we did this year.


DSC_0078_edited-1


Now, you may be wondering how did Square 1 help with these simple candy wrappers.  Well it came in the seal on the back of the wrapper or the sticker as my son called them.


DSC_0079_edited-1


Let’s start at the beginning, I used an assortment of pre-made candy wrappers that I got from Lettering Delights and printed them all out on my printer and then trimmed them with my paper trimmer. Since I was making 72 of these candy bars, I wanted to keep it simple! Next I printed up some coordinating digital papers onto my Square 1 (I just LOVE how vibrant the colors are printed on this stuff!).  Next I turned to my Make the Cut and the Lettering Delights Halloween Cut-Its Set.  I selected Tombstone 1 and added that to the mat. 

Capture2_edited-1


I next added some text to fit inside that tombstone.  The font that I used here is LD Twylight from Lettering Delights.


Capture3_edited-1


I then used the Duplicate feature to copy all those tombstones with the words to fill up the print area.  Next I deleted the ones that were outside of the print area.


Capture4_edited-1


The next thing that I did was hide the tombstones so that only my text was showing on the mat and then I ran the Square 1 that I had printed my digital paper on through the printer again and printed the text on. After doing that,  I hid all the text and selected all the tombstones and rotated them so that they fit in the bottom right hand corner of my mat. 


Capture5_edited-1


Next I cut out my Hinge from the Print & Cut Hinge Method.  Once I had my Hinge in place, I lined up my Square 1 underneath it so that the tombstone shapes would cut around the words.  Since I had taken the time to line up all the text with the tombstones earlier, those dimensions were all in tact so that I could cut out all of my candy wrapper seals for that page in one pass.  I made extra careful to keep my hinge in place the whole time so that I could re-use it for each sheet.


DSC_0081_edited-1


Then it was time for the assembly and this is where the Square 1 really helped me out!  You see, I love doing these things with my kids, but I am also a perfectionist.  I wish it didn’t bother me so much that my son didn’t line up the “stickers” the way I would, but it does.  As my son was doing this, I was cringing in my head, but then I remembered that Square 1 is removable!  So guess what I did…whenever he put one on that was crooked or something, I would peel it up and re-stick it down to my liking.  You do need to be careful peeling it up off of paper, but it can be done! Crisis averted!


DSC_0073_edited-1


Another thing that dawned on me as we were doing this project is that since Square 1 is removable…it would make an excellent envelope seal!  So I just had to try it out, and it is wonderful!  You can open and close that envelope many times over!  Oh the possibilities!

DSC_0083_edited-1

Hope you enjoyed my project today and maybe it even inspired you a little to get the kids in your life involved with your crafting!  Be sure to go to the eCraft by Craftwell blog every day this week for more projects by Debi, Lisa, and Raven!

Monday, October 3, 2011

eCraft Monday Design Project

I hope all of you are in for a fun week of crafting!  This is the first week where your eCraft Design Team will be presenting projects utilizing not only the eCraft, but a special sponsor for the month!  This month our sponsor is Square 1.  Now, I will admit that I had not heard of Square 1 when we were first told that they were our sponsor, but I was immediately intrigued by this product.  Square 1 is a printable, removable adhesive fabric!  This is an amazing product, and even though it is a fabric, it is a lot like vinyl.  For this month, all of us are going to utilize this fantastic product and show you lots of ways that you can use Square 1 and your eCraft to create to your heart’s content!


This week, we are using Square 1 and our eCrafts to create something using the colors Orange and Purple.  Ahhh!  Purple…no problem for me!  When I think of Orange and Purple together, of course I think Halloween.  Halloween is a very big deal in our house, my kids look forward to it just as much as Christmas.  We actually already have our costumes and everything.  For this week’s project, I decided to show you how to use Square 1 instead of cardstock on your layered cuts.  Sometimes when using cardstock, the layers become so thick that it can be distracting.  This is not the case with Square 1! 


Since Square 1 is printable, I knew I wanted to use the Print & Cut Hinge Method with the vegetable cutting mat.  You can find a video that I did on this method HERE on my blog Purple Paper Paradise

CIMG0767

I also knew that this would be the perfect time to play with the new Printable Tiles from Lettering Delights, so in Make the Cut, I set up blocks of the colors and patterns that I wanted to use and then laid my cut layers on top of these blocks.  First, I printed out the blocks without the cuts (except for the witch’s face).  One of the sheets shown below is printed on Matte Photo Paper and the other is on Square 1.  Can you tell the difference?  The print quality of Square 1 is amazing!  The colors are so vibrant!


CIMG0757


For those of you wondering, the bottom sheet is the Square 1.  I then used the Print & Cut technique and cut out my shapes in some spare cardstock and then placed my print sheet underneath it to get it ready to be cut.


CIMG0758

This color blocking technique works really great for this because there are no white edges!  Here is my witch all assembled (underwear and all!).  Isn’t she cute?  Even though, I will be covering her up, I decided to add the underwear because Square 1 is removable which means that she may change her clothes and I wouldn’t want her to expose herself!


CIMG0760

Now it is time to get her dressed!  I cut out my Square 1 the same way I did the paper layer to make her a couple of outfits to choose from.

CIMG0767


CIMG0766

Now she has a few options for Halloween! It’s hard to see in the pictures, but the texture on the Square 1 really makes realistic looking clothes and adds that extra something special!

Hope you all enjoyed my Orange & Purple creation this week using my eCraft and Square 1, and make sure you come back here everyday this week to see what Debi, Lisa and Raven have!  I know that I am looking forward to seeing what these talented ladies have in mind for this week!  Also, on Friday, I will be back here on the eCraft by Craftwell blog with a whole new video!  If you like bling, you don’t want to miss the video! 


Supplies:

eCraft (of course!)

Square 1 printable removable fabric

Matte Photo Paper (for the witch body and the printed banner sentiments using Slap Happy font)

Papertrey Ink Orange Zest cardstock (card base)

Core’dinations cardstock (purple background) embossed with a spider web embossing folder and sanded down.  Inked edges with Distress Ink Black Soot

Lettering Delights Witch One Cut Its Set with Basic Tiles for the orange and purple patterned layers

Papertrey Ink Black Swiss Dot Ribbon

Copic Markers for inking edges of witch

Saturday, October 1, 2011

October Sure Cuts A Lot 3 Video

Happy October fellow crafters! I don't know about all of you, but October is the very start of my heavy crafting season! Between Halloween, Thanksgiving, and of course Christmas, I am going to be one busy crafter and I LOVE it!

Today's SCAL video is all about making shaped cards. You have seen me do this in Make the Cut a few times, and today I show you how to do it in SCAL. Hope you all have a great day...oh and don't forget it is World Cardmaking Day today so crank out some cards!


Monday, September 26, 2011

eCraft Monday Design Team Project

Today I have another Design Team project for all of you!  Did you all sign up to follow the eCraft by Craftwell blog?  Weren’t the projects last week wonderful?  This week the Design Team was challenged to create a project using an image from eCraftCentral.com.  If you have not explored eCraftCentral.com, make sure you do!  There are a lot of images there available for purchase at a low price!  Most images are less than a dollar!


For my project, I chose this image which you can get right HERE!

Capture2

Notice that this image comes from the Banner Expressions SD card?  This is one of the things that I love about Craftwell and what they are doing with eCraftCentral.com.  If there is an image on a SD card that you want, but maybe you don’t want the entire SD card, it just may be available on eCraftCentral.com.  How awesome is that?  Not all the SD images are available, but there are quite a few that are!


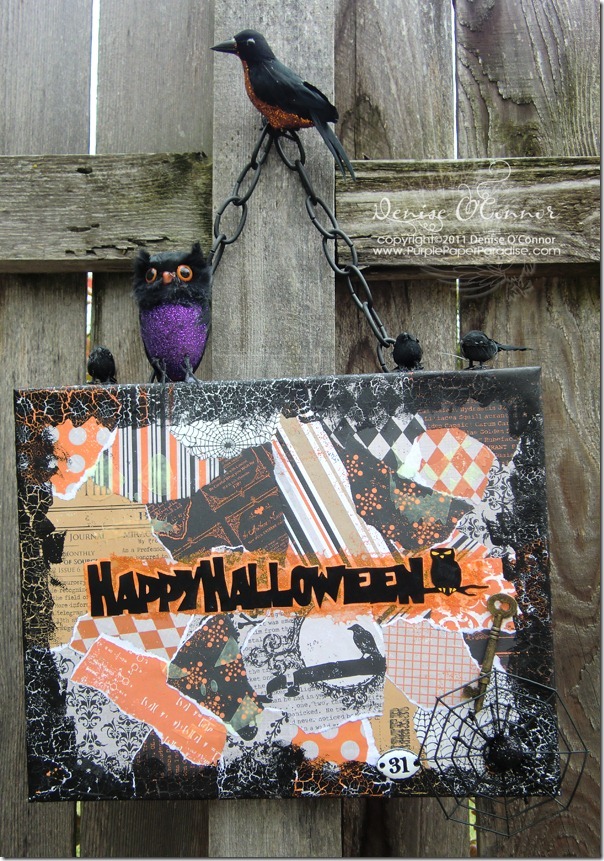
I have to tell you that I got carried away with this project!  I spent more time on it than I planned, but I just love how it turned out, and my 6 year old says that it is really spooky!
CIMG0746

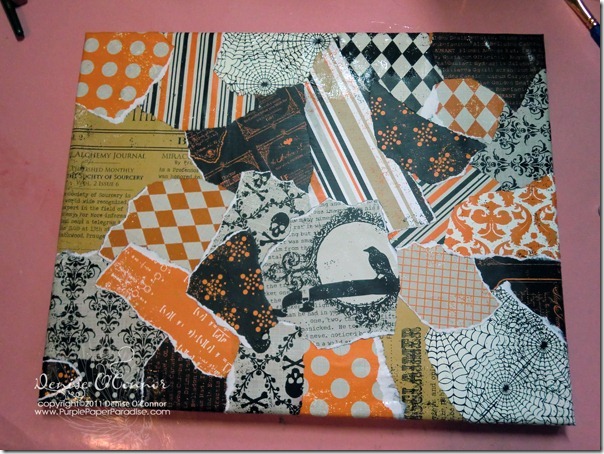
To start, I covered an 11”x14” canvas with paper from Echo Park Apothecary Emporium.  I ripped up the paper and used Glue N’ Seal from Inkssentials to adhere it down. 
CIMG0741

Next I added some Distress Crackle Paint in Black Soot to the edges.

CIMG0742

I just love how you can see the paper underneath through the crackle!  Now comes the fun part!  There is a little hidden surprise on this sign!  Can you guess what it is? Take a close look at the picture below!

CIMG0748

Using images from Lettering Delights doodlebats Jack-O-Patterns, I cut these out of removable vinyl.


For all the vinyl on this project, I used a pressure setting of 2 with my vegetable cutting mat, blade cap on, multi-cut off.

CIMG0744

I placed them sporadically on my sign, making sure that I had enough room for my title.

CIMG0745

Next I used a new product to paint in my stencils, and I have to say that I am loving this stuff.  I used Marta Stewart’s Glow in the Dark Effect from her new paint line (exclusively at Michaels).  The Glow in the Dark is available in a few colors, but I just used the uncolored one so that my paper could glow. I added about 4 coats of the Glow in the Dark effect and then very carefully removed the vinyl. This next picture is not the best, and it really does not do it justice, but I hope you get the idea anyways!

CIMG0754

This is why my son says that this sign is really spooky!  But of course, I am not done!  I still have to add my eCraftCentral.com title to it!  To do this, I decided that I needed to dress it up too!  First, I made a shadow blackout layer in eCraftshop Pro using some white vinyl.  After cutting that out, I covered it with some glitter paint from Martha Stewart’s new line.  This paint is amazing.  It works on glass, metal, wood, so I thought why not vinyl!

CIMG0743

Notice in the picture above how the paint pools on the backing paper.  This is a really neat effect.  I added 3 or 4 coats of the paint until I got the orange color that I was going for and then I added that onto my sign with the extra paint pooling on the edges.  After seeing the surface that the glitter paint left on the vinyl, I decided to cut the black layer out of outdoor vinyl because it adheres stronger.  If I had to do this over, I might just do this in cardstock and use a strong liquid adhesive.  Some parts of the outdoor vinyl did not stick as well as I would have liked them to and so I added a little liquid adhesive in some spots.
CIMG0746

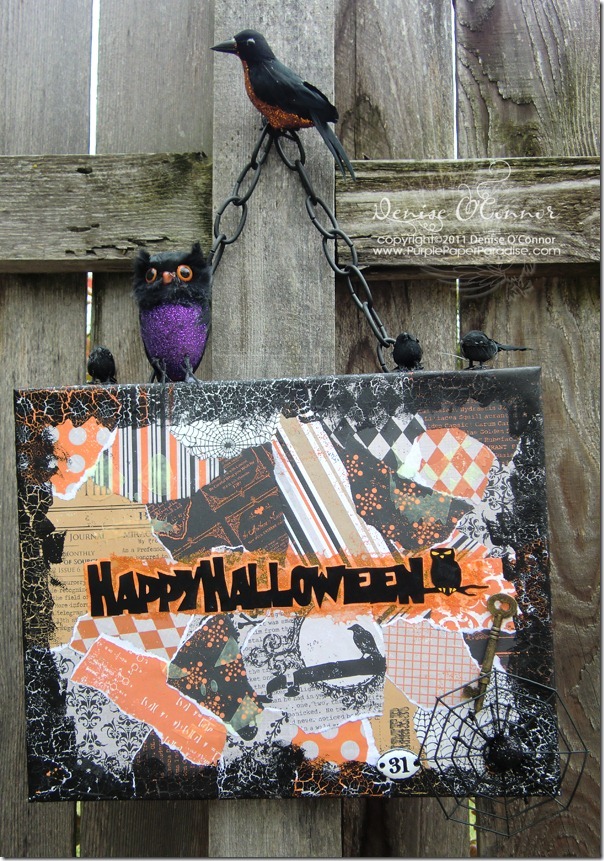
The eyes and toes on the owls were also cut out of vinyl.  When you get the image from eCraftCentral.com those parts are actually set to draw with the pen.  In eCraftshop Pro, this is easy to change to cut instead and that is what I did here. I just love how you can take an image like this and change it around to suit your project!  For a low investment, I got a one of a kind stand out title for my sign!


To finish the sign off, I used some Halloween embellishments that I got at Michaels and the black chain I got at Ace Hardware.


Hope everyone enjoyed this project as much as I enjoyed making it!  If you haven’t signed up to follow the eCraft by Craftwell blog yet, by all means do it now!  The entire Design Team has projects all week long for you!

Sunday, October 24, 2010

I Have Been One Busy Woman!

I have been SO very busy lately between taking care of my kids, the house, and my husband who is recovering very well from his surgery!  In spite of all of that, I have found some time for crafting, just not a lot for blogging.  Here is an update on what I have been working on!  First off, since Halloween is just around the corner, I had to get cracking on my Halloween treats.  Last year, my son and I started this tradition where we "dress up" the candy that we will be handing out on Halloween to all the trick or treaters that come to our house.  Here is a look at the candy bowl...


I used THIS free SVG file from SVGCuts.com.  This SVG cut beautifully in the eCraft using the eCraftshop Pro software and even though I had to cut out a lot of these, it really didn't take that long to get them all cut.


The papers are from Martha Stewart and Cloud 9 Design.  The ribbons are from Hobby Lobby and Michaels.  To create the tag, I used a digital paper (Haunted Halloween Background Paper Pack) from Lettering Delights, and then digitally used the DB Jack o Patterns doodlebat (also from Lettering Delights) on top of the digital paper so that Frank's head had the digital paper shown through.  I enlarged it so that I could use my 1-3/4" circle punch.  I then used my new die set from Papertrey Ink called Limitless Layers to die cut the four different mats for my digital tag.  Since this set comes with 4 mats as well as 1 plain circle, I was able to cut all 4 mats at one time, so it was really quick to get all of these cut.  On the back of the tag is my personal stamp.  The tag was attached with just a little bit of embroidery floss.  These really turned out so cute, I just wished I started earlier so I would have time to make more.  I have a feeling that I won't have enough for all the trick or treaters.  The candy inside is a mixture of Snickers, Milky Way and Twix fun size bars.

Another thing that I have been working on is the Disney sweatshirts for our extended family for our upcoming Disney World trip.  Here are two more of these, and I have to tell you that even though I have made several of these now, every time I finish one I am just amazed every time.  They turn out so good!  I just love this t-shirt vinyl!  First up is another Tinkerbell.  The first one was one that I made for myself, this one is for my wonderful MIL.  I just know that she is going to love this!


This next one is just darling.  This is for my niece, who is only 18 months old, so this sweatshirt is tiny!  This just goes to show you that this stuff can be intricately cut at small sizes and look amazing!  She is the only little girl in our family, so naturally she is our own Cinderella!


I still have not had a chance to play with my new eCraft SD card, but I will be doing that soon, and I will share what I create.  I can't wait to do this, but I had to get these other things out of the way first!

Tuesday, August 24, 2010

My Mother, The Quilter

Ever since I was a little girl, my mother has been a sewer.  She made lots of clothes for me and my brother, and when I was maybe 5 or 6, she took up quilting.  Thirty years since she started this new hobby, and she is going strong.  She has a talent for choosing colors and patterns that go together, and she is so fast too!  My mom is officially retired (has been so for about a year now) and she has been enjoying being able to spend more time quilting.  When I was little, she tried to teach me to sew, and it was an utter failure!  When I started papercrafting, she proclaimed that she could never do it.  I think though that I got my talents from her, we just choose to work with different materials.  Since my mom has become Grandma, several of her creations have become gifts for my boys.

In a few weeks, my parents are going on a month long dream trip throughout Europe, and she wanted to make sure that my kids had these Halloween wallhangings before she left.  When I look at her creations, I can see how the shapes and images within each quilt can be turned into papercrafts as well.  This first one is the one that she gave to my oldest son Jared.


And this next one, is the one that she made for my 2-1/2 yr old Mason.  He has been absolutely enamored with it.


I hope all of you have enjoyed seeing these creations, they are even more beautiful in person!  What ideas do you get from these quilts?  Please let me know if these have inspired you, I would love to pass on the comments to my mom, and if everyone thinks it worthwhile, I have several more quilts that I can share with you for even more inspiration!

Have a great day everybody!

P.S.  There may be another post later today with some exciting news! Hint Hint!

P.P.S.  Here is the GIVEAWAY post!
Related Posts Plugin for WordPress, Blogger...