Showing posts with label eCraft Fundamentals 1 Design Card. Show all posts

Monday, April 16, 2012

eCraft Challenge Week


Earth Day is upon us, so with that in mind Craftwell decided to challenge the Design Team to use some recycling in our projects this week!  I just love doing this and I really should do it more often!

20120409-DSC_0012-1

I decided to create a tag that would be appropriate for so many different occasions and one that is gender neutral too.  To start off with, I stamped a background from the Tim Holtz “Remnants” stamp set on a Kraft colored tag from Inkssentials with some Distress Embossing Ink and embossed it with some clear Embossing Powder.

20120409-DSC_0007-1

I then used a brown Faber-Castell Gelato to color in the non embossed area.  Gelatos come in a chapstick like container and they are a creamy pigment colorant.  I applied them directly onto the tag, rubbed them in a bit with my finger and applied a little water.  This gave the background the perfect aged look that I was going for. 

20120409-DSC_0009-1

I then took a piece of chipboard from a Lucky Charms cereal box and cut the star from the eCraft Fundamentals 1 SD card.  I stamped the same background stamp onto the star and embossed it with clear powder.  I did not apply any additional color on the star, so that you can see the contrast.  I glued the star in place on the tag so that the backgrounds line up.

20120409-DSC_0015-1

I then took an old pair of jeans (that never fit me right…ugh I hate that) and hand cut a strip of the denim.  I ran that strip through my Xyron 1 1/2” X sticker maker and adhered it onto the tag and trimmed off the ends.  I then used a Dymo label maker that embosses the greeting and created the “You are a” part of the sentiment and added that on top of the denim.  I then added the two brads on the ends and pounded on them with the Tim Holtz Texture Hammer.


Now, for the “STAR”, I pulled out something that I pilfered a long time ago.  These letters are from an old computer keyboard.  When we replaced the keyboard, I went through and popped off all the keys and saved them in a baggie that was stuffed in a drawer in my craft room.  As I was going through my supplies, I came across these and knew that they were just perfect for what I wanted on this tag.

20120409-DSC_0016-1

To add the final touch, I cut a few more strips of denim and added some homemade crinkle ribbon and inserted it in the hole.  I love how this all looks and how it came together!  Make sure you stop by the eCraft by Craftwell blog everyday this week to see some more recycling techniques from Kim, KimberlyRae, Debi, and Jennifer!  I know that I can’t wait to see what they come up with!

Monday, October 10, 2011

eCraft Monday Design Team Project

Happy Columbus Day!  It is time for another eCraft Design Team post.  If you are not following the eCraft by Craftwell blog, by all means start!  My fellow Design Team Members are amazing and I am sure that you will all be inspired by them.  Also, I will be back tomorrow with a new Make the Cut video!

This week, we are again using the awesome Square 1 printable, removable, fabric to create projects incorporating leaves and/or pine cones. When I think of leaves and pine cones, my mind tends to go to Thanksgiving when the beautiful fall colors are still out there and the Christmas season is right around the corner. I decided to do a super easy project for you with Thanksgiving in mind that packs a punch.

clip_image001

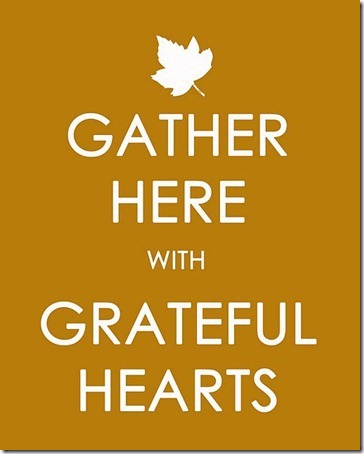
My inspiration for this project came from this picture on Pinterest

clip_image002

Source: myblessedlife.net via Denise on Pinterest

I love the saying and the fact that it is like the “Keep Calm and Carry On” style but with a Thanksgiving twist was just the ticket for my project. To start, I used a digital paper from Scrap Girls that is a text background, and I just knew I had to use it because the text on this paper is all about blessings. Perfect right? I then printed that out and then went back and added my saying on top of it using Century Gothic font. After I did this, I realized that I could have done this all in one step if I used my Photoshop Elements, but it certainly isn’t necessary.

I then turned to my trusty Square 1 and using the leaves found on the eCraft Fundamentals 1 SD card, I cut out a few of each. I did a “kiss cut” on the Square 1 like you would do for vinyl.

clip_image003

Since Square 1 is a printable material, I took a gamble here that I could color the leaves myself. I had GREAT success using alcohol inks. I added a bunch of autumn colors onto a felt pad using my ink blending tool and then dabbed them on the Square 1. I then went back and added some Gold Mixative and a little Alcohol Blending Solution to come up with the gorgeous colored leaves. The picture shows them when the inks were still wet. It only took a few minutes for them to dry.

clip_image004

I wanted to make sure that the leaf that was on my digital paper did not get lost on the page, so I took my leaf and placed it down on my non-stick craft mat and gently inked the edges with Vintage Photo Distress Ink.

clip_image005

One of the wonderful things about Square 1 is that the adhesive is removable so I was able to very easily remove it from my craft mat and place it on my digital paper.

clip_image006

Here is a close up for you!

clip_image007

I then grabbed a black picture frame that I had purchased last year during a crazy ridiculous sale and decided that a touch of embellishment on the frame would just add a little something special to this clean and simple project. I used some of the other leaves that I cut out of Square 1 and colored with alcohol inks and placed them right on the frame.

clip_image008

Again, since they are removable I was able to position them just right so that they peeked out from under the little pumpkin and pine cones that I added on top with some Glossy Accents.

clip_image009

Every week, I am loving Square 1 more and more. It is so versatile! Hope you enjoyed my project today! I promise next week, I will have another Halloween project for you!

clip_image001[1]

Supplies & Other Directions:

Black Picture Frame

Matte Photo Paper printed with Digital Paper and saying (Digital Paper from Scrap Girls and font used was Century Gothic)

Square 1

eCraft (used a pressure of 2 1/2, blade cap on, tabs off to get the kiss cut on the Square 1)

Alcohol Inks – I used Adirondack Alcohol Inks in colors Butterscotch, Sunset Orange, Latte, Cranberry and Caramel, Gold Mixative and Alcohol Blending Solution on a felt pad with the Ink Blending Tool.

Monday, September 19, 2011

eCraft Monday Design Team Project

Hi everyone! Welcome my first design team post for the eCraft by Craftwell blog! This is the first week when all of us on the design team will follow a challenge put forth to us! For this week, our challenge was to use the Fundamentals 1 SD card with a Love theme! For my project today, I decided to do a scrapbook layout focusing on a picture that I recently came across of my MIL and FIL posing with my husband. I am guessing that my husband is about 18 months old in this picture.
CIMG0002-2
Notice that heart background paper on the layout right there in the middle? Well I created that with my eCraft! Here’s how I did it and I have to tell you that this is really fun especially if you love to get inky! I used eCraftshop Pro to cut out Image 11 from Category 7 on Fundamentals 1. Once on my mat, I copied the image several times and then lined everything up. I then cut it and used only the negative image. I positioned everything on my non-stick craft mat with some painters tape. Next comes, the fun inky part! I used Fired Brick Distress Ink and the foam pad on my ink blending tool and added ink to all those exposed areas. This stencil works great for this technique!
CIMG0732
Next I cut out Image 10 from Category 7 on Fundamentals 1 and layered it on top of the inked portions.
CIMG0734
The next thing that I did was spritz the entire paper & the mat layer with some Perfect Pearls Heirloom Gold Spray. Love the sparkle and it works really well with my background paper!
CIMG0737
I also used my eCraft to create the title on this page. These letters are really thin and it just goes to show that when you pair up a delicate font with the right paper and the right pressure setting, you can get just gorgeous results!
CIMG0736
Here are some details on the cuts and what pressure settings I used.
For the heart background paper, all paper cut is from Core’dinations and I used a pressure setting of 5, tab density and tab width of 1. I used my veggie mat stabilizer, multi-cut off, blade cap on.
For the Love, I used Papertrey Ink Distressed Dots, and cut it with a pressure of 4, tab density and tab width of 1. I used my veggie mat stabilizer, multi-cut off, blade cap on.
For the “brings many blessings”, I used Papertrey Ink Bitty Dot Paper and cut it with a pressure of 4, tab density and tab width of 1. I used my veggie mat stabilizer, multi-cut off, blade cap on.
For the word art shadow, I used Basic Grey Basics paper and cut it with a pressure setting of 5, tab density and tab width of 1. I used my veggie mat stabilizer, multi-cut off, blade cap on.
The other supplies that I used not already mentioned are My Mind’s Eye Laundry Line (background paper), Papertrey Ink Spring Moss and Fine Linen cardstock (mats), Martha Stewart border punch. The 1st Son and 1st Grandson were printed from my computer. I also used Papertrey Ink Tea Dye Duo for inking the edges. Papertrey Ink Spring Moss Grosgrain Ribbon with a Papertrey Ink Sweet Blush button and their Natural Button Twine.
Hope you all enjoyed this project and be sure to follow the eCraft by Craftwell blog!  Tomorrow is a whole new eCraft project by Debi!  I can’t wait to see it!

Saturday, August 20, 2011

August eCraftshop Pro Video

Hi everybody!  I am getting this video in under the wire!  In today's video, I am showing you one way to utilize the eCraft's pen.  In this card, I used the pen and a single stroke font called Stymie Hairline to create a text background.


By using the eCraft colored pens, I went for a tone on tone look which gave it a real subtle look and exactly what I was going for here.


Also, it is not too late to get in your comments for the eCraft Back to School Blog Hop.  My post for this hop is HERE and not only will everyone have a chance at winning an eCraft machine, but I am also personally giving away 3 clear tumblers for you to decorate!   Have a great weekend everyone!

Monday, April 11, 2011

Happy Birthday to Me!

Today is my 35th Birthday!  Normally, we don't make a big deal about grown-up birthdays in my family.  We usually just get everyone together for a nice dinner out.  Last night we went to our favorite pizza place for the most amazing Deep Dish pizza.  I have lived in the Chicago area all my life and I have tried a lot of pizzas, but I have to say that this little suburban place is the best!!  If you live in the Western Suburbs of Chicago you have got to try Barone's in Glen Ellyn.  They have been in business for a long time and their pizza is just wonderful!

So for my birthday, I decided to re-design my blog and I hope that you like it.  If you have any suggestions for it, please let me know because I love the feedback! 

I have also decided to celebrate my birthday by doing a week's worth of tutorials for you.  I will be featuring the eCraft, Make the Cut, and also some of my favorite SVGs from Lettering Delights.  With all the recent "unrest" with Provo Craft (makers of the Cricut line of die cutting machines), I have been getting a lot of inquires from people looking at the eCraft as an option for their future die cutting needs.  In light of that, I thought I would share a video today that showcases the eCraft and offers some tips to any eCraft owner on how to get the best possible cuts from your machine.  I have to give a big shout out to the members of the eCraft_Crafters Yahoo Group.  Most of the tips that I share in the video are not mine!  They came from the group and I just wish that I could remember who exactly offered these suggestions because I would love to personally give them the credit and to thank them for sharing!


I have been asked by some people to compare the eCraft to the other die cutting machines out there, and I am afraid that I really can't do that.  There are two reasons for this, the first is that the only other die cutting machine that I own is the Cricut.  The other reason is that it would be extremely difficult to compare the eCraft to any of the other machines because the eCraft is not built like any of the other machines.  Since the eCraft is designed to be mat-less, it really changes everything.  This is also the very reason why so many eCraft owners have had to go through a large learning curve.  I do plan on doing a full review of the eCraft once the stable versions of the SCAL and MTC plug-ins are available.  Since the software is such an integral part of the eCraft, I want to make sure that I have played with all of the options before making a recommendation.  Right now, both MTC and SCAL are still in beta and there are things that need to be resolved in both programs (although minor compared to the eCraftshop Pro software), so therefore I really cannot definitively say which program is better for the eCraft.  You will see in the tutorials coming up this week that I am using Make the Cut.  The reason for this is that I am more familiar with the program, but I am keeping an open mind about SCAL for the eCraft.  So with that being said, I hope that you enjoy the tutorials that I have planned for this week.

Saturday, February 5, 2011

One last Craftwell CHA Booth Project!

A few weeks ago, Craftwell sent out an e-mail looking for projects made with the eCraft to be displayed at their booth at CHA!  At the time, I was working on a Valentine's Day Banner and I decided that I would send it off to them.  Well they decided to display it in their booth!

How about a few close-ups?


All of the scalloped banner shapes were cut from the Jen Allyson Celebrates SD card at 8 1/2 for the top layer and then cutting a shadow for the cardstock base layer.


The top layer of this banner was actually cut from some fabric that I found at Joann's.  It was a perfect match to the Core'dinations cardstock colors that I had picked!


The butterflies here were cut from the Fundamentals 1 SD card.  After cutting them out I coated them with UTEE to make them stronger but also add that shine!  I bent the wings up a bit to add some more dimension.  I also used my sewing machine to stitch the trails.


The stamp used on top of that medallion is from the Signature Series: Flower stamp set from Papertrey Ink.  I just love that saying and knew that I needed to use it!


I added these glitter lines using Scor Tape and Martha Stewart glitter.  The flowers were colored with Distress Inks.


Do you see that glittery see-thru heart above the button border?  I did that by cutting a sheet of Terrifically Tacky Tape in the eCraft so that I was left with a die cut of adhesive.  After putting that on my background paper, I added some Extra Fine Glitter to it.  I love how that turned out!


That pink heart was created by cutting a piece of clear plastic and then coloring it by airbrushing it with some Copic markers. I then stamped it with some white Staz On ink (Fancy Flourishes stamp set from Papertrey Ink) and then I dabbed the whole thing with some Perfect Pearls.  Also, all of the letters on the banner were cut out of cereal box chipboard and then a shadow layer cut from the cardstock.  I coated the chipboard letters with Distress Crackle Paint (Tattered Rose) and then once dry, I added some Victorian Velvet Distress Ink on it to make the cracks stand out some more.

All of the cardstock is from Core'dinations.  The patterned papers are Bo Bunny Wine Dot and digital papers from Lettering Delights Valentine Game Night Collection.

Have a great day everybody and be sure to come back tomorrow, because I am working on something that I think all of you eCraft users will like!

Sunday, January 30, 2011

My Box is on display at Craftwell's CHA Booth!

I'm really excited to share with you a project that I made for Craftwell to display at their booth at the CHA Winter 2011 Trade Show!


The box is cut from the Handled Boxes collection at LetteringDelights.com.  I cut it out of 12x24 paper at the largest possible size.  The ribbons are some White Silk from PapertreyInk.com that I hand dyed with some Perfect Pearls mist sprays.  The flower is made up of several layers of the Skinny Flower and Thick Flower from the Fundamentals 1 SD card.  I patchworked the patterned papers in a rainbow effect and just kept layering.  I am thinking about doing a video tutorial on how I made this, if you are interested in it, let me know so I can add it to my list.

The tag at the top of the box was so super easy!  I used the thick flower (in a shadow) using the eCraftshop Pro software and then layered my sentiment using a TTF (called Hey Gorgeous) directly on top of it and cut the whole thing out in one pass.  I then just deleted the words and cut the base layer in cardstock to layer underneath it.


The above photo is courtesy of Kim Bush from Cutters Creek who was at the booth yesterday and grabbed a picture of it on display!  Thanks Kim!!

Wednesday, January 26, 2011

I'm Back...

I am so sorry that I haven't posted for quite awhile.  My family and I just got back from a fabulous Disney World vacation.  Remember all those Disney sweatshirts that I made with T-shirt vinyl, they got used on this trip.  There were a couple of days where we needed them all day, but most days we just wore them in the morning and the evening.  Disney World is hardly a relaxing vacation, but our family really needed to just have fun together.  My husband did really well on the trip.  If you remember, he had back surgery in October and (although a couple of days he rented an ECV to make it a little easier). It sure is good to be home!

I have been doing quite a bit of crafting lately and I will be sharing some more of my creations with all of you.  My eCraft has gotten a good workout!

The project that I am sharing with you today came as a request from a follower to show more of what can be done with the Fundamentals 1 card that comes with the eCraft.  One thing that I love to do is look at shapes and try to envision a way to use them that is other than what the shape was intended for.


Here is a video showing how I made this flower.  I hope you enjoy it!

Sunday, January 2, 2011

Finding Pressure Settings for the eCraft - Part 2

In yesterday's post, I shared a video on how I find the pressure settings for a piece of cardstock and today I thought I would share with you how I go about finding the pressure settings for a piece of lighter weight paper.  This works for things like copy paper, vellum, and any other non-cardstock weight papers.  The process is pretty similar to the cardstock method, just with a different starting point.


And now I would like to take a couple of moments to answer a few questions...
The Cardstock Stabilizer - I have been contacted by some people that have been kind of upset that some papers need to have the cardstock stabilizer.  I have to be honest here...I don't really understand why anyone would be upset about it.  It is not at all like using a mat because it is not sticky, there is no peeling images on and off the mat risking that they are going to get torn up.  The cardstock stabilizer doesn't get ruined in the process of doing this so therefore it can be used several times over.  The only time that I have ever had to replace my cardstock stabilizer is when I accidentally had my pressure too high and it cut all the way through the cutting paper and the stabilizer.  There is also a huge advantage to using the cardstock stabilizer and that is NO TABS!!  Love That!  I know of several users that always cut with the stabilizer because of that!  If you are skeptical of it, I can understand that, but do give it a try because it really is a great thing!

Learning the Machine - Just like any die cutting machine, the eCraft has a learning process to it.  I was asked by someone if I have to do these test cuts before each new project and the answer is No.  As you get more and more familiar with the machine, you kind of develop a "sense" about it.  I am at the point now where I can pick up a piece of paper and I have a pretty good idea of what pressure my machine should be at to cut it.  I am usually only off by a 1/2 step.  As you get more and more familiar with your machine, you too will develop this "sense" for it.  The videos I have done here are to give you an idea of how I have learned my eCraft so that you can learn yours.  The eCraft Settings Chart is also a great source to learn where to start with a certain paper.

When I first got my Cricut Expression, I can tell you that I had a lot of trouble figuring out that machine.  There was one day in particular that I clearly remember because I came really close to just chucking that machine out of the window!  Just ask my husband, he actually packed up the kids and took them out for awhile so they didn't have to see Mommy so upset.  Eventually I learned the Cricut and figured it out, got a lot of help from bloggers and You Tube videos.  I gradually got more and more comfortable with it and now I know exactly what I need to do to get the machine to do what I want it to.  It can be frustrating to learn a new machine, but it is worth the frustration in the long run, so don't give up!

Saturday, January 1, 2011

Finding Pressure Settings for the eCraft

HAPPY NEW YEAR!

With the holidays behind us, I finally have some time to do a couple of videos that I have been planning on for awhile now.  So in honor of the New Year, let's get that eCraft cutting!  For this first video, I am going to share with all of you how I go about finding the pressure settings for a piece of cardstock.  I have seen a few newer eCraft owners online getting frustrated because they can't seem to find the right setting and it really isn't difficult at all, so I thought I would share with all of you my process and a few tips and tricks that I have picked up.

RULE #1 - If your paper is tearing, that means the pressure is too high!  If it is not cutting all the way through, that means that the pressure is too low!

RULE #2 - Check your blade and blade safety cap for debris that may be interferring with the cut.  This has happened to me numerous times!

RULE #3 - Make sure you are loading the paper in the machine so that the grain is going into the machine.  Watch the video, because I show you exactly what I mean!

RULE #4 - Weather and other environmental aspects do affect the settings, so if it has been awhile since you cut a certain type of paper, you may want to get in the habit of doing a small test cut before embarking on a large project just to make sure that your environment hasn't changed enough to affect the settings.  I had a piece of paper that I tried to cut in the summer that I could not get to cut right at all.  Fast forward to late fall/early winter and suddenly I could cut this paper and it cut great! 

Don't forget that you can download the eCraft settings chart (link located in the column to the right).  Also, I am looking for some input so that I can keep this chart updated, please e-mail me any pressure settings that you find so that I can add them to the list.

Here's the video...


Thanks for watching and if you have any video requests for me, please let me know.  I have a few more planned including some that were suggested so if there is something you want to see, I will do what I can to make it happen for you!  Have a great day AND a GREAT YEAR!

Tuesday, December 7, 2010

Christmas with the eCraft - Day 2

Today, our project is going to be a tag.  I just LOVE making my own tags for the holidays.  There is just something about throwing something together and adding some pretty ribbon and other embellishments to making a gift stand out.


This tag was made entirely out of images found on Craftwell's Design Cards.  By welding various images together, you can make entirely new images.  This method is especially popular right now to make wordbooks.  Here is a video showing how I did this using eCraftshop Pro.


SUPPLY LIST
Jen Allyson Celebrates Design Card
Fundamentals 1 Design Card
White Cardstock (cut base layer)
Red Glitter Paper - I used American Crafts.  Seriously LOVE this paper!
Candy Cane Ribbon - Found this at Michaels
Distress Stickles, Rock Candy - Hard to see in the picture, but I spread a thin layer of this over the white base before adding on my red glitter layers to give the base a little bling.
To/From Stamp - Not shown in picture, but I stamped this on the back of the tag.
Distress Ink Barn Door - Used to ink the edges

Tomorrow we will be using a True Type Font dingbat to create a fancy Christmas card.  I will also be using unconventional colors for this card, which is something that I just love to do at Christmas time!

Monday, October 18, 2010

eCraft Challenge!

Hi everybody!  I haven't been around much lately because of my husband's spinal surgery.  Everything went very well and he is at home recovering.  He is walking and is starting to feel a little better each day, so he is well on the way to recovery.  Now on to other business...

Kim Bush over at the eCraft_Crafters Yahoo group challenged us to make a project using at least three cuts from the Fundamentals SD 1 card.  I actually ended up using 4 images.  First off, here is the card.


The tag, chairs, and table are all from the Fundamentals 1 SD card. The You're Invited sentiment is from the Paper Tray stamp set from Papertrey Ink.  I stamped it in Versamark and embossed it with Vanilla Zing Embossing Powder.  The tag is wrapped with some Enchanted Evening Baker's Twine also from PTI.  The Blue, Green and Brown cardstocks are from Core'dinations Nostalgia Stack.  The chairs are spritzed with some Perfect Pearls (just added a little bit of the Perfect Gold powder to some water in a Mini Mister).  Instead of using the overlay images, I used a brown marker to color in those areas that the eCraft drew on the green cardstock.  I love the way that this made it look like a retro dining chair (something that my Grandmother would have owned).  For the table, I used some Vintage Photo Distress Ink to age the table so that it looked like it went with the chair.  The kraft card base is stamped with Background Basics: Diamonds stamp set from PTI in Versamark ink.  I also used my Scor Buddy to create a border around the perimeter of the card.

Have a great day everybody...oh and I just got a brand new eCraft SD card that I will be playing with over the next few days!

Wednesday, September 29, 2010

A Quick Thank You Card...

Hi everyone!

This is a crazy week for us around here.  My husband is having back surgery in a couple of weeks, and we have all sorts of things that need to be done before the surgery and we have several appointments scheduled for this week, so I have very little crafting time this week.  I am hoping to get in some solid crafting time on Saturday for World Cardmaking Day!  I wanted to share this card that I made for a friend.


The cardbase is Papertrey Ink Ripe Avocado, the accent strip is Aqua Mist and was impressed with the Papertrey Ink Picnic Plaid Impression Plaid.  The frame was cut from My Mind's Eye glitter paper in the eCraft using Fundamentals 1 SD Design Card.  This frame normally has draw lines on it, but I just removed the pen before cutting to get this look.  The flower is cut using Spellbinders Nestabilities Peony dies and I cut them out of Papertrey Ink Simply Chartreuse and Dark Chocolate felt.  I topped them off with a Papertrey Ink Rustic Wood and Harvest Gold buttons tied with Rustic Jute twine.  The sentiment is from the Paper Tray stamp set also from PTI.

Thanks for stopping by today, and I will have more Disney sweatshirts to share soon!

Saturday, September 25, 2010

Papertrey September Blog Hop Challenge

Well I missed the August Blog Hop, but I wasn't about to miss this month's!  The challenge for this month was to demonstrate a technique that you have learned from other stampers.  When I first started stamping, I didn't do any layering of stamps.  From various stampers suggestions, I started to experiment with layering my stamps.  Here is a card that I quickly prepared this morning before the kids got up that shows this!


I used two different background strips from PTI's Polka Dot Basics II, the smaller stamped in Dark Chocolate ink and the larger dots in Terracotta Tile on Harvest Gold cardstock.  I added a 2" strip of Harvest Gold to the middle of the card.  I used my eCraft to cut out the leaf in Orange Zest (stamped in Background Basics: Retro using Fresh Snow) and the circle in Dark Chocolate cardstock. Both shapes are from the Fundamentals 1 SD Design Card. I also used Fillable Frames #8 die to cut out a piece of Terracotta Tile cardstock, and stamped the Fillable Frames #8 frame in Fresh Snow.  The sentiment is from Fillable Frames #7 and is stamped in Dark Chocolate.  This overlapping of background stamps also works great with Versamark ink as your 1st stamp layer with a colored stamp on top, it is a much more subtle approach to the same technique.

Thanks for stopping by and I can't wait to see what everyone else comes up with!
Related Posts Plugin for WordPress, Blogger...